selector key

Gas conversions

Gas conversions (from Natural gas to L.P. gas; or from L.P. gas to Natural gas) must be done by a qualified installer.

WARNING

Fire Hazard

Shut off gas supply line valve.

Make all conversions before turning gas supply valve back on.

Failure to follow these instructions can result in explosion, fire or other injury.

L.P. gas conversion

1.Complete installation sections A-C (Pages

4-5) before converting cooktop to L.P. gas. Check that the manual shutoff valve in the gas supply line has been turned off.

burner

screw

pressure regulator

orifice spuds

Remove and replace

orifice spuds.


notches

NAT L.P.

Note: Burner tube and

brackets not shown. gas manifold

L.R.

L.F.

R.R.

R.F.

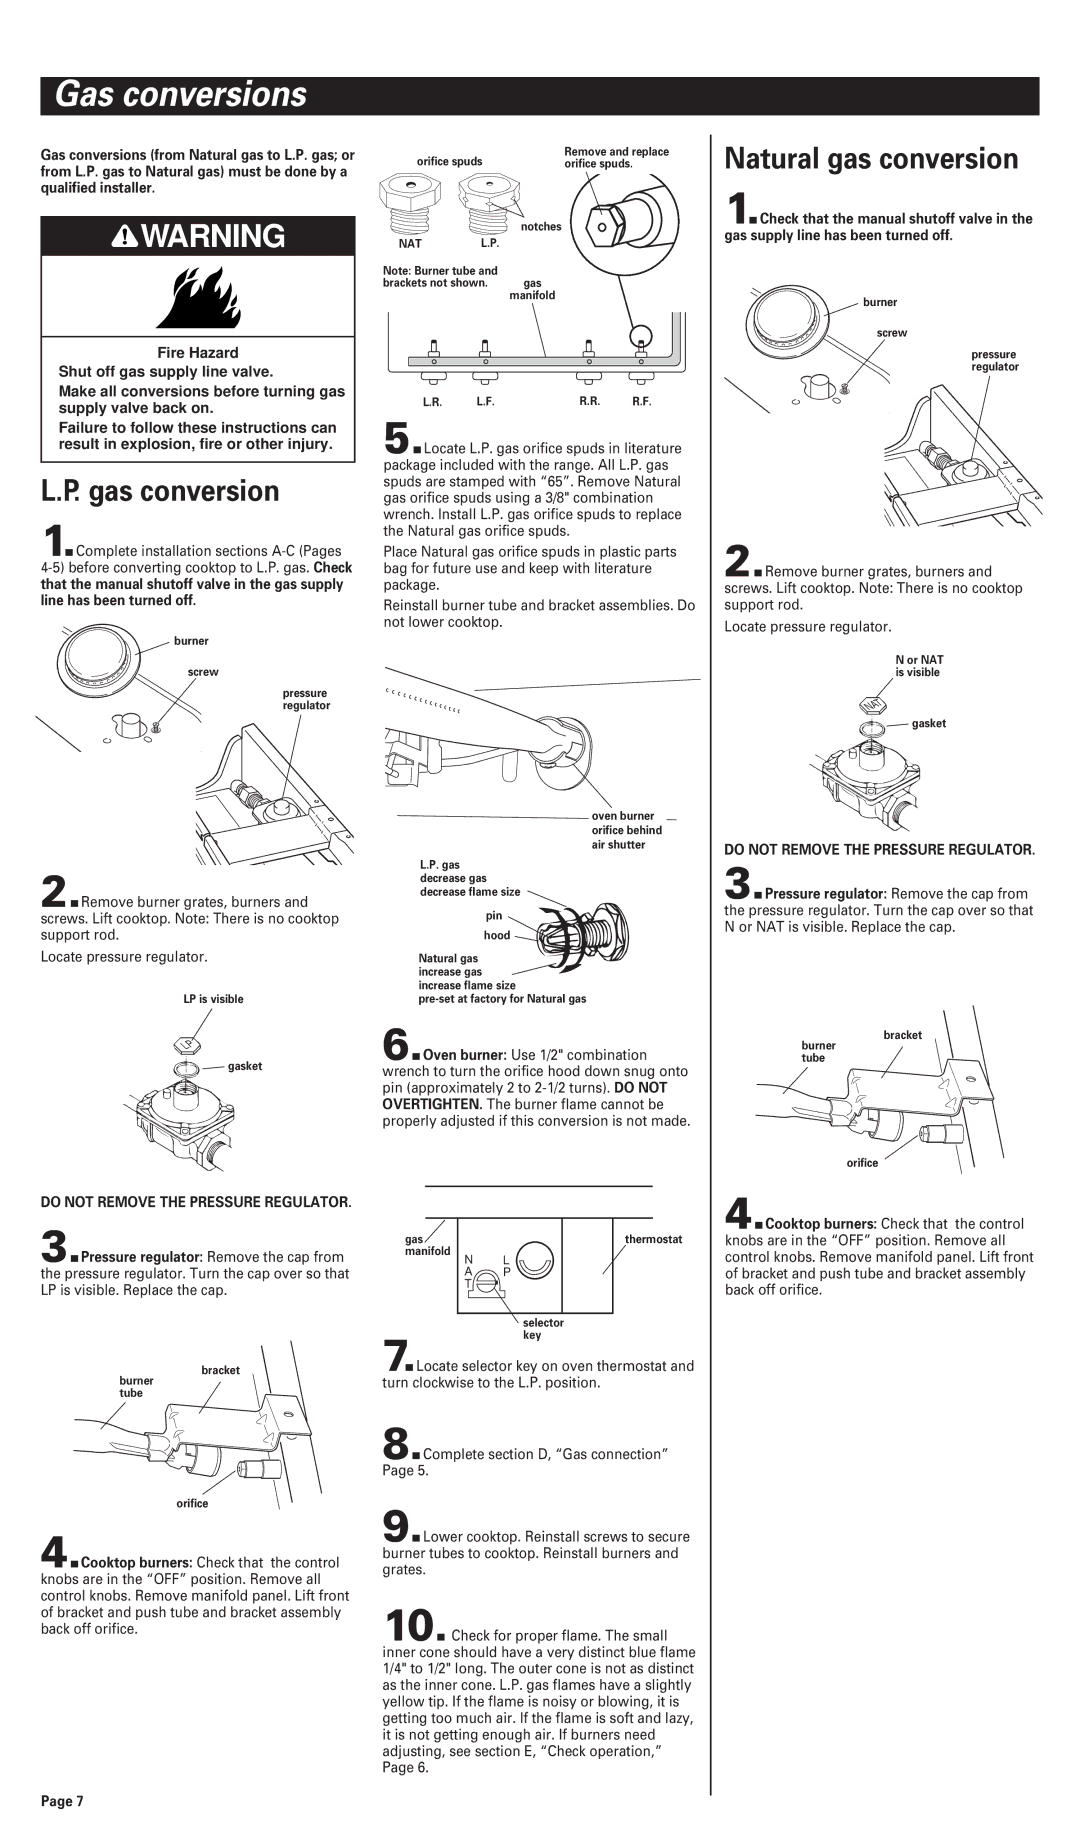
5.Locate L.P. gas orifice spuds in literature package included with the range. All L.P. gas spuds are stamped with “65”. Remove Natural gas orifice spuds using a 3/8" combination wrench. Install L.P. gas orifice spuds to replace the Natural gas orifice spuds.

Place Natural gas orifice spuds in plastic parts bag for future use and keep with literature package.

Reinstall burner tube and bracket assemblies. Do not lower cooktop.

Natural gas conversion

1.Check that the manual shutoff valve in the gas supply line has been turned off.

burner

screw

pressure regulator

2.Remove burner grates, burners and screws. Lift cooktop. Note: There is no cooktop support rod.

Locate pressure regulator.

N or NAT is visible

NAT

gasket

2.Remove burner grates, burners and screws. Lift cooktop. Note: There is no cooktop support rod.

Locate pressure regulator.

LP is visible

LP

gasket

DO NOT REMOVE THE PRESSURE REGULATOR.

3.Pressure regulator: Remove the cap from the pressure regulator. Turn the cap over so that LP is visible. Replace the cap.

bracket

burner tube

orifice

4.Cooktop burners: Check that the control knobs are in the “OFF” position. Remove all control knobs. Remove manifold panel. Lift front of bracket and push tube and bracket assembly back off orifice.

Page 7

oven burner orifice behind air shutter

L.P. gas decrease gas decrease flame size

pin hood

Natural gas increase gas

increase flame size

pre-set at factory for Natural gas

6.Oven burner: Use 1/2" combination wrench to turn the orifice hood down snug onto pin (approximately 2 to 2-1/2 turns). DO NOT OVERTIGHTEN. The burner flame cannot be properly adjusted if this conversion is not made.

gas

thermostat

manifold

L

N

AP

T

7.Locate selector key on oven thermostat and turn clockwise to the L.P. position.

8.Complete section D, “Gas connection” Page 5.

9.Lower cooktop. Reinstall screws to secure burner tubes to cooktop. Reinstall burners and grates.

10.Check for proper flame. The small inner cone should have a very distinct blue flame 1/4" to 1/2" long. The outer cone is not as distinct as the inner cone. L.P. gas flames have a slightly yellow tip. If the flame is noisy or blowing, it is getting too much air. If the flame is soft and lazy, it is not getting enough air. If burners need adjusting, see section E, “Check operation,” Page 6.

DO NOT REMOVE THE PRESSURE REGULATOR.

3.Pressure regulator: Remove the cap from the pressure regulator. Turn the cap over so that N or NAT is visible. Replace the cap.

bracket

burner tube

orifice

4.Cooktop burners: Check that the control knobs are in the “OFF” position. Remove all control knobs. Remove manifold panel. Lift front of bracket and push tube and bracket assembly back off orifice.

Page 7
Image 7
Whirlpool FGP300JN0 installation instructions Gas conversions, Natural gas conversion

FGP300JN0 specifications

The Whirlpool FGP300JN0 is a standout gas range that merges advanced technology with user-friendly design, catering to both amateur cooks and culinary experts alike. This range features a robust array of functionalities that enhance cooking experiences, all while maintaining an aesthetically pleasing appearance.

At the heart of the FGP300JN0 is its powerful gas cooktop, equipped with four burners, including a high-output burner designed for rapid heating. This feature allows for quicker boiling and efficient stir-frying, making meal prep more efficient. Additionally, the simmer burner is perfect for delicate tasks like melting chocolate or simmering sauces without the risk of burning.

One of the most notable characteristics of this range is its spacious oven, which includes a large capacity that allows users to cook multiple dishes simultaneously. It employs the AccuBake temperature management system, ensuring even baking results by using a combination of advanced technology to monitor the oven temperature accurately. This feature is crucial for achieving perfectly baked goods and uniform cooking.

The Whirlpool FGP300JN0 also boasts a convenient self-cleaning option. This technology utilizes high temperatures to eliminate food residue and grease buildup, saving time and effort for maintenance. The oven’s interior features a smooth surface that further enhances the ease of cleaning.

In terms of design, the FGP300JN0 comes with a sleek and modern exterior that fits seamlessly into various kitchen styles. The stainless steel finish not only adds to its durability but also offers a contemporary look that appeals to today's homeowners.

User-friendly controls on this model include easy-to-read knobs and a clear display, making it simple to adjust temperatures and settings. Whirlpool’s commitment to safety is showcased in its features, which include oven lockout and flame failure devices, ensuring peace of mind during use.

In summary, the Whirlpool FGP300JN0 gas range is a versatile and reliable cooking appliance, equipped with multiple features and technologies designed to elevate the cooking experience. Its powerful burners, spacious oven, self-cleaning convenience, and stylish design make it an excellent addition to any modern kitchen. Whether it's everyday meals or special occasions, this gas range stands ready to meet diverse culinary needs.