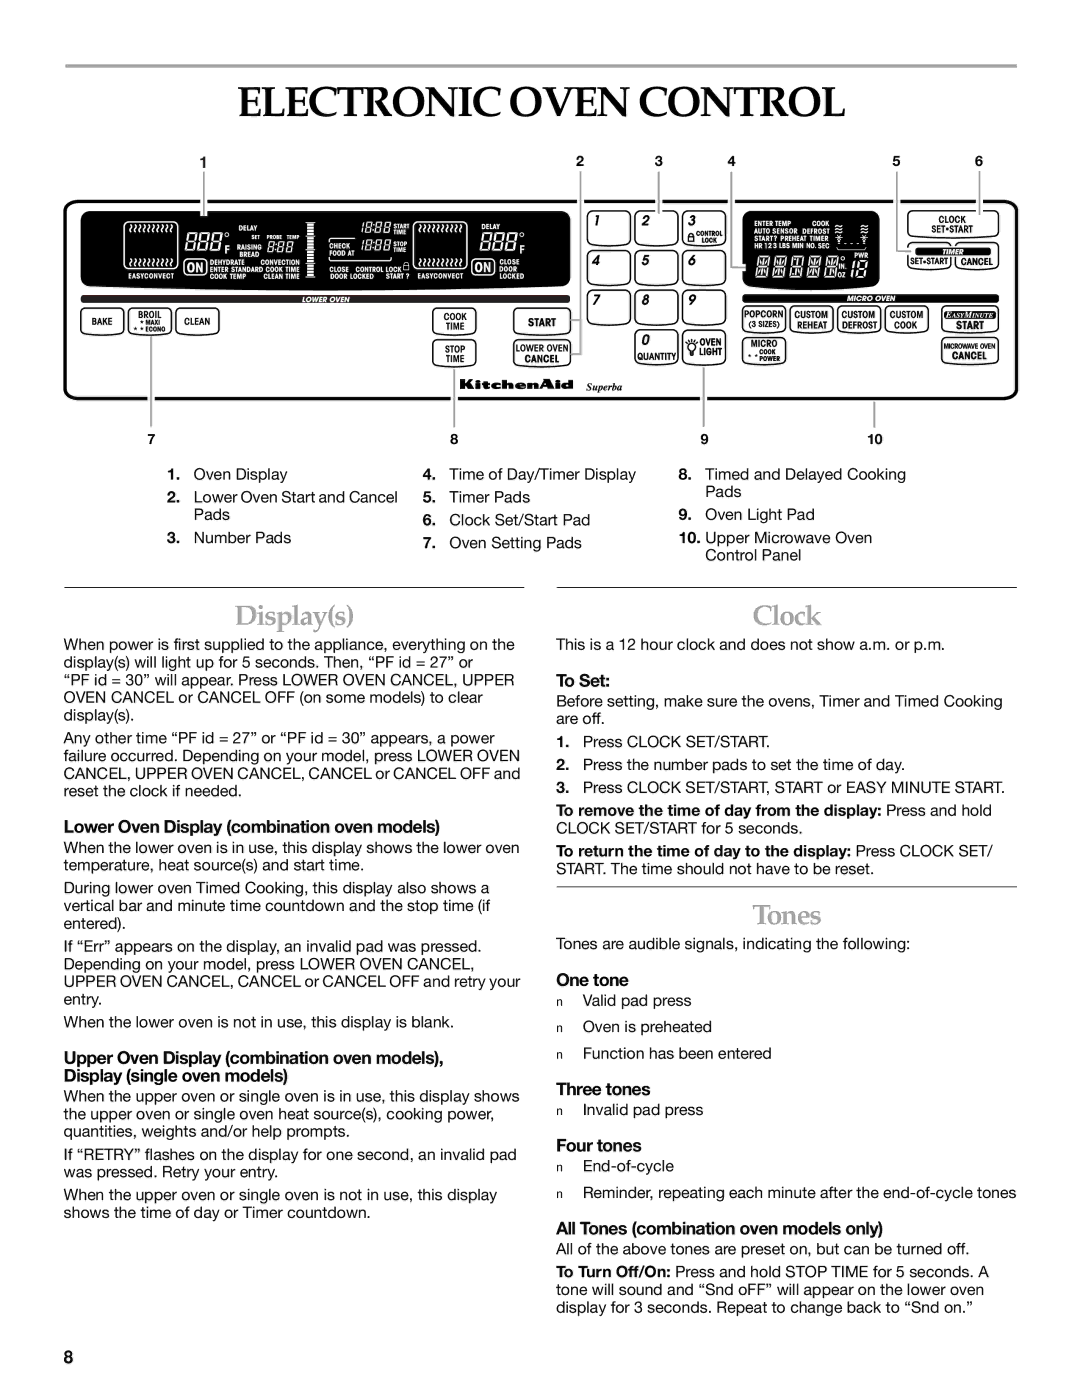
ELECTRONIC OVEN CONTROL

2

3

4

5

6

7

8

9

10

1.

Oven Display

4.

Time of Day/Timer Display

8.

Timed and Delayed Cooking

2.

Lower Oven Start and Cancel

5.

Timer Pads


Pads

9.


Pads

6.

Clock Set/Start Pad

Oven Light Pad

3.

Number Pads

10.

Upper Microwave Oven

7.

Oven Setting Pads


Control Panel

Display(s)

When power is first supplied to the appliance, everything on the display(s) will light up for 5 seconds. Then, “PF id = 27” or “PF id = 30” will appear. Press LOWER OVEN CANCEL, UPPER OVEN CANCEL or CANCEL OFF (on some models) to clear display(s).

Any other time “PF id = 27” or “PF id = 30” appears, a power failure occurred. Depending on your model, press LOWER OVEN CANCEL, UPPER OVEN CANCEL, CANCEL or CANCEL OFF and reset the clock if needed.

Lower Oven Display (combination oven models)

When the lower oven is in use, this display shows the lower oven temperature, heat source(s) and start time.

During lower oven Timed Cooking, this display also shows a vertical bar and minute time countdown and the stop time (if entered).

If “Err” appears on the display, an invalid pad was pressed. Depending on your model, press LOWER OVEN CANCEL, UPPER OVEN CANCEL, CANCEL or CANCEL OFF and retry your entry.

When the lower oven is not in use, this display is blank.

Upper Oven Display (combination oven models), Display (single oven models)

When the upper oven or single oven is in use, this display shows the upper oven or single oven heat source(s), cooking power, quantities, weights and/or help prompts.

If “RETRY” flashes on the display for one second, an invalid pad was pressed. Retry your entry.

When the upper oven or single oven is not in use, this display shows the time of day or Timer countdown.

Clock

This is a 12 hour clock and does not show a.m. or p.m.

To Set:

Before setting, make sure the ovens, Timer and Timed Cooking are off.

1.Press CLOCK SET/START.

2.Press the number pads to set the time of day.

3.Press CLOCK SET/START, START or EASY MINUTE START.

To remove the time of day from the display: Press and hold

CLOCK SET/START for 5 seconds.

To return the time of day to the display: Press CLOCK SET/ START. The time should not have to be reset.

Tones

Tones are audible signals, indicating the following:

One tone

Valid pad press

Oven is preheated

Function has been entered

Three tones

Invalid pad press

Four tones

End-of-cycle

Reminder, repeating each minute after the end-of-cycle tones

All Tones (combination oven models only)

All of the above tones are preset on, but can be turned off.

To Turn Off/On: Press and hold STOP TIME for 5 seconds. A tone will sound and “Snd oFF” will appear on the lower oven display for 3 seconds. Repeat to change back to “Snd on.”

8

Page 8
Image 8
Whirlpool KEMI301G, KEMI371G manual Electronic Oven Control, Displays, Clock, Tones

KEMI371G, KEMI301G specifications

Whirlpool, a leading name in home appliances, has made a significant mark in the built-in kitchen appliance sector with their innovative models, the KEMI301G and KEMI371G. Both models are designed to enhance cooking experiences while providing a sleek, modern aesthetic to any kitchen.

The Whirlpool KEMI301G is a compact built-in microwave that comes with user-friendly features and advanced technology. At the heart of its design is a powerful inverter that allows for precise temperature control, ensuring evenly cooked meals. This model offers multiple cooking modes, including microwave, grill, and convection, which provide versatility for different culinary needs. The KEMI301G features an intuitive control panel that makes it easy for users to navigate settings, adjust cooking times, and select the desired power level with just a few clicks.

In addition to its cooking functionalities, the KEMI301G is designed for optimal space efficiency. With a compact size, it fits perfectly in smaller kitchens without compromising on performance. Its sleek stainless steel finish not only enhances its visual appeal but also makes cleaning a breeze. The integrated design helps minimize clutter, allowing for a seamless look in any kitchen decor.

On the other hand, the Whirlpool KEMI371G is a larger built-in oven that is ideal for those who enjoy cooking for family and friends. Boasting a generous capacity, it allows for multiple dishes to be cooked simultaneously. The KEMI371G incorporates Whirlpool's unique 6th Sense technology, which automatically adjusts cooking parameters based on the type of food being prepared, ensuring optimal results every time. The oven also features a range of cooking modes, including conventional, grilling, and fan cooking, enabling users to experiment with various recipes.

Safety and ease of use are paramount in the design of both models. The KEMI301G and KEMI371G are equipped with child lock features to prevent accidental operation, making them safe for family use. Additionally, both models come with easy-to-clean interiors that resist stains and odors, ensuring a hygienic cooking environment.

In summary, Whirlpool's KEMI301G and KEMI371G embody the perfect balance of style, functionality, and technology. Their innovative features cater to the needs of modern culinary enthusiasts, providing an efficient, convenient, and enjoyable cooking experience. With their compactness and user-centric designs, these appliances are sure to fit seamlessly into any contemporary kitchen setup.