Manuals
/
Whirlpool
/
Kitchen Appliance
/
Range
Whirlpool
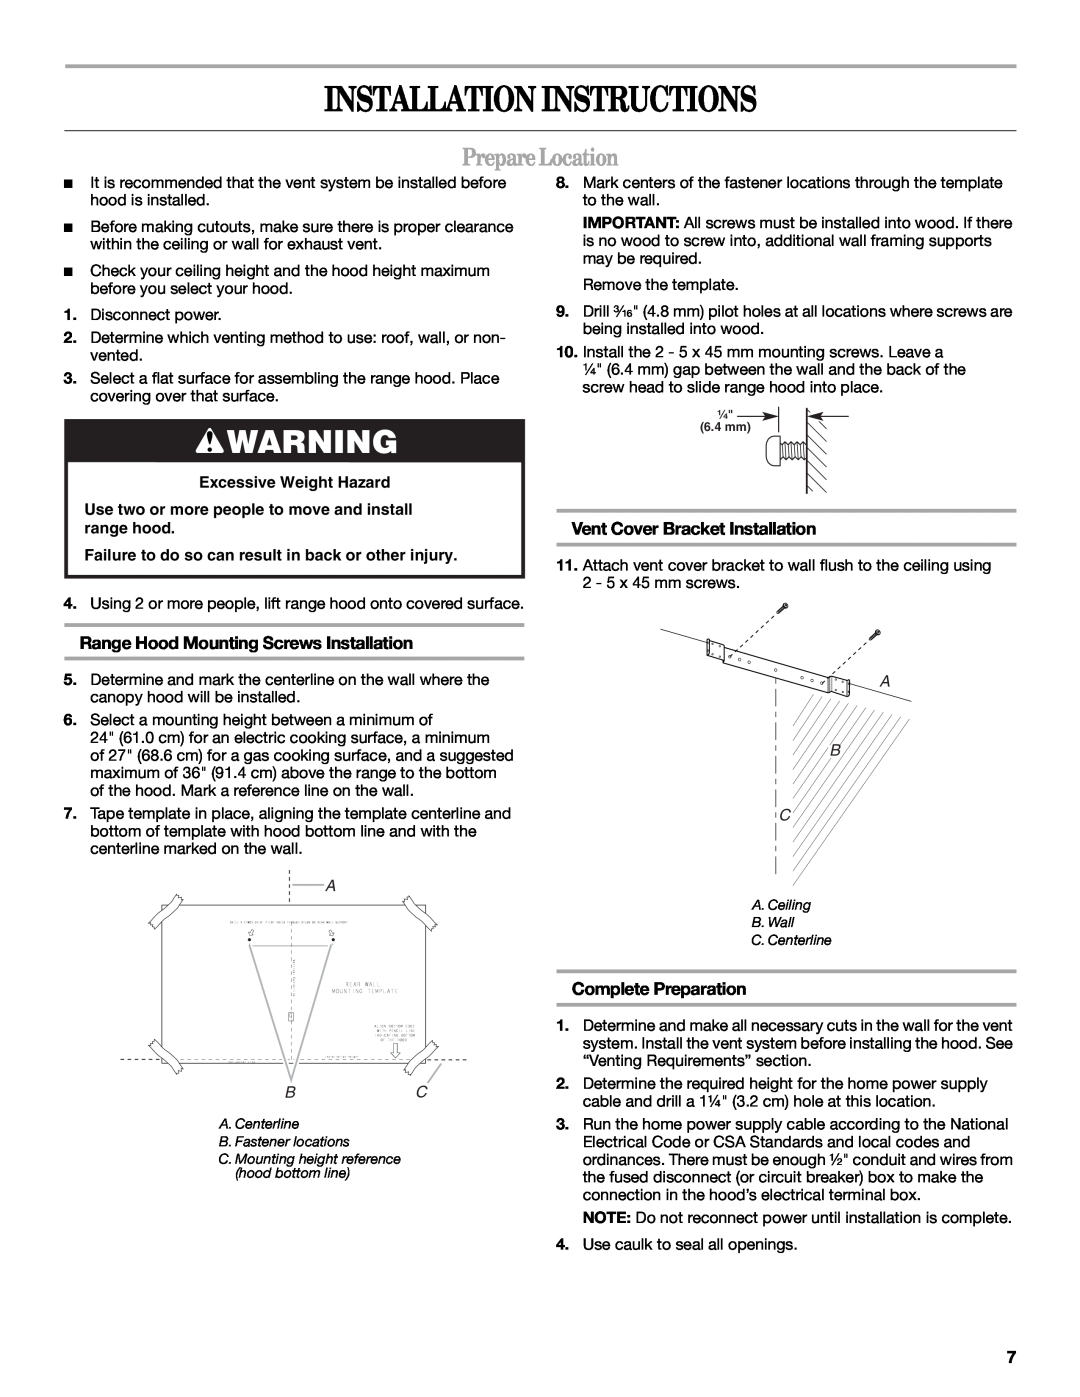
GXW6530DXS Installation Instructions, Prepare Location, Vent Cover Bracket Installation
Models:
GXW6530DXS
GXW6536DXS
W10292167D
LI3YMC/W
1
7
28
28
Download
28 pages
35.83 Kb
4
5
6
7
8
9
10
11
Install
Wiring Diagram
Warranty
Dimension
Accessories
Cleaning
Weight
Exigences d’emplacement
Safety
Assistance Ou Service
Page 7
Image 7
Page 6
Page 8
Page 7
Image 7
Page 6
Page 8
Contents
RANGE HOOD
30 76.2 CM AND 36 91.4 CM WALL-MOUNT CANOPY
Installation Instructions and Use & Care Guide
Instructions d’installation et Guide d’utilisation et d’entretien
DANGER
RANGE HOOD SAFETY
Your safety and the safety of others are very important
TABLE DES MATIÈRES
READ AND SAVE THESE INSTRUCTIONS
IMPORTANT SAFETY INSTRUCTIONS
For Mobile Home Installations
INSTALLATION REQUIREMENTS
Tools and Parts
Location Requirements
ventedmodels only
Venting Requirements
Cabinet Dimensions
Cold Weather Installations
Example vent system
Electrical Requirements
For Non-Vented recirculating Installations
Calculating Vent System Length
Range Hood Mounting Screws Installation
INSTALLATION INSTRUCTIONS
Prepare Location
Vent Cover Bracket Installation
For non-vented recirculating installation only
Install Range Hood
Connect Vent System
For vented installations only
Connect ground wire to green and yellow ground wire in terminal box
Install Vent Covers
Make Electrical Connection
Electrical Shock Hazard Disconnect power before servicing
Operating the light
Complete Installation
RANGE HOOD USE
Range Hood Controls
Cleaning Method
Cleaning
RANGE HOOD CARE
Non-Vented recirculating Installation Filters
GND L N
WIRING DIAGRAM
In Canada
ASSISTANCE OR SERVICE
Accessories
In the U.S.A
DISCLAIMER OF IMPLIED WARRANTIES LIMITATION OF REMEDIES
WHIRLPOOL CORPORATION MAJOR APPLIANCE WARRANTY
LIMITED WARRANTY
ITEMS EXCLUDED FROM WARRANTY This limited warranty does not cover
DANGER AVERTISSEMENT
SÉCURITÉ DE LA HOTTE DE CUISINIÈRE
Votre sécurité et celle des autres est très importante
LIRE ET CONSERVER CES INSTRUCTIONS
IMPORTANTES INSTRUCTIONS DE SÉCURITÉ
Installation dans une résidence mobile
EXIGENCES DINSTALLATION
Exigences d’emplacement
Outils et pièces
seulement pour unmodèle avecdécharge àlextérieur
Exigences concernant l’évacuation
Dimensions du produit
Dimensions du placard
Air dappoint
Installation dans une région à climat froid
Installation sans décharge à lextérieur recyclage
Installation sans
Spécifications électriques
INSTRUCTIONS DINSTALLATION
Préparation de lemplacement
AVERTISSEMENT
Pour installations avec décharge à l’extérieur uniquement
Installation de la hotte
Raccordement du circuit dévacuation
Installation de la bride de cache-conduit
Replacer pièces et panneaux avant de faire la remise en marche
Raccordement électrique
Risque de choc électrique
Déconnecter la source de courant électrique avant lentretien
Risque de choc électrique Relier le ventilateur à la terre
Installation des cache-conduits
Achever l’installation
UTILISATION DE LA HOTTE
Filtres dinstallation sans décharge à l’extérieur recyclage
Commandes de la hotte de cuisinière
ENTRETIEN DE LA HOTTE
Nettoyage
Remplacement d’une lampe
Terre L Neu
SCHÉMA DE CÂBLAGE
Au Canada
ASSISTANCE OU SERVICE
Accessoires
GARANTIE DES GROS APPAREILS MÉNAGERS WHIRLPOOL CORPORATION
W10292167D
Top
Page
Image
Contents