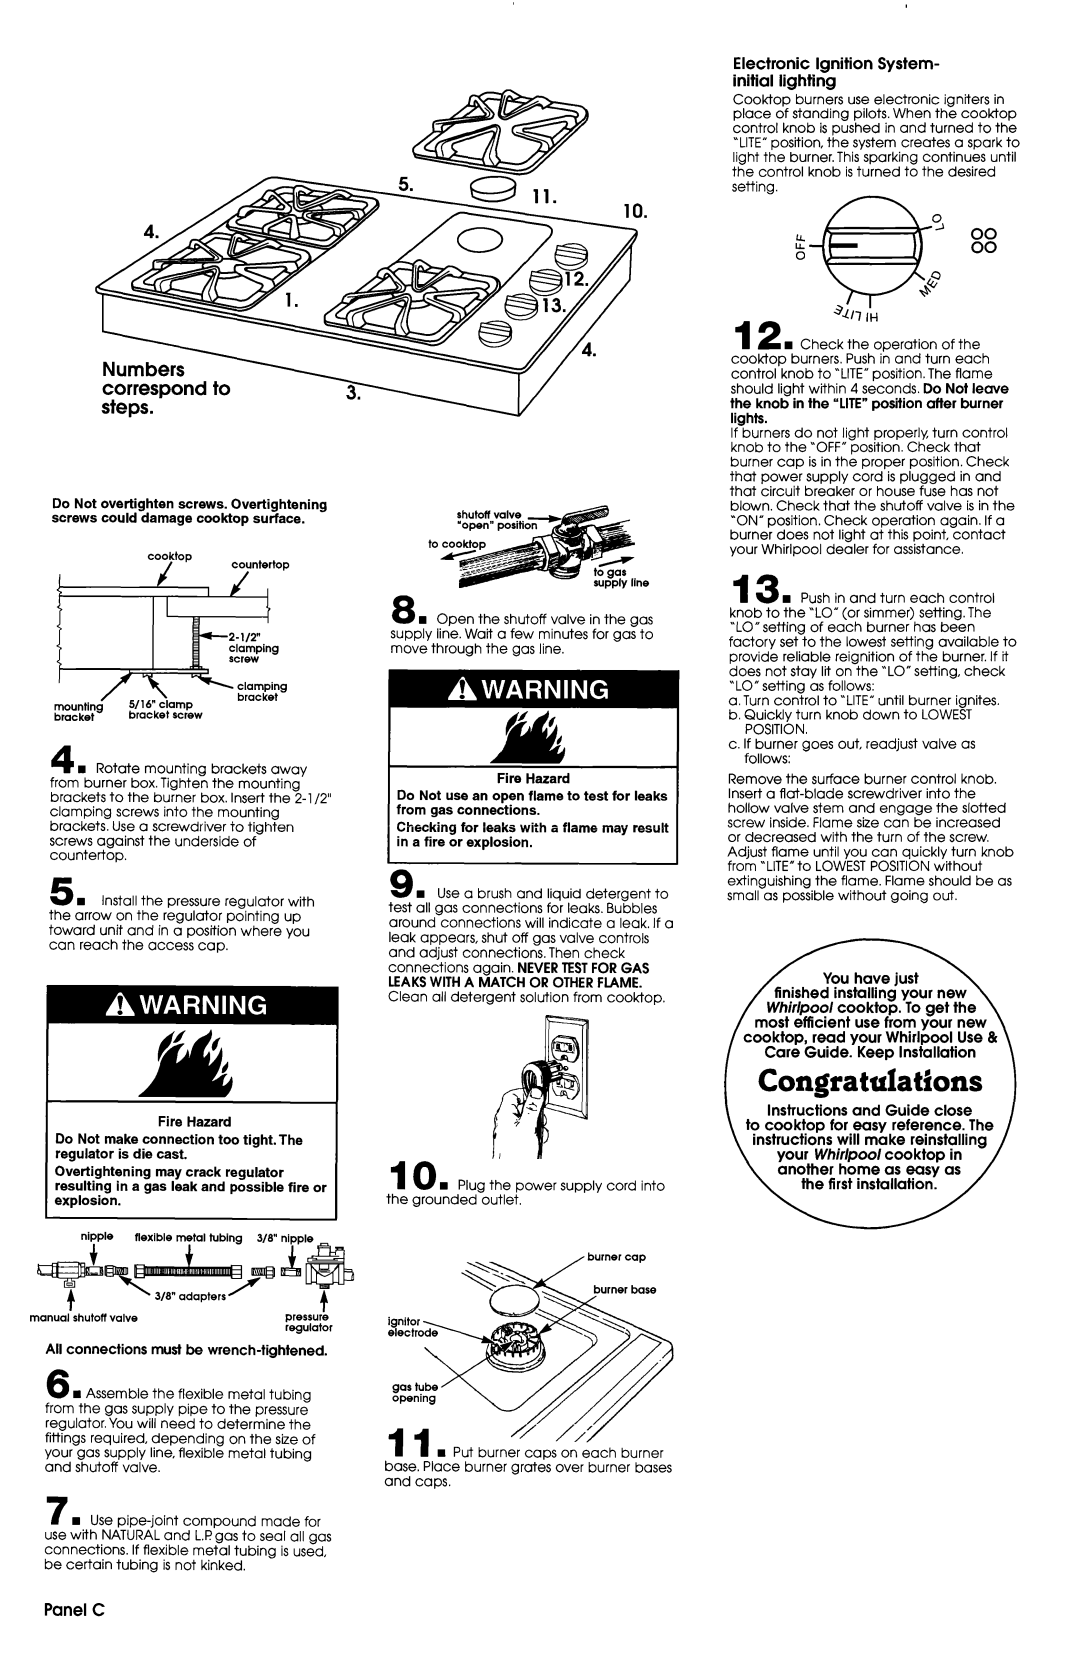
correspond to steps.

Do Not overtighten screws. Overtightening screws could damage cooktop surface.

4 n Rotate mounting brackets away from burner box. Tighten the mounting brackets to the burner box. Insert the 2-l /2” clamping screws into the mounting brackets. Use a screwdriver to tighten screws against the underside of countertop.

5 n Install the pressure regulator with the arrow on the regulator pointing up toward unit and in a position where you can reach the access cap.

8n Ooen the shutoff valve in the aas supply line. Wait a few minutes for gaFt0 move through the gas line.

Fire Hazard

Do Not use an open flame to test for leaks from gas connections.

Checking for leaks with a flame may result in a fire or explosion.

9 n Use a brush and liquid detergent to test all gas connections for leaks. Bubbles around connections will indicate a leak. If a leak appears, shut off gas valve controls and adjust connections. Then check connections again. NEVERTESTFOR GAS LEAKSWITHA MATCH OR OTHERFLAME. Clean all detergent solution from cooktop.

Electronic Ignition System- initial lighting

Cooktop burners use electronic igniters in place of standing pilots. When the cooktop control knob is pushed in and turned to the ‘LITE” position, the system creates a spark to light the burner. This sparking continues until the control knob is turned to the desired setting.

,

% IL

12 n Check the operation of the cooktop burners. Push in and turn each control knob to ‘LITE” position. The flame should light within 4 seconds. Do Not leave the knob in the “LITE”position after burner lights.

If burners do not light properly, turn control knob to the “OFF”position. Check that burner cap is in the proper position. Check that power supply cord is plugged in and that circuit breaker or house fuse has not blown. Check that the shutoff valve is in the “ON”position. Check operation again. If a burner does not light at this point, contact your Whirlpool dealer for assistance.

13 n Push in and turn each control knob to the “LO”(or simmer) setting. The “LO”setting of each burner has been factory set to the lowest setting available to provide reliable reignition of the burner. If it does not stay lit on the “LO”setting, check ‘LO” setting as follows:

a. Turn control to “LITE”until burner ignites. b. Quickly turn knob down to LOWEST

POSITION.

c. If burner goes out, readjust valve as follows:

Remove the surface burner control knob. Insert a flat-blade screwdriver into the hollow valve stem and engage the slotted screw inside. Flame size can be increased or decreased with the turn of the screw. Adjust flame until you can quickly turn knob from “LITE”to LOWESTPOSITION without extinguishing the flame. Flame should be as small as possible without going out.

Fire Hazard

Do Not make connection too tight. The regulator is die cast.

Over-tightening may crack regulator resulting in a gas leak and possible fire or explosion.

nipple

flexible

metal tubing

3/8” nipple -

manual shutoff valve

pressure


regulator

All connections must be wrench-tightened.

n Assemble the flexible metal tubing from the gas supply pipe to the pressure regulator. You will need to determine the fittings required, depending on the size of your gas supply line, flexible metal tubing and shutoff valve.

7 n Use pipe-joint compound made for use with NATURAL and L.Pgas to seal all gas

connections.

If flexible

metal tubina

is used,

be certain

tubing is not

kinked.

-

1 Congratulations )

10 n Plug the power supply cord into the grounded outlet.

nPut burner caos on each burner base. Place burner grates over burner bases and caps.

Panel C

Page 4
Image 4
Whirlpool SC864OED installation instructions Correspond to steps, Electronic Ignition System- initial lighting, Panel C

SC864OED specifications

The Whirlpool SC864OED is a cutting-edge built-in oven that showcases the perfect blend of functionality, style, and advanced technology, making it an ideal addition to any modern kitchen. With its sleek design and high performance, this oven is crafted to meet the needs of both culinary enthusiasts and home chefs alike.

One of the standout features of the SC864OED is its multifunctional capabilities, enabling users to explore a variety of cooking methods. This oven supports multiple cooking modes, including conventional, fan-assisted, and grill settings, allowing for versatile meal preparation. Whether you are baking, roasting, or grilling, the SC864OED delivers consistent results with every use.

Another notable technology integrated into the SC864OED is the 6th Sense technology, which automatically adjusts temperature and cooking time based on the dish being prepared. This feature ensures perfectly cooked meals by taking the guesswork out of cooking, making it easier for users to achieve consistent results without constant monitoring.

The oven's generous 73-liter capacity offers ample space for cooking large meals, making it perfect for families or for entertaining guests. The interior is designed with a special heat distribution system that ensures even cooking throughout, allowing dishes to cook uniformly without hot or cold spots. This is complemented by the Eco Clean enamel interior, which not only enhances durability but also simplifies the cleaning process, as it helps reduce food residue accumulation.

The Whirlpool SC864OED also includes an intuitive control panel featuring an easy-to-read digital display. This allows users to select cooking modes and adjust settings with minimal effort. In addition, the oven comes with a variety of pre-set programs, making it easy to whip up popular dishes with just a few clicks.

Safety is a top priority, and the SC864OED is equipped with a triple-glazed oven door that retains heat effectively while ensuring the exterior remains cool to the touch. This feature minimizes the risk of burns and accidents in the kitchen, particularly in households with young children.

In summary, the Whirlpool SC864OED is a sophisticated built-in oven that excels in performance, versatility, and safety. With its array of innovative features and elegant design, it stands out as a premium choice for those looking to enhance their cooking experience while adding a touch of modernity to their kitchen.