Cookware with nonstick surfaces should not be used under the broiler.
Use the following chart as a guide for cookware material characteristics.
COOKWARE CHARACTERISTICS
Aluminum | ■ Heats quickly and evenly. |
■Suitable for all types of cooking.
■Medium or heavy thickness is best for most cooking tasks.
Cast iron | ■ Heats slowly and evenly. |
■Good for browning and frying.
■Maintains heat for slow cooking.
Ceramic or | ■ | Follow manufacturer’s instructions. |
Ceramic glass | ■ | Heats slowly, but unevenly. |
| ||
| ■ Ideal results on low to medium heat | |
|
| settings. |
|
|
|
Copper | ■ | Heats very quickly and evenly. |
|
|
|
Earthenware | ■ | Follow manufacturer’s instructions. |
■Use on low heat settings.
Porcelain | ■ | See stainless steel or cast iron. |
|
| |
steel or cast |
|
|
iron |
|
|
|
|
|
Stainless steel | ■ | Heats quickly, but unevenly. |
■A core or base of aluminum or copper on stainless steel provides even heating.
ELECTRONIC OVEN CONTROLS
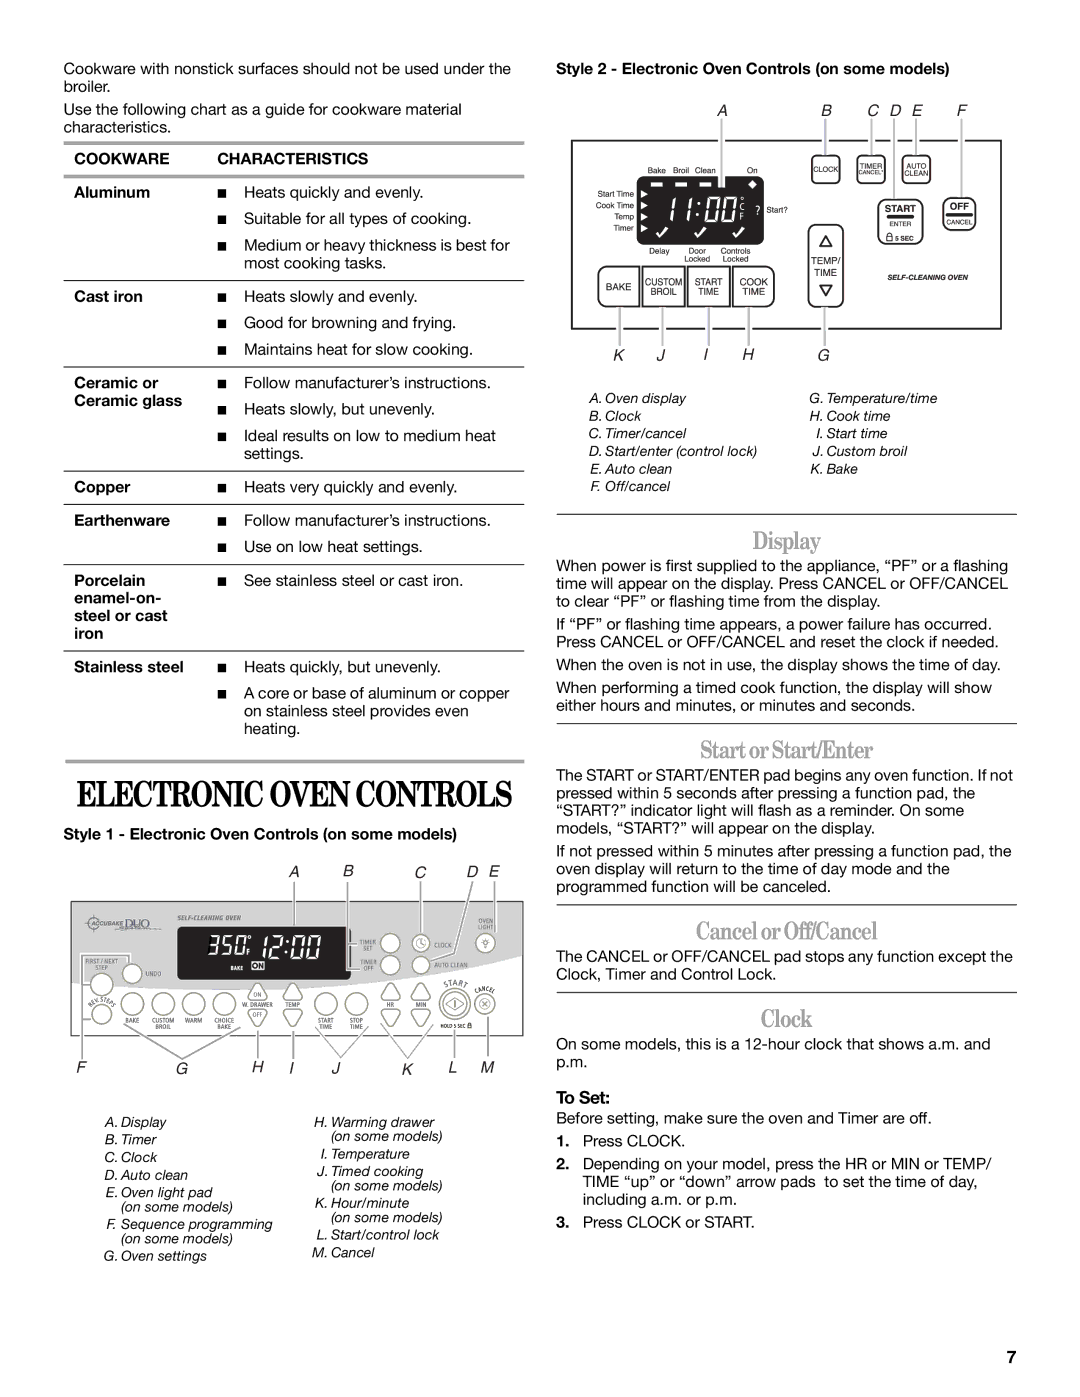
Style 1 - Electronic Oven Controls (on some models)
A B C D E
F | G | H | I | J | K | L | M |
A. Display | H. Warming drawer | |
B. Timer | (on some models) | |
C. Clock | I. Temperature | |
D. Auto clean | J. Timed cooking | |
E. Oven light pad | (on some models) | |
K. Hour/minute | ||
(on some models) | ||
F. Sequence programming | (on some models) | |
L. Start/control lock | ||
(on some models) | ||
G. Oven settings | M. Cancel |
Style 2 - Electronic Oven Controls (on some models)
AB C D E F
K | J | I | H | G |
A. Oven display |
|
| G. Temperature/time | |
B. Clock |
|
|
| H. Cook time |
C. Timer/cancel |
|
| I. Start time | |
D. Start/enter (control lock) | J. Custom broil | |||
E. Auto clean |
|
| K. Bake | |
F. Off/cancel |
|
|
| |
Display
When power is first supplied to the appliance, “PF” or a flashing time will appear on the display. Press CANCEL or OFF/CANCEL to clear “PF” or flashing time from the display.
If “PF” or flashing time appears, a power failure has occurred. Press CANCEL or OFF/CANCEL and reset the clock if needed.
When the oven is not in use, the display shows the time of day.
When performing a timed cook function, the display will show either hours and minutes, or minutes and seconds.
StartorStart/Enter
The START or START/ENTER pad begins any oven function. If not pressed within 5 seconds after pressing a function pad, the “START?” indicator light will flash as a reminder. On some models, “START?” will appear on the display.
If not pressed within 5 minutes after pressing a function pad, the oven display will return to the time of day mode and the programmed function will be canceled.
CancelorOff/Cancel
The CANCEL or OFF/CANCEL pad stops any function except the Clock, Timer and Control Lock.
Clock
On some models, this is a
To Set:
Before setting, make sure the oven and Timer are off.
1.Press CLOCK.
2.Depending on your model, press the HR or MIN or TEMP/ TIME “up” or “down” arrow pads to set the time of day, including a.m. or p.m.
3.Press CLOCK or START.
7
