Using the oven control

Baking

Adjusting the oven temperature control

Does your oven seem hotter or colder than your old oven? The temperature of your old oven may have shifted gradually without you noticing the change. Your new oven is properly adjusted to provide accurate temperatures. But, when compared to your old oven, the new design may give you different results.

If, after using the oven for a period of time, you are not satisfied with the temperature settings, they can be adjusted by following these steps:

Broiling

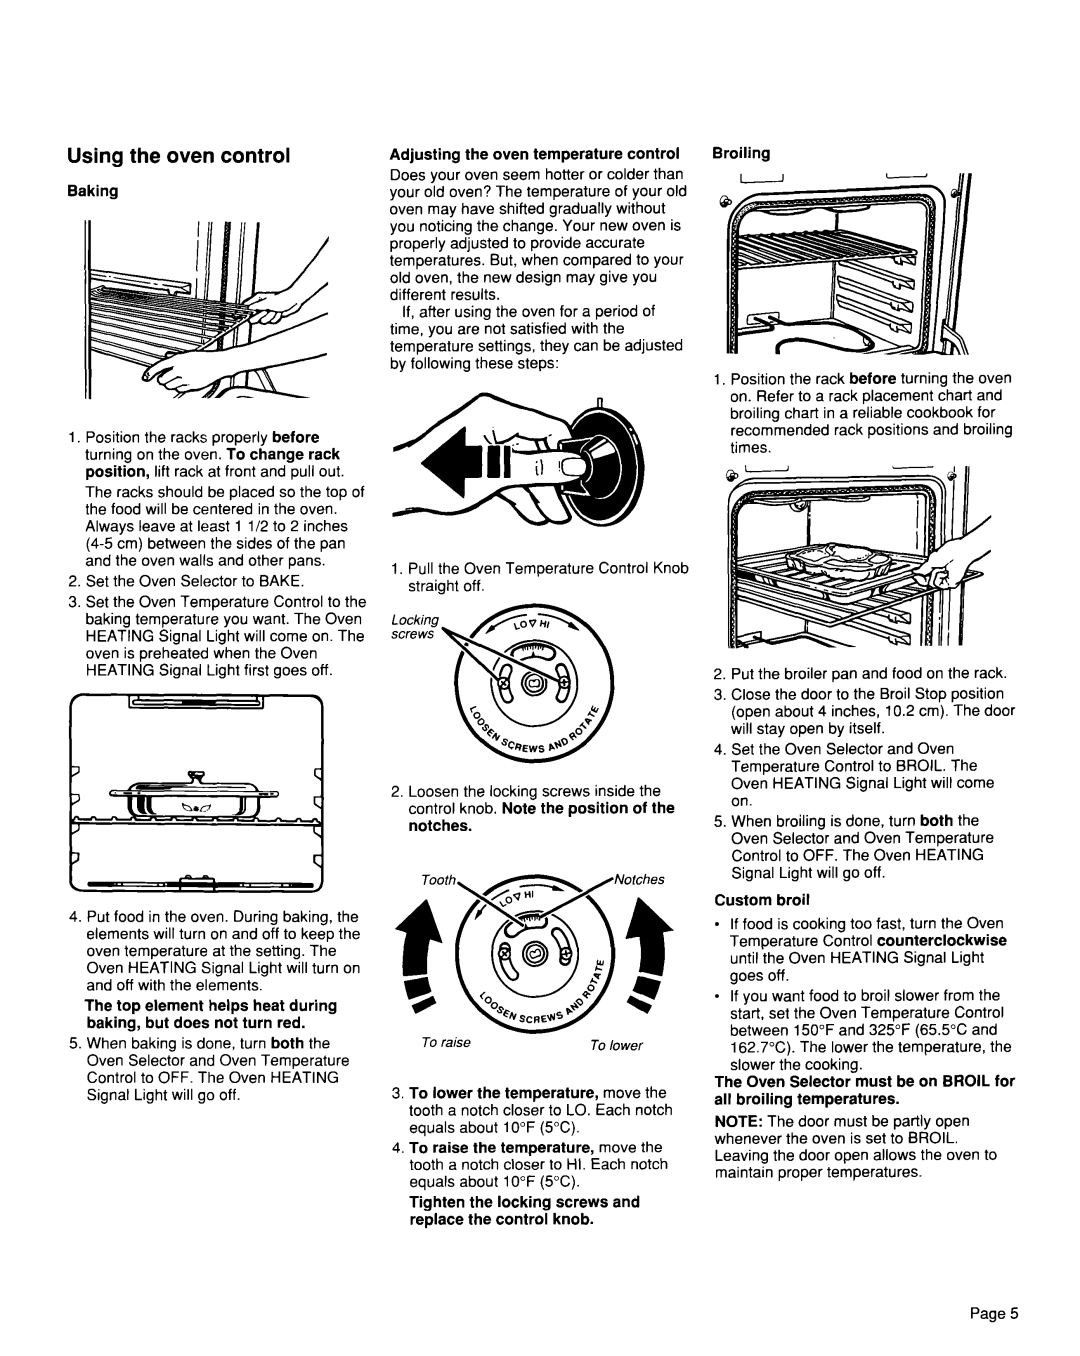
1.Position the racks properly before turning on the oven. To change rack position, lift rack at front and pull out.

The racks should be placed so the top of the food will be centered in the oven. Always leave at least 1 l/2 to 2 inches (4-5 cm) between the sides of the pan and the oven walls and other pans.

2.Set the Oven Selector to BAKE.

3.Set the Oven Temperature Control to the baking temperature you want. The Oven HEATING Signal Light will come on. The oven is preheated when the Oven HEATING Signal Light first goes off.

1.Pull the Oven Temperature Control Knob straight off.

Locking screws

1.Position the rack before turning the oven on. Refer to a rack placement chart and broiling chart in a reliable cookbook for recommended rack positions and broiling times.

2. Put the broiler pan and food on the rack.

3.

Close the door to the

Broil Stop position


(open about 4 inches, 10.2 cm). The door


will stay open by itself.


4.

Set the Oven Selector

and Oven


Temperature Control to BROIL. The


Oven HEATING Signal Light will come

4.Put food in the oven. During baking, the elements will turn on and off to keep the oven temperature at the setting. The Oven HEATING Signal Light will turn on and off with the elements.

The top element helps heat during baking, but does not turn red.

5.When baking is done, turn both the Oven Selector and Oven Temperature Control to OFF. The Oven HEATING Signal Light will go off.

2.Loosen the locking screws inside the control knob. Note the position of the notches.

To raise

To lower

3.To lower the temperature, move the tooth a notch closer to LO. Each notch equals about 10°F (5°C).

4.To raise the temperature, move the tooth a notch closer to HI. Each notch equals about 10°F (5°C).

Tighten the locking screws and replace the control knob.

on.


5. When broiling is done, turn both the

Oven Selector and

Oven Temperature

Control to OFF. The Oven HEATING

Signal Light will go

off.

Custom broil

lIf food is cooking too fast, turn the Oven Temperature Control counterclockwise until the Oven HEATING Signal Light goes off.

lIf you want food to broil slower from the start, set the Oven Temperature Control between 150°F and 325°F (65.5% and 162.7%). The lower the temperature, the slower the cooking.

The Oven Selector must be on BROIL for all broiling temperatures.

NOTE: The door must be partly open whenever the oven is set to BROIL. Leaving the door open allows the oven to maintain proper temperatures.

Page 5

Page 5
Image 5
Whirlpool TER46WOW installation instructions Using the oven control

TER46WOW specifications

The Whirlpool TER46WOW is an innovative and versatile tumble dryer that reflects the brand's commitment to delivering efficient and user-friendly home appliances. Designed to meet the needs of modern households, this model combines cutting-edge technology with practical features that simplify laundry days.

One of the standout features of the Whirlpool TER46WOW is its Heat Pump technology. This advanced system utilizes a closed-loop cycle to recycle hot air, significantly reducing energy consumption compared to traditional dryers. As a result, users not only save on electricity bills but also contribute to a more sustainable environment. The A+++ energy rating further emphasizes its energy efficiency, making it an eco-friendly choice for conscientious consumers.

Equipped with a large capacity drum, the TER46WOW allows for ample space to dry large loads of laundry. This feature is particularly beneficial for families or individuals with busy lifestyles, as it minimizes the number of drying cycles needed. Furthermore, the soft motion technology employed in the drum ensures that clothes are treated gently, reducing wear and tear on fabrics and maintaining their quality even after multiple washes.

The user-friendly interface of the Whirlpool TER46WOW is another highlight. The intuitive control panel features a clear display and convenient settings that make it easy for users to select the optimal drying program based on their laundry needs. With multiple drying programs available, including programs tailored for specific fabric types, users can achieve the best results every time.

Another noteworthy characteristic of this tumble dryer is its special cycle for delicate items. This cycle is designed to treat fragile fabrics with care, ensuring they are dried thoroughly while minimizing the risk of damage. Additionally, the option to delay the start of the drying cycle further enhances convenience, allowing users to schedule laundry according to their daily routines.

In conclusion, the Whirlpool TER46WOW stands out for its energy-efficient Heat Pump technology, generous drum capacity, gentle drying options, and user-friendly interface. It embodies a perfect blend of performance and convenience, making it an excellent choice for any home looking to streamline their laundry process while conserving energy and maintaining fabric quality.