OVEN USE

Odors and smoke are normal when the oven is used the first few times, or when it is heavily soiled.

IMPORTANT: The health of some birds is extremely sensitive to the fumes given off. Exposure to the fumes may result in death to certain birds. Always move birds to another closed and well- ventilated room.

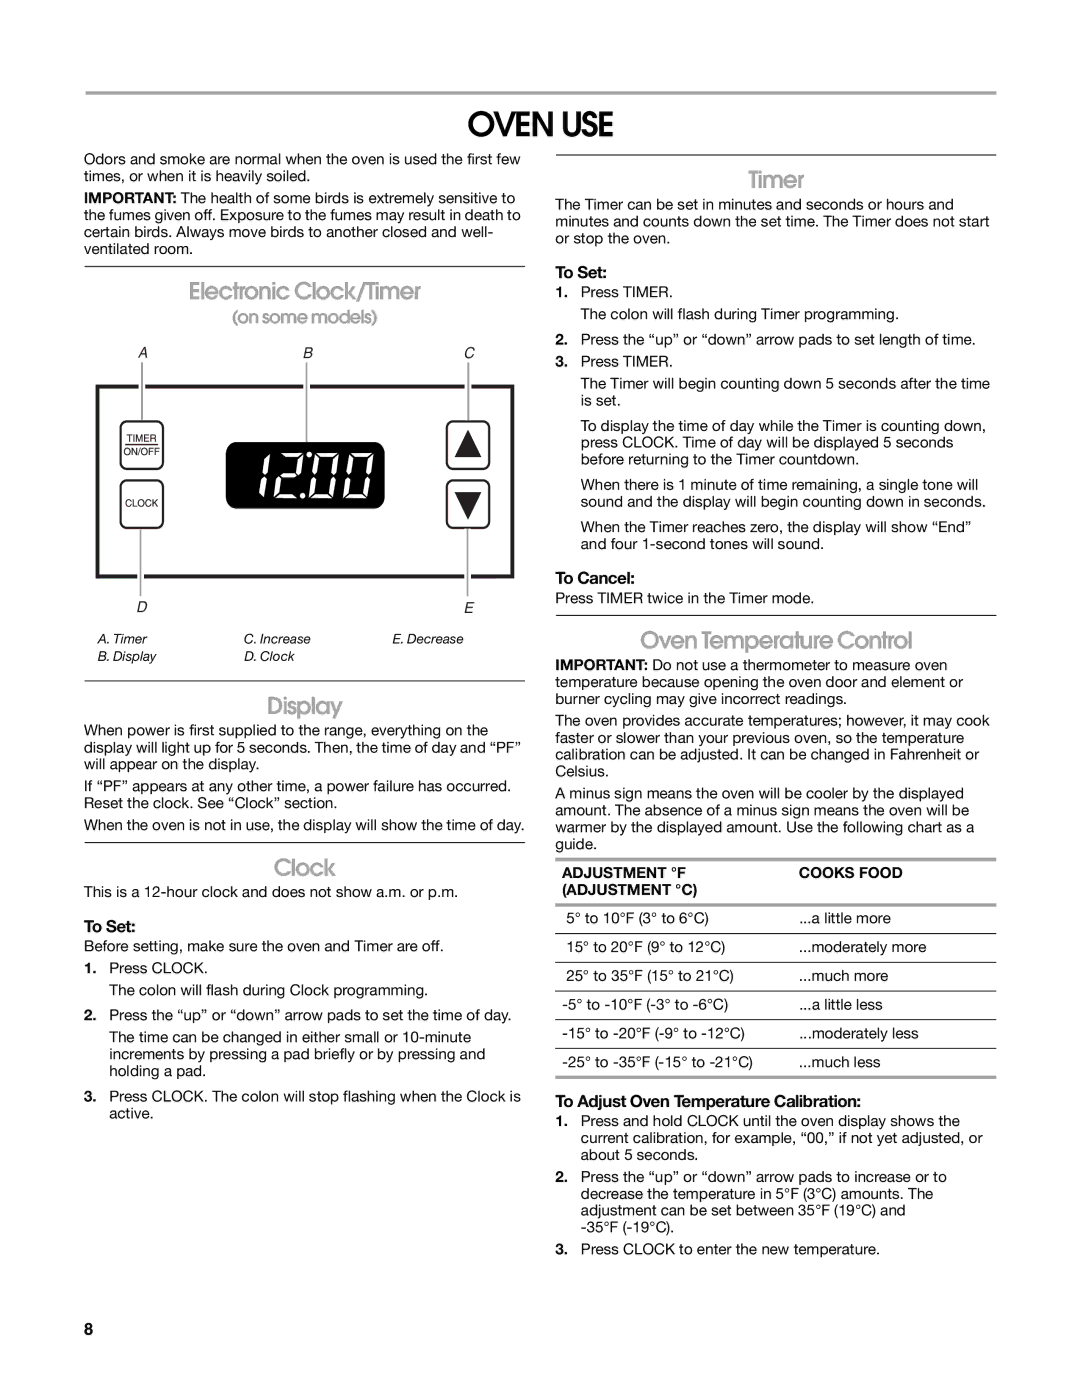
Electronic Clock/Timer

(on some models)

ABC

Timer

The Timer can be set in minutes and seconds or hours and minutes and counts down the set time. The Timer does not start or stop the oven.

To Set:

1.Press TIMER.

The colon will flash during Timer programming.

2.Press the “up” or “down” arrow pads to set length of time.

3.Press TIMER.

The Timer will begin counting down 5 seconds after the time is set.

To display the time of day while the Timer is counting down, press CLOCK. Time of day will be displayed 5 seconds before returning to the Timer countdown.

When there is 1 minute of time remaining, a single tone will sound and the display will begin counting down in seconds.

When the Timer reaches zero, the display will show “End” and four 1-second tones will sound.

D


E

A. Timer

C. Increase

E. Decrease

B. Display

D. Clock


Display

When power is first supplied to the range, everything on the display will light up for 5 seconds. Then, the time of day and “PF” will appear on the display.

If “PF” appears at any other time, a power failure has occurred. Reset the clock. See “Clock” section.

When the oven is not in use, the display will show the time of day.

Clock

This is a 12-hour clock and does not show a.m. or p.m.

To Set:

Before setting, make sure the oven and Timer are off.

1.Press CLOCK.

The colon will flash during Clock programming.

2.Press the “up” or “down” arrow pads to set the time of day.

The time can be changed in either small or 10-minute increments by pressing a pad briefly or by pressing and holding a pad.

3.Press CLOCK. The colon will stop flashing when the Clock is active.

To Cancel:

Press TIMER twice in the Timer mode.

Oven Temperature Control

IMPORTANT: Do not use a thermometer to measure oven temperature because opening the oven door and element or burner cycling may give incorrect readings.

The oven provides accurate temperatures; however, it may cook faster or slower than your previous oven, so the temperature calibration can be adjusted. It can be changed in Fahrenheit or Celsius.

A minus sign means the oven will be cooler by the displayed amount. The absence of a minus sign means the oven will be warmer by the displayed amount. Use the following chart as a guide.

ADJUSTMENT °F

COOKS FOOD

(ADJUSTMENT °C)


5° to 10°F (3° to 6°C)

...a little more


15° to 20°F (9° to 12°C)

...moderately more


25° to 35°F (15° to 21°C)

...much more


-5° to -10°F (-3° to -6°C)

...a little less


-15° to -20°F (-9° to -12°C)

...moderately less


-25° to -35°F (-15° to -21°C)

...much less


To Adjust Oven Temperature Calibration:

1.Press and hold CLOCK until the oven display shows the current calibration, for example, “00,” if not yet adjusted, or about 5 seconds.

2.Press the “up” or “down” arrow pads to increase or to decrease the temperature in 5°F (3°C) amounts. The adjustment can be set between 35°F (19°C) and -35°F (-19°C).

3.Press CLOCK to enter the new temperature.

8

Page 8
Image 8
Whirlpool W10162215A manual Oven USE

W10162215A specifications

The Whirlpool W10162215A is a top-tier oven rack designed specifically for use with various Whirlpool oven models. This essential kitchen accessory offers functionality, versatility, and durability, making it a valuable addition to any home cooking experience. Whether you're baking, broiling, or roasting, this oven rack accommodates a wide range of culinary tasks with ease.

One of the standout features of the W10162215A oven rack is its sturdy construction. Made from high-quality materials, it is designed to withstand high temperatures and heavy loads, ensuring that it remains reliable during any cooking process. This durability is particularly important for baking enthusiasts who often use multiple racks for various dishes simultaneously. The robust build also means that it can be used for a long time without showing signs of wear and tear.

Another key characteristic of the W10162215A is its adjustable configuration. The rack fits seamlessly into different oven models, allowing users to customize their cooking space according to their needs. It can be positioned at different heights, providing flexibility for various cooking methods. This adjustability is beneficial when baking large items such as turkey or multiple tray-bakes, as it helps maximize oven space efficiently.

The design of the W10162215A emphasizes ease of use. Its smooth glide mechanism allows for effortless insertion and removal, making it user-friendly, even for those who may not be as experienced in the kitchen. Additionally, the rack’s design promotes optimal airflow around dishes, ensuring even cooking and browning, which is essential for achieving perfect results with baked goods.

Cleaning the W10162215A is straightforward, as its materials are not only resilient but also resistant to staining and odors. A simple wipe-down is often sufficient to keep it looking clean and new, which adds to its convenience for busy home cooks.

In summary, the Whirlpool W10162215A oven rack exemplifies modern kitchen design through its durable construction, adjustable functionality, user-friendly features, and easy maintenance. Ideal for both novice cooks and seasoned chefs, it enhances the cooking experience by providing reliable support for a variety of dishes, making it a worthwhile investment for any kitchen.