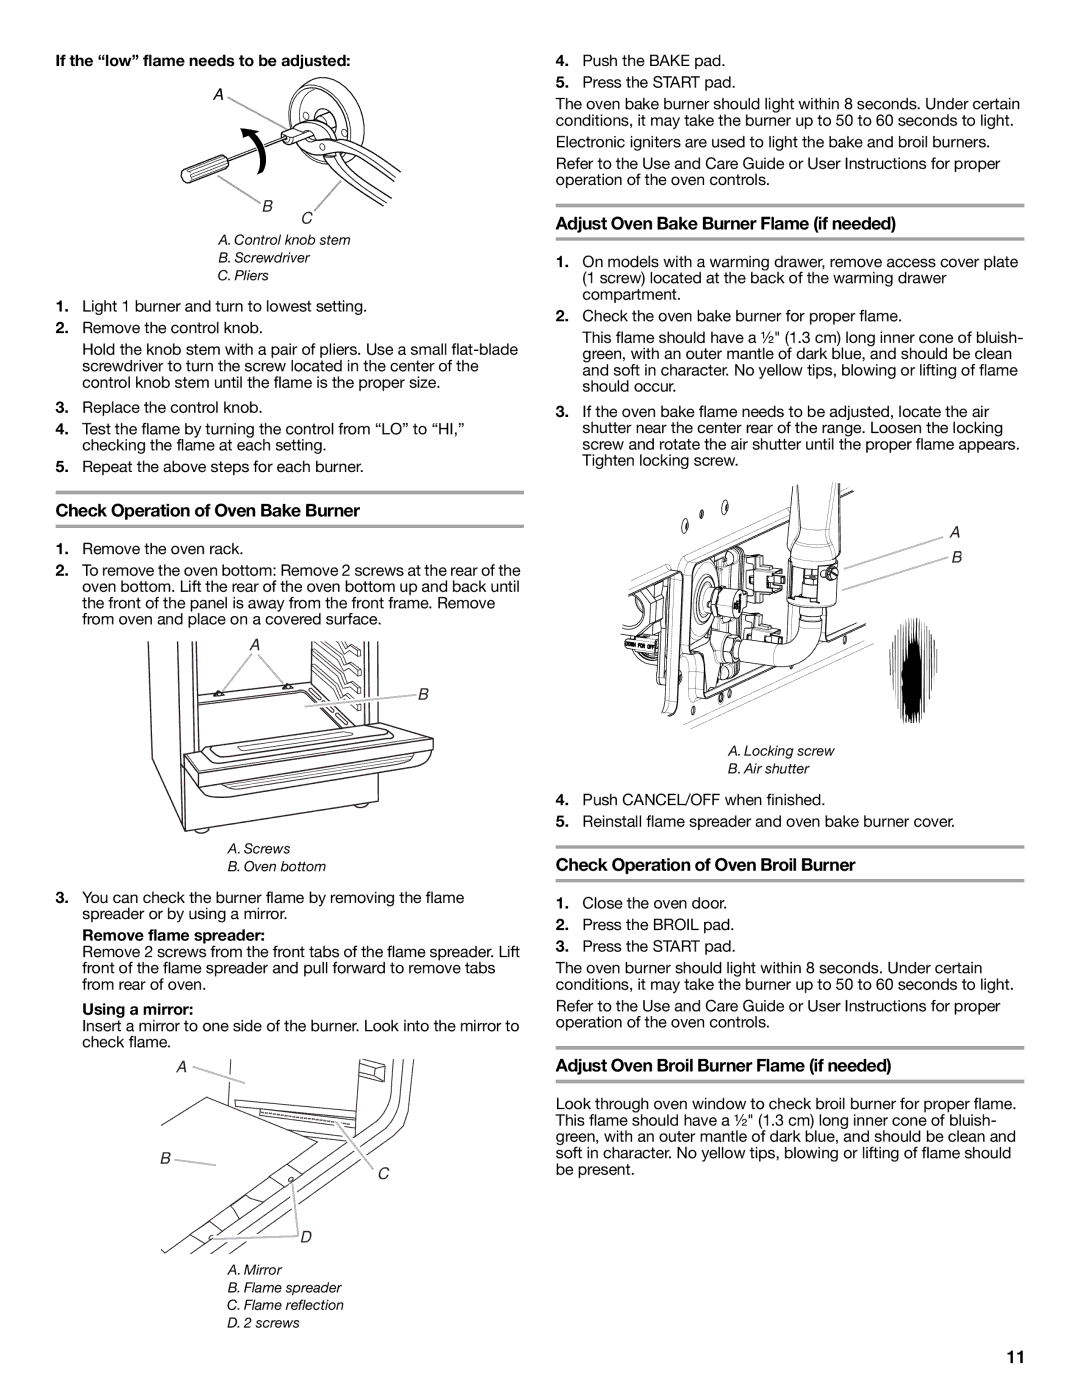
If the “low” flame needs to be adjusted:

A

B

C

A.Control knob stem

B.Screwdriver

C.Pliers

1.Light 1 burner and turn to lowest setting.

2.Remove the control knob.

Hold the knob stem with a pair of pliers. Use a small flat-blade screwdriver to turn the screw located in the center of the control knob stem until the flame is the proper size.

3.Replace the control knob.

4.Test the flame by turning the control from “LO” to “HI,” checking the flame at each setting.

5.Repeat the above steps for each burner.

4.Push the BAKE pad.

5.Press the START pad.

The oven bake burner should light within 8 seconds. Under certain conditions, it may take the burner up to 50 to 60 seconds to light.

Electronic igniters are used to light the bake and broil burners.

Refer to the Use and Care Guide or User Instructions for proper operation of the oven controls.

Adjust Oven Bake Burner Flame (if needed)

1.On models with a warming drawer, remove access cover plate (1 screw) located at the back of the warming drawer compartment.

2.Check the oven bake burner for proper flame.

This flame should have a ½" (1.3 cm) long inner cone of bluish- green, with an outer mantle of dark blue, and should be clean and soft in character. No yellow tips, blowing or lifting of flame should occur.

3.If the oven bake flame needs to be adjusted, locate the air shutter near the center rear of the range. Loosen the locking screw and rotate the air shutter until the proper flame appears. Tighten locking screw.

Check Operation of Oven Bake Burner

1.Remove the oven rack.

2.To remove the oven bottom: Remove 2 screws at the rear of the oven bottom. Lift the rear of the oven bottom up and back until the front of the panel is away from the front frame. Remove from oven and place on a covered surface.

A

B

A.Screws

B.Oven bottom

3.You can check the burner flame by removing the flame spreader or by using a mirror.

Remove flame spreader:

Remove 2 screws from the front tabs of the flame spreader. Lift front of the flame spreader and pull forward to remove tabs from rear of oven.

Using a mirror:

Insert a mirror to one side of the burner. Look into the mirror to check flame.

A

B

C

D

A.Mirror

B.Flame spreader

C.Flame reflection

D.2 screws

A

B

A. Locking screw

B. Air shutter

4.Push CANCEL/OFF when finished.

5.Reinstall flame spreader and oven bake burner cover.

Check Operation of Oven Broil Burner

1.Close the oven door.

2.Press the BROIL pad.

3.Press the START pad.

The oven burner should light within 8 seconds. Under certain conditions, it may take the burner up to 50 to 60 seconds to light.

Refer to the Use and Care Guide or User Instructions for proper operation of the oven controls.

Adjust Oven Broil Burner Flame (if needed)

Look through oven window to check broil burner for proper flame. This flame should have a ½" (1.3 cm) long inner cone of bluish- green, with an outer mantle of dark blue, and should be clean and soft in character. No yellow tips, blowing or lifting of flame should be present.

11

Page 11
Image 11
Whirlpool W10526974A installation instructions Adjust Oven Bake Burner Flame if needed, Check Operation of Oven Bake Burner

W10526974A specifications

The Whirlpool W10526974A is an exceptional appliance designed to enhance the efficiency and convenience of modern laundry routines. This model is a replacement part specifically crafted for certain Whirlpool washing machines, ensuring compatibility and optimal performance. Its design reflects the brand's commitment to quality, integrating advanced technologies aimed at improving the user experience.

One of the standout features of the Whirlpool W10526974A is its durable construction. Made from high-quality materials, this part is designed to withstand significant wear and tear, ensuring longevity and reliability. This resilience is particularly important in household appliances, where frequent use can lead to common issues. By investing in the W10526974A, users can maintain the performance of their washing machines without compromising on durability.

Moreover, the Whirlpool W10526974A incorporates innovative technologies that contribute to its functionality. It is engineered with precision to ensure smooth operation, minimizing the risk of malfunctions and breakdowns. This technology not only enhances the longevity of the washing machine but also improves efficiency, allowing users to complete their laundry tasks quickly and effectively.

Another advantage of this replacement part is its user-friendly design. Installation is straightforward, making it accessible for individuals with basic DIY skills. Whirlpool has taken user convenience into account, providing clear instructions that accompany the part, enabling quick and hassle-free setup. This feature eliminates the need for professional assistance, saving both time and money for homeowners.

In addition to its practical features, the Whirlpool W10526974A also aligns with modern sustainability practices. Whirlpool is known for its commitment to environmentally friendly products, and this model is no exception. By ensuring efficient performance, it helps reduce water and energy consumption, contributing to a more sustainable household.

Lastly, Whirlpool's reputation for excellent customer support and service adds to the overall appeal of the W10526974A. Owners can have peace of mind knowing that they are backed by a trusted brand that prioritizes customer satisfaction. In conclusion, the Whirlpool W10526974A is a reliable, efficient, and user-friendly part that enhances the performance of compatible washing machines, making it a valuable addition to any laundry setup.