.

Shift

ArmFriction

Wheel

Hex Shaft

Bearing

Sprocket


Figure 25

Figure 23

NOTE:

If you placed plastic under the gas cap, be


certain to remove it.


Plate

Friction

Screw

Wheel

Rubber

Figure 24

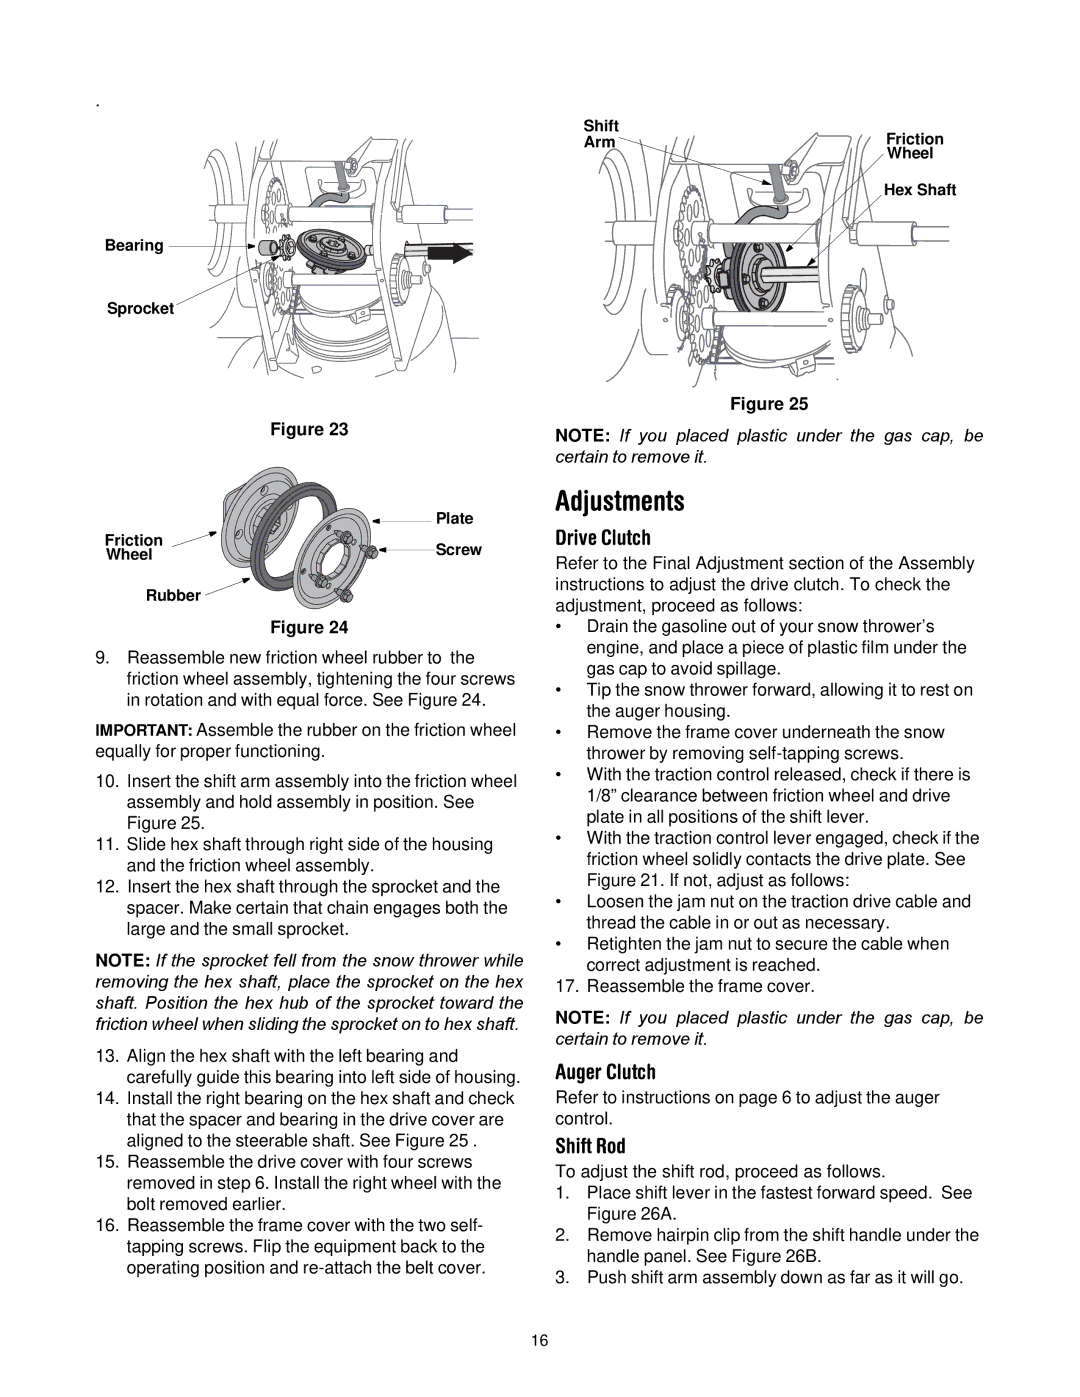
9.Reassemble new friction wheel rubber to the friction wheel assembly, tightening the four screws in rotation and with equal force. See Figure 24.

IMPORTANT: Assemble the rubber on the friction wheel equally for proper functioning.

10.Insert the shift arm assembly into the friction wheel assembly and hold assembly in position. See Figure 25.

11.Slide hex shaft through right side of the housing and the friction wheel assembly.

12.Insert the hex shaft through the sprocket and the spacer. Make certain that chain engages both the large and the small sprocket.

NOTE: If the sprocket fell from the snow thrower while removing the hex shaft, place the sprocket on the hex shaft. Position the hex hub of the sprocket toward the friction wheel when sliding the sprocket on to hex shaft.

13.Align the hex shaft with the left bearing and carefully guide this bearing into left side of housing.

14.Install the right bearing on the hex shaft and check that the spacer and bearing in the drive cover are aligned to the steerable shaft. See Figure 25 .

15.Reassemble the drive cover with four screws removed in step 6. Install the right wheel with the bolt removed earlier.

16.Reassemble the frame cover with the two self- tapping screws. Flip the equipment back to the operating position and re-attach the belt cover.

Adjustments

Drive Clutch

Refer to the Final Adjustment section of the Assembly instructions to adjust the drive clutch. To check the adjustment, proceed as follows:

Drain the gasoline out of your snow thrower’s engine, and place a piece of plastic film under the gas cap to avoid spillage.

Tip the snow thrower forward, allowing it to rest on the auger housing.

Remove the frame cover underneath the snow thrower by removing self-tapping screws.

With the traction control released, check if there is 1/8” clearance between friction wheel and drive plate in all positions of the shift lever.

With the traction control lever engaged, check if the friction wheel solidly contacts the drive plate. See Figure 21. If not, adjust as follows:

Loosen the jam nut on the traction drive cable and thread the cable in or out as necessary.

Retighten the jam nut to secure the cable when correct adjustment is reached.

17. Reassemble the frame cover.

NOTE: If you placed plastic under the gas cap, be certain to remove it.

Auger Clutch

Refer to instructions on page 6 to adjust the auger control.

Shift Rod

To adjust the shift rod, proceed as follows.

1.Place shift lever in the fastest forward speed. See Figure 26A.

2.Remove hairpin clip from the shift handle under the handle panel. See Figure 26B.

3.Push shift arm assembly down as far as it will go.

16

Page 16
Image 16
White Outdoor 500 manual Adjustments, Drive Clutch, Auger Clutch, Shift Rod

500 specifications

The White Outdoor 500 is a rugged and versatile lawn and garden tractor designed for homeowners looking to tackle a variety of outdoor tasks with ease. Renowned for its robust construction and reliable performance, the White Outdoor 500 is equipped with a host of features that make it a valuable addition to any landscape maintenance arsenal.

One of the standout features of the White Outdoor 500 is its powerful engine, typically powered by a dependable Briggs & Stratton or Kohler engine. This engine provides ample horsepower to handle a wide range of conditions, from mowing grassy lawns to tackling tougher terrain and heavy gardening tasks. The engine is designed for easy starting and efficient fuel consumption, ensuring that homeowners can complete their tasks without frequent interruptions for refueling.

The tractor is equipped with a hydrostatic transmission, offering seamless acceleration and smooth operation. This user-friendly system allows operators to easily control speed and direction without the need for shifting gears, enabling a more comfortable mowing experience. The tractor's design promotes maneuverability, making it suitable for navigating around obstacles like trees and flower beds.

Another key characteristic of the White Outdoor 500 is its cutting deck. The tractor typically features a wide, multi-blade cutting system that ensures a clean and even cut across various grass types and lengths. Many models include adjustable cutting heights, allowing users to customize their lawn care according to seasonal requirements or personal preferences. The robust construction of the deck ensures durability, even under the rigors of regular use.

The White Outdoor 500 also prioritizes comfort and ease of use. With an ergonomic seat design, users can enjoy extended mowing sessions without experiencing fatigue. The placement of controls is intuitive, making it easy to operate various functions like headlights, deck engagement, and throttle adjustments.

In addition, the tractor often features advanced technologies such as a built-in mulching system and bagging capabilities that allow homeowners to collect clippings for easy disposal or recycling. As a result, maintaining a tidy lawn becomes a simple affair.

Overall, the White Outdoor 500 is a reliable and efficient lawn tractor that combines power, comfort, and advanced features for a superior mowing experience, making it a popular choice among homeowners looking for a dependable solution to their outdoor maintenance needs.