OPERATING INSTRUCTIONS
PRODUCT MAY VARY SLIGHTLY FROM ILLUSTRATIONS
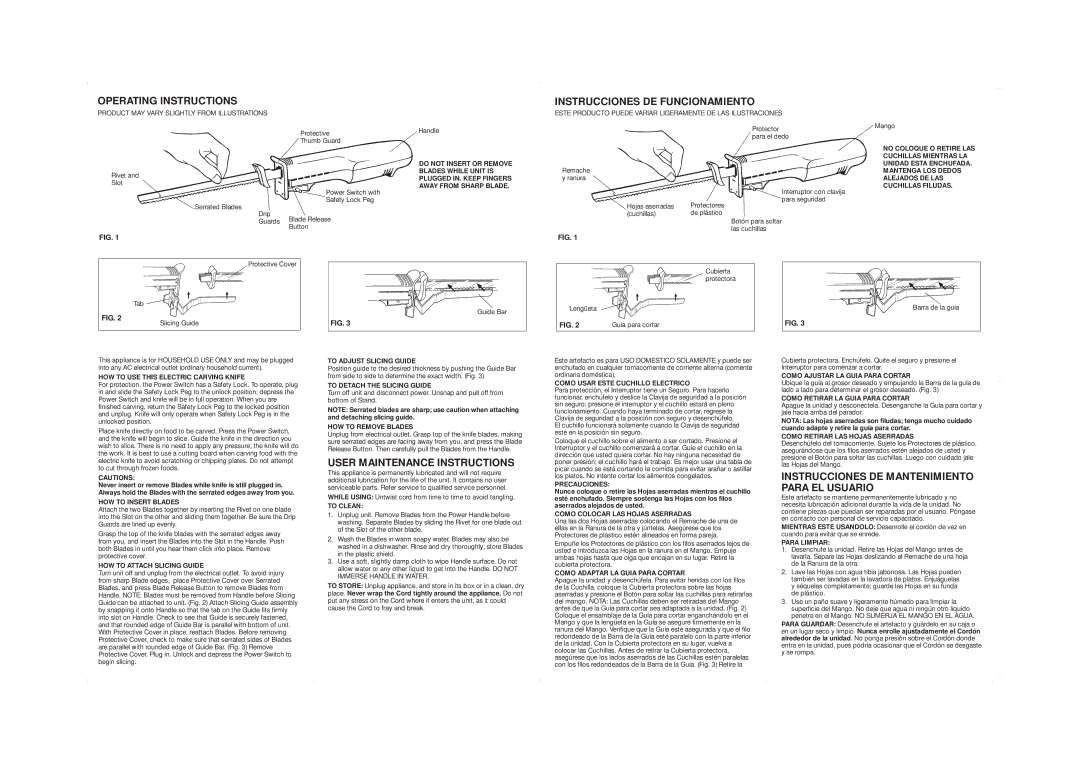
Protective
Thumb Guard
Rivet and
Slot
Power Switch with
Safety Lock Peg
Serrated Blades
Drip
Guards Blade Release
Button
Handle
DO NOT INSERT OR REMOVE BLADES WHILE UNIT IS PLUGGED IN. KEEP FINGERS AWAY FROM SHARP BLADE.
INSTRUCCIONES DE FUNCIONAMIENTO
ESTE PRODUCTO PUEDE VARIAR LIGERAMENTE DE LAS ILUSTRACIONES
Protector para el dedo
Remache y ranura
Interruptor con clavija para seguridad
Hojas aserradas | Protectores |
(cuchillas) | de plástico |
Botón para soltar las cuchillas
Mango
NO COLOQUE O RETIRE LAS CUCHILLAS MIENTRAS LA UNIDAD ESTA ENCHUFADA. MANTENGA LOS DEDOS ALEJADOS DE LAS CUCHILLAS FILUDAS.
FIG. 1
Protective Cover
Tab
FIG. 2
Slicing Guide
This appliance is for HOUSEHOLD USE ONLY and may be plugged into any AC electrical outlet (ordinary household current).
HOW TO USE THIS ELECTRIC CARVING KNIFE
For protection, the Power Switch has a Safety Lock. To operate, plug in and slide the Safety Lock Peg to the unlock position; depress the Power Switch and knife will be in full operation. When you are finished carving, return the Safety Lock Peg to the locked position and unplug. Knife will only operate when Safety Lock Peg is in the unlocked position.
Place knife directly on food to be carved. Press the Power Switch, and the knife will begin to slice. Guide the knife in the direction you wish to slice. There is no need to apply any pressure; the knife will do the work. It is best to use a cutting board when carving food with the electric knife to avoid scratching or chipping plates. Do not attempt to cut through frozen foods.
CAUTIONS:
Never insert or remove Blades while knife is still plugged in. Always hold the Blades with the serrated edges away from you.
HOW TO INSERT BLADES
Attach the two Blades together by inserting the Rivet on one blade into the Slot on the other and sliding them together. Be sure the Drip Guards are lined up evenly.
Grasp the top of the knife blades with the serrated edges away from you, and insert the Blades into the Slot in the Handle. Push both Blades in until you hear them click into place. Remove protective cover.
HOW TO ATTACH SLICING GUIDE
Turn unit off and unplug from the electrical outlet. To avoid injury from sharp Blade edges, place Protective Cover over Serrated Blades, and press Blade Release Button to remove Blades from Handle. NOTE: Blades must be removed from Handle before Slicing Guide can be attached to unit. (Fig. 2) Attach Slicing Guide assembly by snapping it onto Handle so that the tab on the Guide fits firmly into slot on Handle. Check to see that Guide is securely fastened, and that rounded edge of Guide Bar is parallel with bottom of unit. With Protective Cover in place, reattach Blades. Before removing Protective Cover, check to make sure that serrated sides of Blades are parallel with rounded edge of Guide Bar. (Fig. 3) Remove Protective Cover. Plug in. Unlock and depress the Power Switch to begin slicing.
Guide Bar
FIG. 3
TO ADJUST SLICING GUIDE
Position guide to the desired thickness by pushing the Guide Bar from side to side to determine the exact width. (Fig. 3)
TO DETACH THE SLICING GUIDE
Turn off unit and disconnect power. Unsnap and pull off from bottom of Stand.
NOTE: Serrated blades are sharp; use caution when attaching and detaching slicing guide.
HOW TO REMOVE BLADES
Unplug from electrical outlet. Grasp top of the knife blades, making sure serrated edges are facing away from you, and press the Blade Release Button. Then carefully pull the Blades from the Handle.
USER MAINTENANCE INSTRUCTIONS
This appliance is permanently lubricated and will not require additional lubrication for the life of the unit. It contains no user serviceable parts. Refer service to qualified service personnel.
WHILE USING: Untwist cord from time to time to avoid tangling.
TO CLEAN:
1.Unplug unit. Remove Blades from the Power Handle before washing. Separate Blades by sliding the Rivet for one blade out of the Slot of the other blade.
2.Wash the Blades in warm soapy water. Blades may also be washed in a dishwasher. Rinse and dry thoroughly; store Blades in the plastic shield.
3.Use a soft, slightly damp cloth to wipe Handle surface. Do not allow water or any other liquid to get into the Handle. DO NOT IMMERSE HANDLE IN WATER.
TO STORE: Unplug appliance, and store in its box or in a clean, dry place. Never wrap the Cord tightly around the appliance. Do not put any stress on the Cord where it enters the unit, as it could cause the Cord to fray and break.
FIG. 1
Cubierta ![]()
![]() protectora
protectora
Lengüeta
FIG. 2 |
| Guía para cortar |
Este artefacto es para USO DOMESTICO SOLAMENTE y puede ser enchufado en cualquier tomacorriente de corriente alterna (corriente ordinaria doméstica).
COMO USAR ESTE CUCHILLO ELECTRICO
Para protección, el Interruptor tiene un Seguro. Para hacerlo funcionar, enchúfelo y deslice la Clavija de seguridad a la posición sin seguro; presione el interruptor y el cuchillo estará en pleno funcionamiento. Cuando haya terminado de cortar, regrese la Clavija de seguridad a la posición con seguro y desenchúfelo.
El cuchillo funcionará solamente cuando la Clavija de seguridad esté en la posición sin seguro.
Coloque el cuchillo sobre el alimento a ser cortado. Presione el Interruptor y el cuchillo comenzará a cortar. Guíe el cuchillo en la dirección que usted quiera cortar. No hay ninguna necesidad de poner presión; el cuchillo hará el trabajo. Es mejor usar una tabla de picar cuando se está cortando la comida para evitar arañar o astillar los platos. No intente cortar los alimentos congelados.
PRECAUCIONES:
Nunca coloque o retire las Hojas aserradas mientras el cuchillo esté enchufado. Siempre sostenga las Hojas con los filos aserrados alejados de usted.
COMO COLOCAR LAS HOJAS ASERRADAS
Una las dos Hojas aserradas colocando el Remache de una de ellas en la Ranura de la otra y júntelas. Asegúrese que los Protectores de plástico estén alineados en forma pareja.
Empuñe los Protectores de plástico con los filos aserrados lejos de usted e introduzca las Hojas en la ranura en el Mango. Empuje ambas hojas hasta que oiga que encajan en su lugar. Retire la cubierta protectora.
COMO ADAPTAR LA GUIA PARA CORTAR
Apague la unidad y desenchúfela. Para evitar heridas con los filos de la Cuchilla, coloque la Cubierta protectora sobre las hojas aserradas y presione el Botón para soltar las cuchillas para retirarlas del mango. NOTA: Las Cuchillas deben ser retiradas del Mango antes de que la Guía para cortar sea adaptada a la unidad. (Fig. 2) Coloque el ensamblaje de la Guía para cortar enganchándolo en el Mango y que la lengüeta en la Guía se asegure firmemente en la ranura del Mango. Verifique que la Guía esté asegurada y que el filo redondeado de la Barra de la Guía esté paralelo con la parte inferior de la unidad. Con la Cubierta protectora en su lugar, vuelva a colocar las Cuchillas. Antes de retirar la Cubierta protectora, asegúrese que los lados aserrados de las Cuchillas estén paralelas con los filos redondeados de la Barra de la Guía. (Fig. 3) Retire la
Barra de la guía
FIG. 3
Cubierta protectora. Enchúfelo. Quite el seguro y presione el Interruptor para comenzar a cortar.
COMO AJUSTAR LA GUIA PARA CORTAR
Ubique la guía al grosor deseado y empujando la Barra de la guía de lado a lado para determinar el grosor deseado. (Fig. 3)
COMO RETIRAR LA GUIA PARA CORTAR
Apague la unidad y desconéctela. Desenganche la Guía para cortar y jale hacia arriba del parador.
NOTA: Las hojas aserradas son filudas; tenga mucho cuidado cuando adapte y retire la guía para cortar.
COMO RETIRAR LAS HOJAS ASERRADAS
Desenchúfelo del tomacorriente. Sujete los Protectores de plástico, asegurándose que los filos aserrados estén alejados de usted y presione el Botón para soltar las cuchillas. Luego con cuidado jale las Hojas del Mango.
INSTRUCCIONES DE MANTENIMIENTO PARA EL USUARIO
Este artefacto se mantiene permanentemente lubricado y no necesita lubricación adicional durante la vida de la unidad. No contiene piezas que puedan ser reparadas por el usuario. Póngase en contacto con personal de servicio capacitado.
MIENTRAS ESTE USANDOLO: Desenrolle el cordón de vez en cuando para evitar que se enrede.
PARA LIMPIAR:
1.Desenchufe la unidad. Retire las Hojas del Mango antes de lavarla. Separe las Hojas deslizando el Remache de una hoja de la Ranura de la otra.
2.Lave las Hojas con agua tibia jabonosa. Las Hojas pueden también ser lavadas en la lavadora de platos. Enjuáguelas y séquelas completamente; guarde las Hojas en su funda de plástico.
3.Use un paño suave y ligeramente húmedo para limpiar la superficie del Mango. No deje que agua ni ningún otro líquido penetre en el Mango. NO SUMERJA EL MANGO EN EL AGUA.
PARA GUARDAR: Desenchufe el artefacto y guárdelo en su caja o en un lugar seco y limpio. Nunca enrolle ajustadamente el Cordón alrededor de la unidad. No ponga presión sobre el Cordón donde entra en la unidad, pues podría ocasionar que el Cordón se desgaste y se rompa.