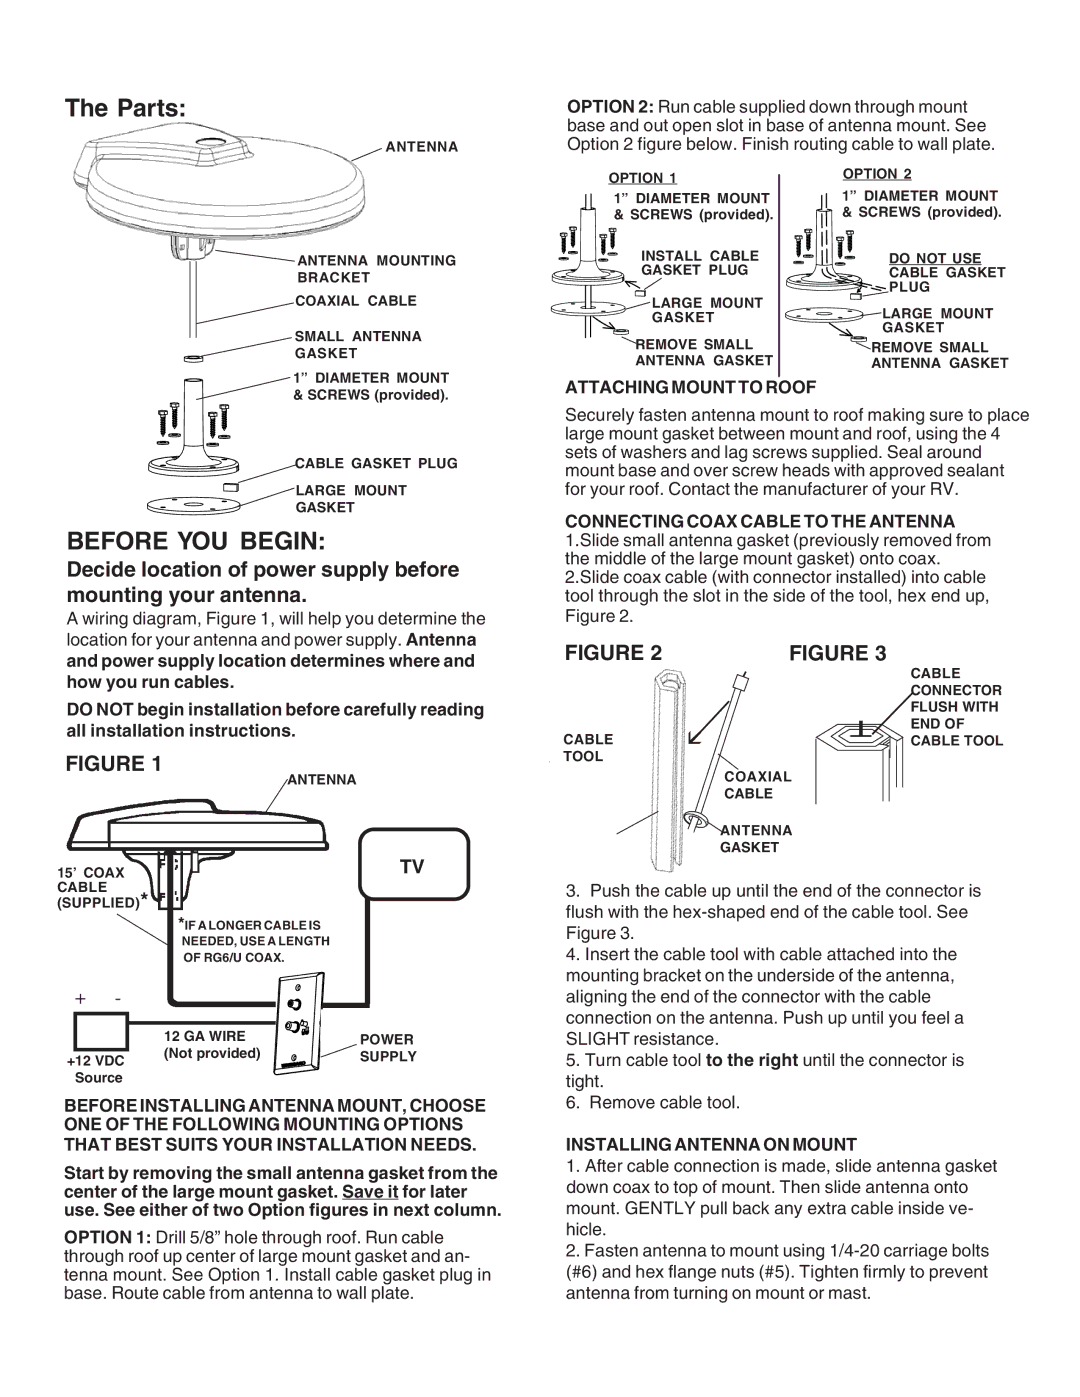
The Parts:
ANTENNA
OPTION 2: Run cable supplied down through mount base and out open slot in base of antenna mount. See Option 2 figure below. Finish routing cable to wall plate.
![]() ANTENNA MOUNTING
ANTENNA MOUNTING
BRACKET
COAXIAL CABLE
SMALL ANTENNA
GASKET
OPTION 1
1” DIAMETER MOUNT & SCREWS (provided).
INSTALL CABLE
GASKET PLUG
![]()
![]()
![]()
![]()
![]()
![]()
![]()
![]()
![]()
![]() LARGE MOUNT
LARGE MOUNT ![]() GASKET
GASKET
![]() REMOVE SMALL
REMOVE SMALL
ANTENNA GASKET
OPTION 2
1” DIAMETER MOUNT & SCREWS (provided).
DO NOT USE
CABLE GASKET
PLUG
![]()
![]()
![]()
![]()
![]()
![]() LARGE MOUNT
LARGE MOUNT
GASKET
![]() REMOVE SMALL ANTENNA GASKET
REMOVE SMALL ANTENNA GASKET
1” DIAMETER MOUNT & SCREWS (provided).
CABLE GASKET PLUG
LARGE MOUNT
GASKET
BEFORE YOU BEGIN:
Decide location of power supply before mounting your antenna.
A wiring diagram, Figure 1, will help you determine the location for your antenna and power supply. Antenna
ATTACHING MOUNT TO ROOF
Securely fasten antenna mount to roof making sure to place large mount gasket between mount and roof, using the 4 sets of washers and lag screws supplied. Seal around mount base and over screw heads with approved sealant for your roof. Contact the manufacturer of your RV.
CONNECTING COAX CABLE TO THE ANTENNA
1.Slide small antenna gasket (previously removed from the middle of the large mount gasket) onto coax. 2.Slide coax cable (with connector installed) into cable tool through the slot in the side of the tool, hex end up, Figure 2.
and power supply location determines where and how you run cables.
DO NOT begin installation before carefully reading all installation instructions.
FIGURE 1
ANTENNA
FIGURE 2 | FIGURE 3 |
CABLE
TOOL
COAXIAL
CABLE
ANTENNA
GASKET
CABLE CONNECTOR FLUSH WITH END OF CABLE TOOL
15’ COAX CABLE (SUPPLIED)*
+-
TV
*IF A LONGER CABLE IS |
NEEDED, USE A LENGTH |
OF RG6/U COAX. |
3. Push the cable up until the end of the connector is |
flush with the |
Figure 3. |
4. Insert the cable tool with cable attached into the |
mounting bracket on the underside of the antenna, |
aligning the end of the connector with the cable |
connection on the antenna. Push up until you feel a |
| 12 GA WIRE | POWER |
+12 VDC | (Not provided) | SUPPLY |
|
| |
Source |
|
|
BEFORE INSTALLING ANTENNA MOUNT, CHOOSE ONE OF THE FOLLOWING MOUNTING OPTIONS THAT BEST SUITS YOUR INSTALLATION NEEDS.
Start by removing the small antenna gasket from the center of the large mount gasket. Save it for later use. See either of two Option figures in next column.
OPTION 1: Drill 5/8” hole through roof. Run cable through roof up center of large mount gasket and an- tenna mount. See Option 1. Install cable gasket plug in base. Route cable from antenna to wall plate.
SLIGHT resistance. |
5. Turn cable tool to the right until the connector is |
tight. |
6. Remove cable tool. |
INSTALLING ANTENNA ON MOUNT
1.After cable connection is made, slide antenna gasket down coax to top of mount. Then slide antenna onto mount. GENTLY pull back any extra cable inside ve- hicle.
2.Fasten antenna to mount using