JCP_SlowCooker08 10/14/08 5:34 PM Page 9
Using Your Slow Cooker
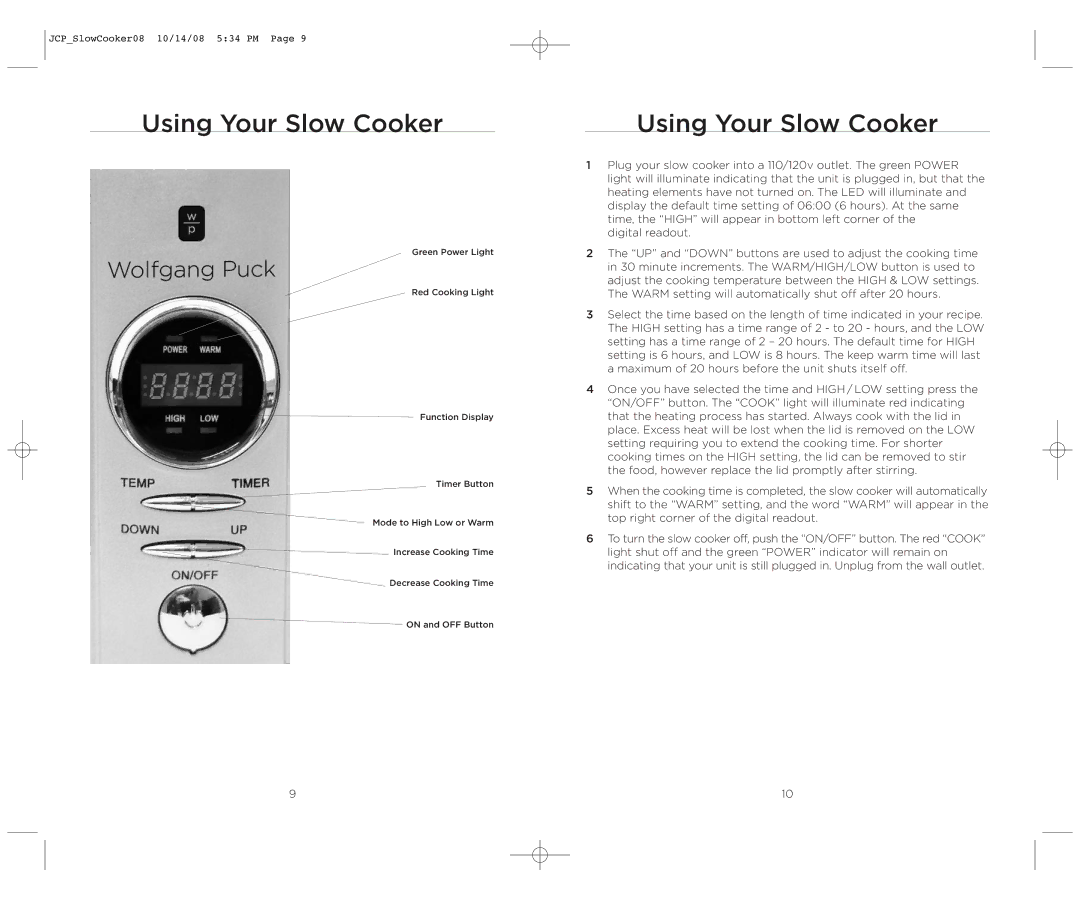
Green Power Light
Red Cooking Light
Function Display
Timer Button
Mode to High Low or Warm
![]() Increase Cooking Time
Increase Cooking Time
Decrease Cooking Time
![]() ON and OFF Button
ON and OFF Button
Using Your Slow Cooker
1Plug your slow cooker into a 110/120v outlet. The green POWER light will illuminate indicating that the unit is plugged in, but that the heating elements have not turned on. The LED will illuminate and display the default time setting of 06:00 (6 hours). At the same time, the “HIGH” will appear in bottom left corner of the
digital readout.
2The “UP” and “DOWN” buttons are used to adjust the cooking time in 30 minute increments. The WARM/HIGH/LOW button is used to adjust the cooking temperature between the HIGH & LOW settings. The WARM setting will automatically shut off after 20 hours.
3Select the time based on the length of time indicated in your recipe. The HIGH setting has a time range of 2 - to 20 - hours, and the LOW setting has a time range of 2 – 20 hours. The default time for HIGH setting is 6 hours, and LOW is 8 hours. The keep warm time will last a maximum of 20 hours before the unit shuts itself off.
4Once you have selected the time and HIGH / LOW setting press the “ON/OFF” button. The “COOK” light will illuminate red indicating that the heating process has started. Always cook with the lid in place. Excess heat will be lost when the lid is removed on the LOW setting requiring you to extend the cooking time. For shorter cooking times on the HIGH setting, the lid can be removed to stir the food, however replace the lid promptly after stirring.
5When the cooking time is completed, the slow cooker will automatically shift to the “WARM” setting, and the word “WARM” will appear in the top right corner of the digital readout.
6To turn the slow cooker off, push the “ON/OFF” button. The red “COOK” light shut off and the green “POWER” indicator will remain on indicating that your unit is still plugged in. Unplug from the wall outlet.
9 | 10 |
