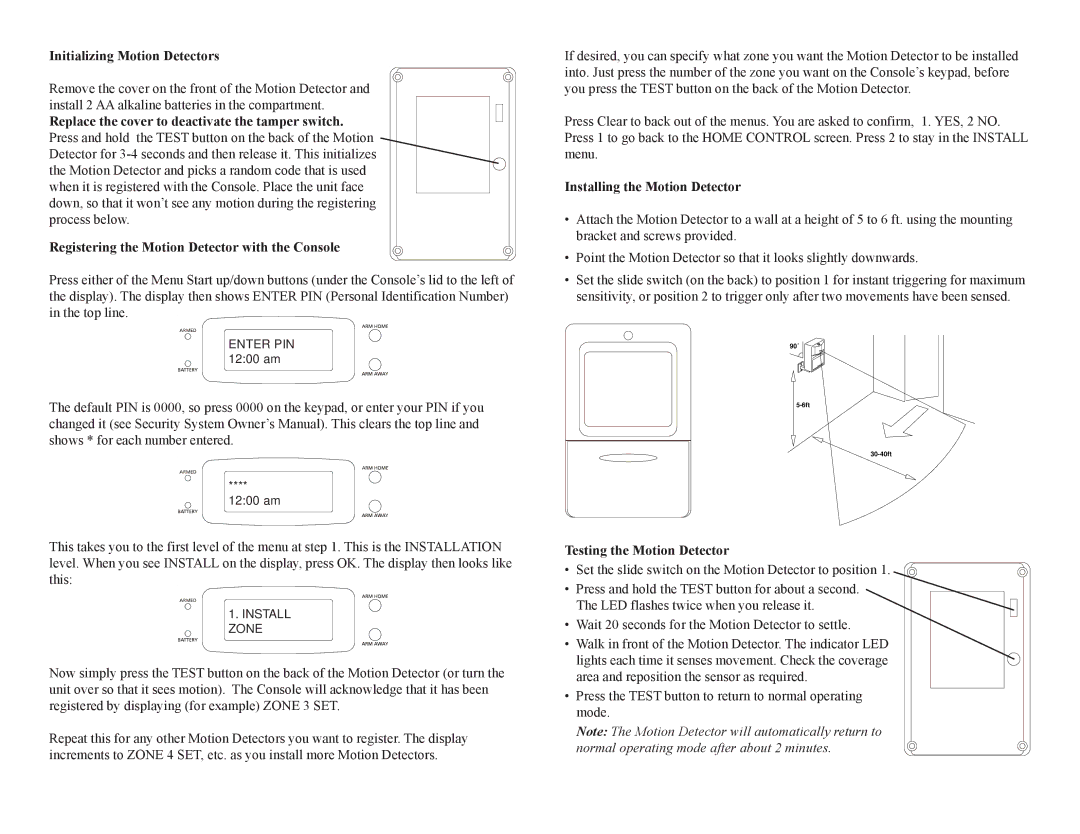
Initializing Motion Detectors

Remove the cover on the front of the Motion Detector and install 2 AA alkaline batteries in the compartment.

Replace the cover to deactivate the tamper switch. Press and hold the TEST button on the back of the Motion Detector for 3-4 seconds and then release it. This initializes the Motion Detector and picks a random code that is used when it is registered with the Console. Place the unit face down, so that it won’t see any motion during the registering process below.

Registering the Motion Detector with the Console

Press either of the Menu Start up/down buttons (under the Console’s lid to the left of the display). The display then shows ENTER PIN (Personal Identification Number) in the top line.

ENTER PIN 12:00 am

The default PIN is 0000, so press 0000 on the keypad, or enter your PIN if you changed it (see Security System Owner’s Manual). This clears the top line and shows * for each number entered.

****

12:00 am

This takes you to the first level of the menu at step 1. This is the INSTALLATION level. When you see INSTALL on the display, press OK. The display then looks like this:

1.INSTALL ZONE

Now simply press the TEST button on the back of the Motion Detector (or turn the unit over so that it sees motion). The Console will acknowledge that it has been registered by displaying (for example) ZONE 3 SET.

Repeat this for any other Motion Detectors you want to register. The display increments to ZONE 4 SET, etc. as you install more Motion Detectors.

If desired, you can specify what zone you want the Motion Detector to be installed into. Just press the number of the zone you want on the Console’s keypad, before you press the TEST button on the back of the Motion Detector.

Press Clear to back out of the menus. You are asked to confirm, 1. YES, 2 NO. Press 1 to go back to the HOME CONTROL screen. Press 2 to stay in the INSTALL menu.

Installing the Motion Detector

Attach the Motion Detector to a wall at a height of 5 to 6 ft. using the mounting bracket and screws provided.

Point the Motion Detector so that it looks slightly downwards.

Set the slide switch (on the back) to position 1 for instant triggering for maximum sensitivity, or position 2 to trigger only after two movements have been sensed.

90˚

5-6ft

30-40ft

Testing the Motion Detector

Set the slide switch on the Motion Detector to position 1.

Press and hold the TEST button for about a second. The LED flashes twice when you release it.

Wait 20 seconds for the Motion Detector to settle.

Walk in front of the Motion Detector. The indicator LED lights each time it senses movement. Check the coverage area and reposition the sensor as required.

Press the TEST button to return to normal operating mode.

Note: The Motion Detector will automatically return to normal operating mode after about 2 minutes.

Page 1
Image 1
X10 Wireless Technology MS18A owner manual Initializing Motion Detectors, Installing the Motion Detector

MS18A specifications

X10 Wireless Technology has established itself as a pioneer in home automation and control, and one of its standout products is the MS18A Motion Sensor. Designed to enhance security and convenience within residential and commercial properties, the MS18A brings a range of advanced features and reliable technologies to the forefront.

At its core, the MS18A is a passive infrared (PIR) motion sensor that detects motion by measuring changes in infrared radiation within its field of view. This technology enables the device to accurately sense the presence of people or pets, making it an invaluable tool for home security systems.

A noteworthy characteristic of the MS18A is its impressive detection range. The sensor can detect motion within a radius of up to 30 feet, and its 110-degree field of view ensures broad coverage, allowing it to monitor large spaces effectively. This makes it suitable for various applications, from monitoring entry points to overseeing entire rooms.

The MS18A is designed for seamless integration with other X10 wireless devices, which allows for a comprehensive home automation system. When paired with X10 cameras or lighting controllers, the motion sensor can trigger events such as turning on lights or recording video when motion is detected. This feature not only enhances security but also adds convenience to daily life by automating routine tasks.

Power efficiency is another highlight of the MS18A. The sensor is powered by a 9V battery, which ensures long-lasting operation while minimizing the need for frequent replacements. This is particularly advantageous for home or office environments, where maintaining battery levels can be a hassle.

Durability and ease of installation are also key attributes of the MS18A. The device is compact and lightweight, making it easy to mount in various locations. Installation typically requires minimal tools, and its wireless nature eliminates the need for extensive wiring, allowing for a cleaner and more organized setup.

In conclusion, the X10 Wireless Technology MS18A Motion Sensor stands out for its robust motion detection capabilities, effortless integration with other devices, efficient power consumption, and user-friendly installation. With its capacity to enhance security and streamline automation, the MS18A is an excellent investment for anyone looking to improve their home or office environment. As a testament to X10's commitment to innovation, this motion sensor continues to be a popular choice among users seeking reliable wireless solutions.