The X10 SC12A Supervised Security Console with automatic dialer calls friends or relatives in the event of a break in, and plays a message (in your voice). Your friend or neighbor can listen in to your home through the Console’s microphone, and call the police if there’s a problem. Accessories include battery powered Radio Frequency (RF) Door/Window Sensors, battery powered RF Motion Detectors, and RF Keyfob Remote Controls for arming and disarming the system.
Initializing the devices
Initializing Keyfob Remotes
Press and hold the ARM button on the Keyfob remote for 3-4 seconds and then release it. This initializes the remote and picks a random code that is used when it is registered with the Console.
Press either of the Menu up/down buttons. The display then shows ENTER PIN in the top line. Press 0000 on the keypad. This clears the top line and shows * for each number entered.
When you see INSTALL on the display, press OK.
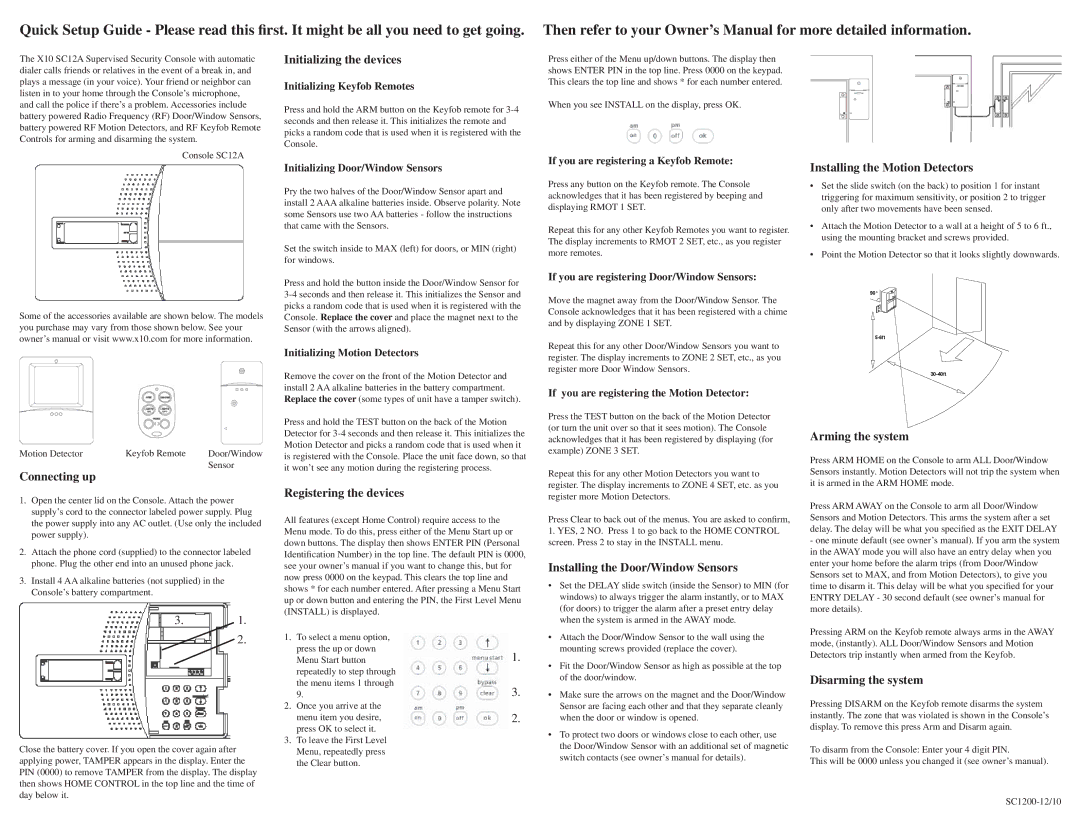
Console SC12A
Some of the accessories available are shown below. The models you purchase may vary from those shown below. See your owner’s manual or visit www.x10.com for more information.
Motion Detector | Keyfob Remote | Door/Window |
| | Sensor |
Connecting up
1. | Open the center lid on the Console. Attach the power | |
| supply’s cord to the connector labeled power supply. Plug |
| the power supply into any AC outlet. (Use only the included |
| power supply). | |
2. | Attach the phone cord (supplied) to the connector labeled |
| phone. Plug the other end into an unused phone jack. | |
3. | Install 4 AA alkaline batteries (not supplied) in the | |
| Console’s battery compartment. | |
| 3. | 1. |
Initializing Door/Window Sensors
Pry the two halves of the Door/Window Sensor apart and install 2 AAA alkaline batteries inside. Observe polarity. Note some Sensors use two AA batteries - follow the instructions that came with the Sensors.
Set the switch inside to MAX (left) for doors, or MIN (right) for windows.
Press and hold the button inside the Door/Window Sensor for 3-4 seconds and then release it. This initializes the Sensor and picks a random code that is used when it is registered with the Console. Replace the cover and place the magnet next to the Sensor (with the arrows aligned).
Initializing Motion Detectors
Remove the cover on the front of the Motion Detector and install 2 AA alkaline batteries in the battery compartment. Replace the cover (some types of unit have a tamper switch).
Press and hold the TEST button on the back of the Motion Detector for 3-4 seconds and then release it. This initializes the Motion Detector and picks a random code that is used when it is registered with the Console. Place the unit face down, so that it won’t see any motion during the registering process.
Registering the devices
All features (except Home Control) require access to the Menu mode. To do this, press either of the Menu Start up or down buttons. The display then shows ENTER PIN (Personal Identification Number) in the top line. The default PIN is 0000, see your owner’s manual if you want to change this, but for now press 0000 on the keypad. This clears the top line and shows * for each number entered. After pressing a Menu Start up or down button and entering the PIN, the First Level Menu (INSTALL) is displayed.
If you are registering a Keyfob Remote:
Press any button on the Keyfob remote. The Console acknowledges that it has been registered by beeping and displaying RMOT 1 SET.
Repeat this for any other Keyfob Remotes you want to register. The display increments to RMOT 2 SET, etc., as you register more remotes.
If you are registering Door/Window Sensors:
Move the magnet away from the Door/Window Sensor. The Console acknowledges that it has been registered with a chime and by displaying ZONE 1 SET.
Repeat this for any other Door/Window Sensors you want to register. The display increments to ZONE 2 SET, etc., as you register more Door Window Sensors.
If you are registering the Motion Detector:
Press the TEST button on the back of the Motion Detector (or turn the unit over so that it sees motion). The Console acknowledges that it has been registered by displaying (for example) ZONE 3 SET.
Repeat this for any other Motion Detectors you want to register. The display increments to ZONE 4 SET, etc. as you register more Motion Detectors.
Press Clear to back out of the menus. You are asked to confirm,
1.YES, 2 NO. Press 1 to go back to the HOME CONTROL screen. Press 2 to stay in the INSTALL menu.
Installing the Door/Window Sensors
•Set the DELAY slide switch (inside the Sensor) to MIN (for windows) to always trigger the alarm instantly, or to MAX (for doors) to trigger the alarm after a preset entry delay when the system is armed in the AWAY mode.
Installing the Motion Detectors
•Set the slide switch (on the back) to position 1 for instant triggering for maximum sensitivity, or position 2 to trigger only after two movements have been sensed.
•Attach the Motion Detector to a wall at a height of 5 to 6 ft., using the mounting bracket and screws provided.
•Point the Motion Detector so that it looks slightly downwards.
90°
5-6ft
30-40ft
Arming the system
Press ARM HOME on the Console to arm ALL Door/Window Sensors instantly. Motion Detectors will not trip the system when it is armed in the ARM HOME mode.
Press ARM AWAY on the Console to arm all Door/Window Sensors and Motion Detectors. This arms the system after a set delay. The delay will be what you specified as the EXIT DELAY
-one minute default (see owner’s manual). If you arm the system in the AWAY mode you will also have an entry delay when you enter your home before the alarm trips (from Door/Window Sensors set to MAX, and from Motion Detectors), to give you time to disarm it. This delay will be what you specified for your ENTRY DELAY - 30 second default (see owner’s manual for more details).
Close the battery cover. If you open the cover again after applying power, TAMPER appears in the display. Enter the PIN (0000) to remove TAMPER from the display. The display then shows HOME CONTROL in the top line and the time of day below it.
1.To select a menu option, press the up or down Menu Start button repeatedly to step through the menu items 1 through 9.
2.Once you arrive at the menu item you desire, press OK to select it.
3.To leave the First Level Menu, repeatedly press the Clear button.
| | • Attach the Door/Window Sensor to the wall using the |
| 1. | mounting screws provided (replace the cover). |
| • Fit the Door/Window Sensor as high as possible at the top |
| |
| | of the door/window. |
| 3. | • Make sure the arrows on the magnet and the Door/Window |
| | Sensor are facing each other and that they separate cleanly |
2.when the door or window is opened.
•To protect two doors or windows close to each other, use the Door/Window Sensor with an additional set of magnetic switch contacts (see owner’s manual for details).
Pressing ARM on the Keyfob remote always arms in the AWAY mode, (instantly). ALL Door/Window Sensors and Motion Detectors trip instantly when armed from the Keyfob.
Disarming the system
Pressing DISARM on the Keyfob remote disarms the system instantly. The zone that was violated is shown in the Console’s display. To remove this press Arm and Disarm again.
To disarm from the Console: Enter your 4 digit PIN.
This will be 0000 unless you changed it (see owner’s manual).
SC1200-12/10