Remote control – RF – Radio Frequency (868,3MHz)
OPERATION:
The RF system (Radio Frequency) is an installation technique that does not use any wiring between the control point(s) and the receiver. This technique is known as “remote control”. Transmission is via radio waves which makes the system ideally suited for use in specific applications such as renovation of interiors, extensions; in existing electrical installations where drilling or channeling work is excluded, offices with movable walls etc, or to avoid the use of complex cabling configurations. It is a modular system consisting of one or more emitters and one or more receivers. The emitters take the form of a
CHARACTERISTICS:
•emitter range: 100m in open air
•no wiring between control points and receivers (RF controlled), only one connection between the
•orientation of emitters is not necessary. Transmission of signals through
•the
•receiver and emitter form one integrated whole
•operating temperature:
•receiver: max. load 4A / 230V~ 50Hz
•emitters + base plate: button with 4 positions
![]() = low
= low
![]() = middle
= middle
![]() = high
= high
![]() = high with timer
= high with timer
-short press (<1.6sec.) = max. speed for 10 minutes
-long press (>1.6sec.) = max. speed for 30 minutes
After this time has elapsed the fan returns to the lowest position.
MOUNTING INSTRUCTIONS AND RECOMMENDATIONS
•Never mount the emitters and/or receivers in a metal distribution box, housing or netting.
•Wherever possible, avoid mounting the emitters and/or receivers in the immediate vicinity of large metal objects.
•Never mount emitters and/or receivers on (or near) the ground.
•Best results are obtained when mounting the receivers as closely to the emitters as possible.
•The presence of metal or moisture in the walls may adversely affect the emitter range.
MOUNTING
Test the emitter before mounting!
The RF emitter can be mounted in two ways:
A) Gluing:
Mounting on a flat base, e.g. glass, paint, varnished wood, tiles...
1 Make sure the base is free from dust and grease.
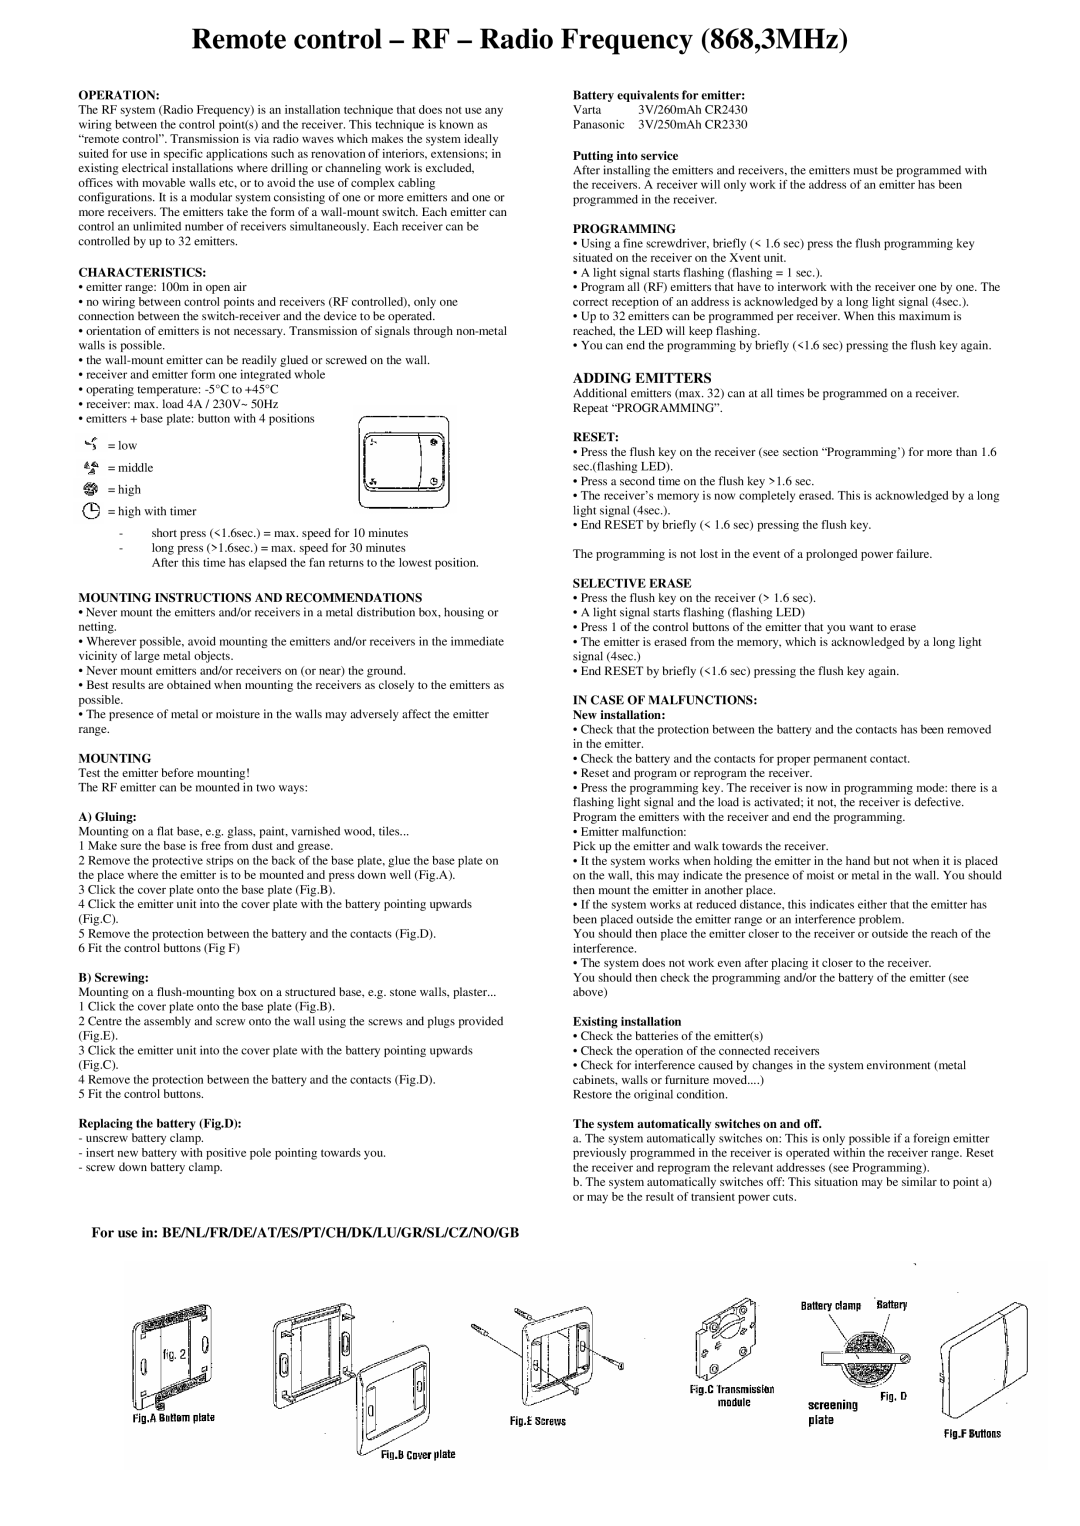
2 Remove the protective strips on the back of the base plate, glue the base plate on the place where the emitter is to be mounted and press down well (Fig.A).
3 Click the cover plate onto the base plate (Fig.B).
4 Click the emitter unit into the cover plate with the battery pointing upwards (Fig.C).
5 Remove the protection between the battery and the contacts (Fig.D).
6 Fit the control buttons (Fig F)
B) Screwing:
Mounting on a
1 Click the cover plate onto the base plate (Fig.B).
2 Centre the assembly and screw onto the wall using the screws and plugs provided (Fig.E).
3 Click the emitter unit into the cover plate with the battery pointing upwards (Fig.C).
4 Remove the protection between the battery and the contacts (Fig.D).
5 Fit the control buttons.
Replacing the battery (Fig.D):
-unscrew battery clamp.
-insert new battery with positive pole pointing towards you.
-screw down battery clamp.
For use in: BE/NL/FR/DE/AT/ES/PT/CH/DK/LU/GR/SL/CZ/NO/GB
Battery equivalents for emitter:
Varta 3V/260mAh CR2430
Panasonic 3V/250mAh CR2330
Putting into service
After installing the emitters and receivers, the emitters must be programmed with the receivers. A receiver will only work if the address of an emitter has been programmed in the receiver.
PROGRAMMING
•Using a fine screwdriver, briefly (< 1.6 sec) press the flush programming key situated on the receiver on the Xvent unit.
•A light signal starts flashing (flashing = 1 sec.).
•Program all (RF) emitters that have to interwork with the receiver one by one. The correct reception of an address is acknowledged by a long light signal (4sec.).
•Up to 32 emitters can be programmed per receiver. When this maximum is reached, the LED will keep flashing.
•You can end the programming by briefly (<1.6 sec) pressing the flush key again.
ADDING EMITTERS
Additional emitters (max. 32) can at all times be programmed on a receiver. Repeat “PROGRAMMING”.
RESET:
•Press the flush key on the receiver (see section “Programming’) for more than 1.6 sec.(flashing LED).
•Press a second time on the flush key >1.6 sec.
•The receiver’s memory is now completely erased. This is acknowledged by a long light signal (4sec.).
•End RESET by briefly (< 1.6 sec) pressing the flush key.
The programming is not lost in the event of a prolonged power failure.
SELECTIVE ERASE
•Press the flush key on the receiver (> 1.6 sec).
•A light signal starts flashing (flashing LED)
•Press 1 of the control buttons of the emitter that you want to erase
•The emitter is erased from the memory, which is acknowledged by a long light signal (4sec.)
•End RESET by briefly (<1.6 sec) pressing the flush key again.
IN CASE OF MALFUNCTIONS:
New installation:
•Check that the protection between the battery and the contacts has been removed in the emitter.
•Check the battery and the contacts for proper permanent contact.
•Reset and program or reprogram the receiver.
•Press the programming key. The receiver is now in programming mode: there is a flashing light signal and the load is activated; it not, the receiver is defective. Program the emitters with the receiver and end the programming.
•Emitter malfunction:
Pick up the emitter and walk towards the receiver.
•It the system works when holding the emitter in the hand but not when it is placed on the wall, this may indicate the presence of moist or metal in the wall. You should then mount the emitter in another place.
•If the system works at reduced distance, this indicates either that the emitter has been placed outside the emitter range or an interference problem.
You should then place the emitter closer to the receiver or outside the reach of the interference.
•The system does not work even after placing it closer to the receiver.
You should then check the programming and/or the battery of the emitter (see above)
Existing installation
•Check the batteries of the emitter(s)
•Check the operation of the connected receivers
•Check for interference caused by changes in the system environment (metal cabinets, walls or furniture moved....)
Restore the original condition.
The system automatically switches on and off.
a. The system automatically switches on: This is only possible if a foreign emitter previously programmed in the receiver is operated within the receiver range. Reset the receiver and reprogram the relevant addresses (see Programming).
b. The system automatically switches off: This situation may be similar to point a) or may be the result of transient power cuts.