YHT-185 Digital Home Theater System
En | System Connection Guide | GARK |
|
| |
| © 2007 | All rights reserved. |
|
Printed in China ![]() WJ99940
WJ99940
STEP 2: Connect other home theater components (optional)
CAUTION
Components must not be plugged in while connecting them. Wait until all connections are made before
plugging in your components.
5
Yamaha created this package to greatly enhance your audio and home theater enjoyment. This System Connection Guide will help you get started. Follow the steps to connect the speakers first. Then connect your video monitor, DVD Player and other components.
Refer to your OwnerÕs Manuals as well as those that came with your other components for complete instructions and precautions.
Be sure that all components are not plugged in while making connections.
STEP 1: Unpack and connect speakers
1 | 1 | 2 | 5 |
|
|
|
6
3 4
|
Inspect contents
After unpacking, inspect the contents to confirm you have the above items:
2
1 | 6 | 1 Front right speaker |
|
| |
|
| 2 Front left speaker |
2 |
| 3 Surround right speaker |
|
| 4 Surround left speaker |
5 |
| 3 5 Center speaker |
|
| 6 Subwoofer |
4
Place speakers
Place speakers so they appear in the approximate positions as shown in the diagram above. See your OwnerÕs Manual for more information on speaker placement and mounting.
3
70 mm
Connect speaker wires
Connect speaker wire for front speakers (1, 2), surround speakers (3, 4), and center speaker (5). The positive (+) side of the wire with the white stripe attaches to the red terminal. The negative (Ð) side attaches to the black terminal. See your OwnerÕs Manual for more information on speaker wire connections.
4
To the front right speaker (1) |
|
|
| To the front left speaker (2) |
|
|
Connect front speakers
Connect speaker wires for front speakers (1, 2). The positive (+) side of the wire with the white stripe attaches to the red terminal. The negative (Ð) side attaches to the black terminal.
CAUTION
Receiver must not be plugged in while connecting speakers.
5
To the center speaker (5)
To the surround
right speaker (3)To the surround left speaker (4)
Connect surround and center speakers
Connect speaker wire for surround speakers (3, 4) and center speaker (5). The positive
(+)side of the wire with the white stripe attaches to the red terminal. The negative (Ð) side attaches to the black terminal.
CAUTION
Receiver must not be plugged in while connecting speakers.
6
Connect the subwoofer
Connect the subwoofer cable to the subwoofer (6). Set subwoofer VOLUME control to
CAUTION
Components must not be plugged in while connecting them.
7
Connect antennas
Keeping receiver unplugged, connect AM loop antenna and indoor FM antenna as shown. For more information about obtaining clear reception and grounding, see your OwnerÕs Manual.
1
ANT.VIDEOS-VIDEO
Video monitor
Connect a video monitor
Connect the MONITOR OUT jack of the receiver and the video input jack of your video monitor using an RCA video cable (not included).
2
DVD player
Connect a DVD player (video)
Connect the DVD VIDEO IN jack of the receiver and the video output jack of your DVD player using an RCA video cable (not included).
3
DVD player | |
|
Connect a DVD player (audio)
Connect the DVD DIGITAL INPUT jack of the receiver and the digital output jack of your DVD player using a coaxial cable (not included).
4
DSS/Cable/HDTV tuner box
Connect a DSS/Cable/HDTV tuner box
Connect the DTV/CBL jacks of the receiver and the output jacks of your
| AUDIO |
|
R | L | VIDEO |
IN
OUT
DVR/VCR
Connect a DVR/VCR
Connect DVR IN/OUT jacks of the receiver and the input/output jacks of your component using RCA audio/video cables (not included) as shown.
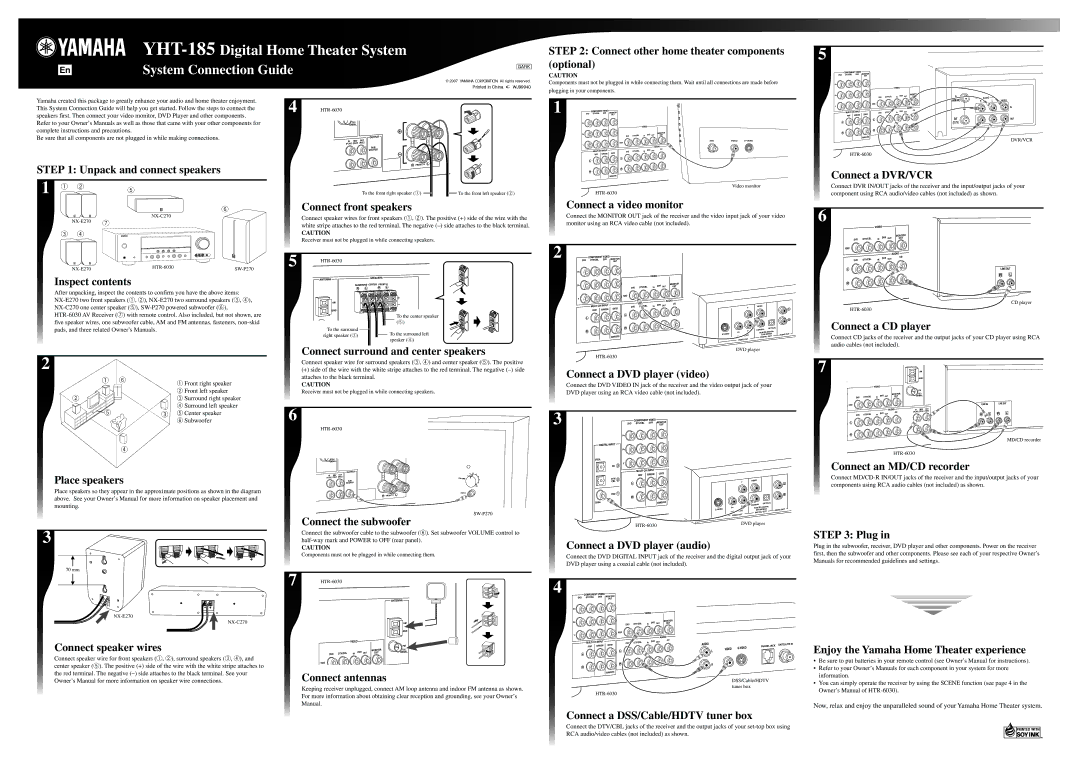
6
CD player
Connect a CD player
Connect CD jacks of the receiver and the output jacks of your CD player using RCA audio cables (not included).
7
MD/CD recorder
Connect an MD/CD recorder
Connect
STEP 3: Plug in
Plug in the subwoofer, receiver, DVD player and other components. Power on the receiver first, then the subwoofer and other components. Please see each of your respective OwnerÕs Manuals for recommended guidelines and settings.
Enjoy the Yamaha Home Theater experience
¥Be sure to put batteries in your remote control (see OwnerÕs Manual for instructions).
¥Refer to your OwnerÕs Manuals for each component in your system for more information.
¥You can simply operate the receiver by using the SCENE function (see page 4 in the OwnerÕs Manual of
Now, relax and enjoy the unparalleled sound of your Yamaha Home Theater system.