Pull rope with a rapid, continuous, full arm stroke. Keep a firm grip on starter handle. Let rope rewind slowly. Do not let starter handle snap back against starter.

Repeat preceding instructions 5 and 6 until engine starts. When engine starts, move choke lever on engine halfway between CHOKE and RUN.

Move throttle control to IDLE position for a few minutes warm-up. Move choke lever to RUN position as engine warms up.

Models 343 & 345

Attach spark plug wire to spark plug. Make certain the metal loop on the end of the spark plug wire (inside the boot) is fastened securely over the metal tip on the spark plug.

Make certain all controls are in the neutral position (released). See Figure 6.

Place the engine speed control in the START position.

Push primer two (2) or three (3) times See Figure 10. Wait about two (2) seconds between each push.

NOTE: Primer may be needed to restart a warm engine after a short shutdown.

Stand at side of tiller. Grasp the starter handle and pull out slowly, until it pulls slightly harder. Let rope rewind slowly.

Pull rope with a rapid full arm stroke. Do not allow handle to snap back. Allow it to rewind slowly while keeping a firm hold on the starter handle.

NOTE: If engine fails to start after three (3) pulls, push primer two (2) times and pull starter rope again.

Repeat steps 4 and 5 until engine starts. Refer to engine manual for additional engine information.

NOTE: After starting engine and prior to using the tiller, be certain to check the clutch adjustment as described in “Checking the Clutch Adjustment” section of the Assembly Instructions.

With the proper amount of care and maintenance, this machine will provide the owner with many years of service.

Wheel Position

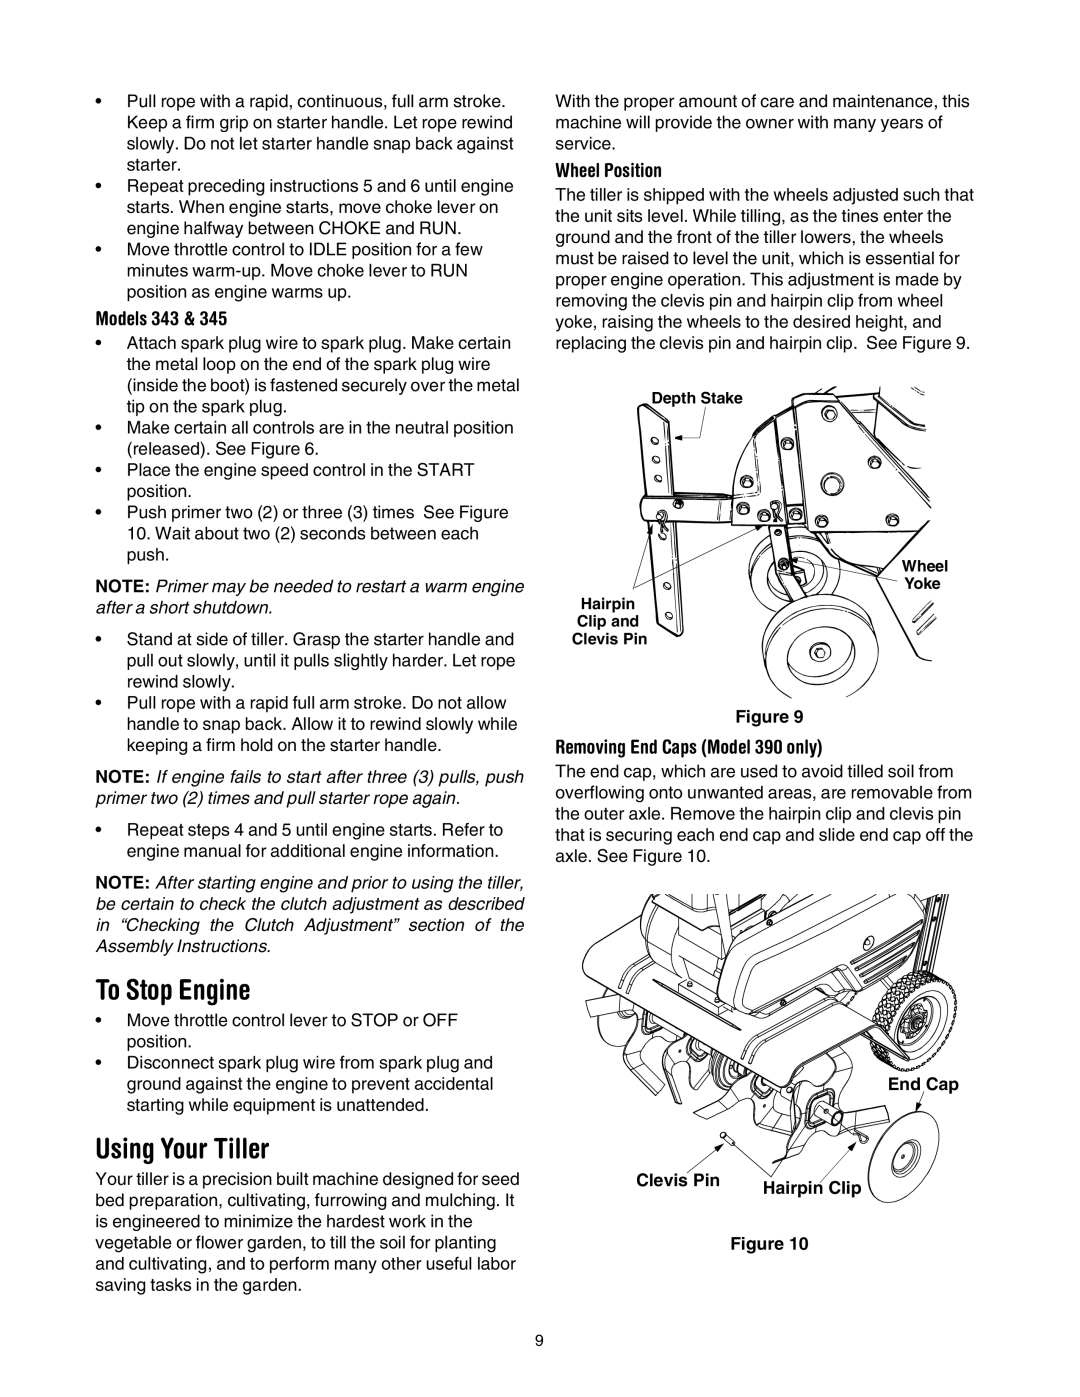
The tiller is shipped with the wheels adjusted such that the unit sits level. While tilling, as the tines enter the ground and the front of the tiller lowers, the wheels must be raised to level the unit, which is essential for proper engine operation. This adjustment is made by removing the clevis pin and hairpin clip from wheel yoke, raising the wheels to the desired height, and replacing the clevis pin and hairpin clip. See Figure 9.

Depth Stake

Wheel

Yoke

Hairpin

Clip and

Clevis Pin

Figure 9

Removing End Caps (Model 390 only)

The end cap, which are used to avoid tilled soil from overflowing onto unwanted areas, are removable from the outer axle. Remove the hairpin clip and clevis pin that is securing each end cap and slide end cap off the axle. See Figure 10.

To Stop Engine

Move throttle control lever to STOP or OFF position.

Disconnect spark plug wire from spark plug and ground against the engine to prevent accidental starting while equipment is unattended.

Using Your Tiller

Your tiller is a precision built machine designed for seed bed preparation, cultivating, furrowing and mulching. It is engineered to minimize the hardest work in the vegetable or flower garden, to till the soil for planting and cultivating, and to perform many other useful labor saving tasks in the garden.

End Cap

Clevis Pin

Hairpin Clip


Figure 10

9

Page 9
Image 9
Yard Machines manual To Stop Engine, Using Your Tiller, Models 343, Wheel Position, Removing End Caps Model 390 only

390 specifications

The Yard Machines 390 is a robust and versatile lawn mower designed to meet the demands of both residential and commercial users. With its powerful features and advanced technologies, the Yard Machines 390 delivers exceptional performance, making lawn care an easier and more efficient task.

At the heart of the Yard Machines 390 is a reliable engine. The 390cc engine provides ample power to tackle even the toughest mowing jobs. This engine is engineered for optimal performance, ensuring a smooth and consistent cut across various grass types. Its efficient fuel consumption not only extends the operation time but also reduces the frequency of refueling.

One of the standout features of the Yard Machines 390 is its cutting deck. The 21-inch cutting deck is crafted from durable materials, allowing for longevity and resilience against wear and tear. The deck is designed for superior airflow, ensuring a clean and even cut every time. Additionally, the mower offers multiple cutting height positions, allowing users to customize their mowing height according to their preference and the type of grass being cut.

The Yard Machines 390 is equipped with a self-propelled drive system, which significantly reduces the effort required by the user. This feature is particularly beneficial on hilly terrain or uneven surfaces, providing enhanced maneuverability and control. The adjustable speed settings further allow users to tailor the mowing pace to their comfort level.

An additional characteristic of the Yard Machines 390 is its ease of maintenance. The mower is designed for simple access to vital components, making routine maintenance tasks such as oil changes and blade sharpening straightforward and hassle-free. The machine's durable construction also contributes to its reliability and reduces the need for frequent repairs.

Moreover, the Yard Machines 390 incorporates safety features to protect users during operation. The operator presence control ensures that the engine stops immediately if the user loses control of the mower, minimizing the risk of accidents.

In summary, the Yard Machines 390 is a powerful, efficient, and user-friendly lawn mower that combines advanced technology with practical features. Its robust engine, versatile cutting deck, self-propelled drive, and safety measures make it an excellent choice for anyone looking to maintain a pristine lawn with minimal effort. Whether you are a homeowner or a professional landscaper, the Yard Machines 390 is designed to deliver exceptional results.