Installation
Any electrical work required to install this appliance should be carried out by a qualified electrician or competent person.
Any plumbing work required to install this appliance should be carried out by a qualified plumber or competent person.
Remove all packaging before positioning the machine.
If possible, position the machine next to a water tap and a drain.
Levelling
Good levelling is essential for correct closure and sealing of the door. When the appliance is correctly levelled, the door will not catch on the levelling spacers on either side of the cabinet. If the door does not close correctly, loosen or tighten the adjustable feet until the machine is perfectly level.
Water supply connections
This dishwasher must be plumbed into a cold water supply.
The water pressure must be within the limits given in the |
| |
"Technical specifications" | (Instruction Book - Part 2) | . |
Your local Water Authority will advise you on the average mains pressure in your area.
The dishwasher features fill and drain hoses which can be turned either to the left or the right to suit the installation.
Do not use, for connection, old hoses which have been used in another appliance.
The locknut must be correctly fitted to avoid water leaks.
Avoid bends or kinks in the hose which could prevent or slow down the water supply.
If the machine is connected to new pipes or pipes which have not been used for a long time, you should run the water for a few minutes before connecting the inlet hose. This will prevent deposits of sand or rust clogging the inlet hose.
Water outlet hose connection
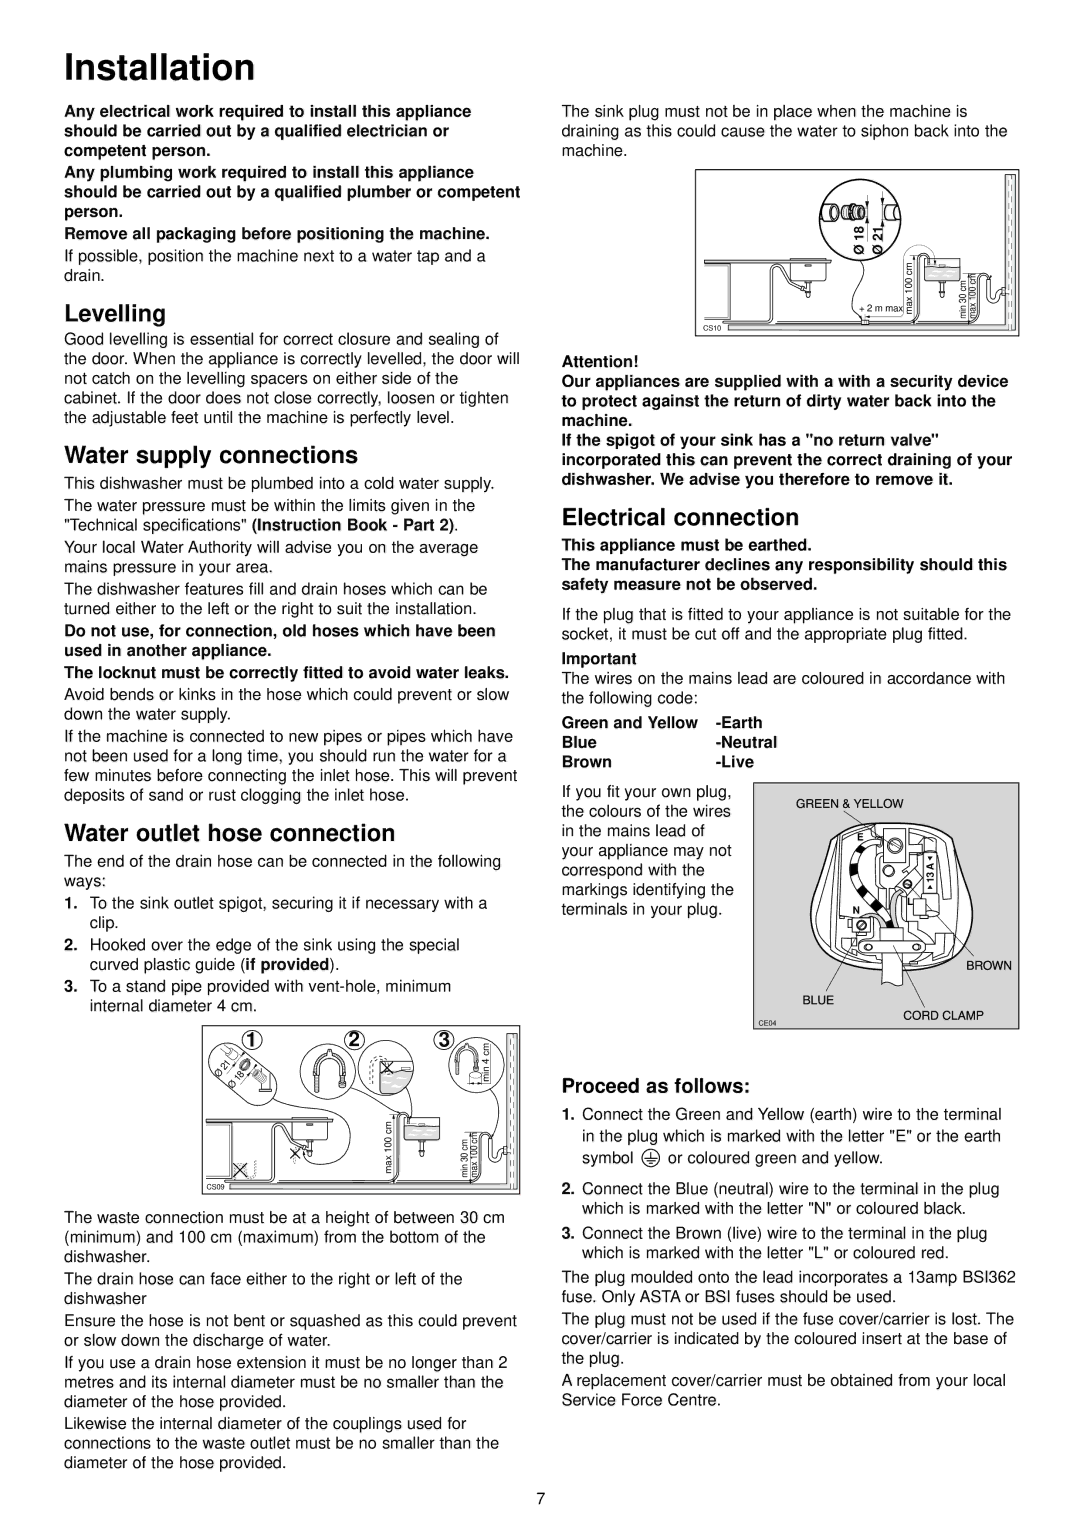
The end of the drain hose can be connected in the following ways:
1.To the sink outlet spigot, securing it if necessary with a clip.
2.Hooked over the edge of the sink using the special
curved plastic guide ( | if provided | ). |
3.To a stand pipe provided with
|
|
| 1 | 2 | 3 |
| 21 |
|
|
| 4 cm |
Ø |
| 18 |
| min | |
|
|
| |||
|
| Ø |
| ||
|
|
|
| ||
|
|
|
|
| |
|
|
|
| max 100 cm | min 30 cm max 100 cm |
CS09 |
|
|
|
| |
The waste connection must be at a height of between 30 cm (minimum) and 100 cm (maximum) from the bottom of the dishwasher.
The drain hose can face either to the right or left of the dishwasher
Ensure the hose is not bent or squashed as this could prevent or slow down the discharge of water.
If you use a drain hose extension it must be no longer than 2 metres and its internal diameter must be no smaller than the diameter of the hose provided.
Likewise the internal diameter of the couplings used for connections to the waste outlet must be no smaller than the diameter of the hose provided.
The sink plug must not be in place when the machine is draining as this could cause the water to siphon back into the machine.
Ø 18 | Ø 21 |
|
|
|
| cm | min 30 cm max 100 cm |
+ 2 m max | max 100 | ||
|
| ||
CS10 |
|
|
|
Attention!
Our appliances are supplied with a with a security device to protect against the return of dirty water back into the machine.
If the spigot of your sink has a "no return valve" incorporated this can prevent the correct draining of your dishwasher. We advise you therefore to remove it.
Electrical connection
This appliance must be earthed.
The manufacturer declines any responsibility should this safety measure not be observed.
If the plug that is fitted to your appliance is not suitable for the socket, it must be cut off and the appropriate plug fitted.
Important
The wires on the mains lead are coloured in accordance with the following code:
Green and Yellow |
| ||
Blue |
|
| |
Brown |
|
| |
If you fit your own plug, |
| ||
the colours of the wires |
| ||
in the mains lead of | E | ||
your appliance may not |
| ||
correspond with the |
| A | |
markings identifying the | 13 | ||
L | |||
terminals in your plug. | |||
N | |||
CE04
Proceed as follows:
1.Connect the Green and Yellow (earth) wire to the terminal
in the plug which is marked with the letter "E" or the earth
symbol | or coloured green and yellow. |
2.Connect the Blue (neutral) wire to the terminal in the plug which is marked with the letter "N" or coloured black.
3.Connect the Brown (live) wire to the terminal in the plug which is marked with the letter "L" or coloured red.
The plug moulded onto the lead incorporates a 13amp BSI362 fuse. Only ASTA or BSI fuses should be used.
The plug must not be used if the fuse cover/carrier is lost. The cover/carrier is indicated by the coloured insert at the base of the plug.
A replacement cover/carrier must be obtained from your local Service Force Centre.
7
