Bush Hog RTC manual With the corresponding ones of the rigid cone

Page 13

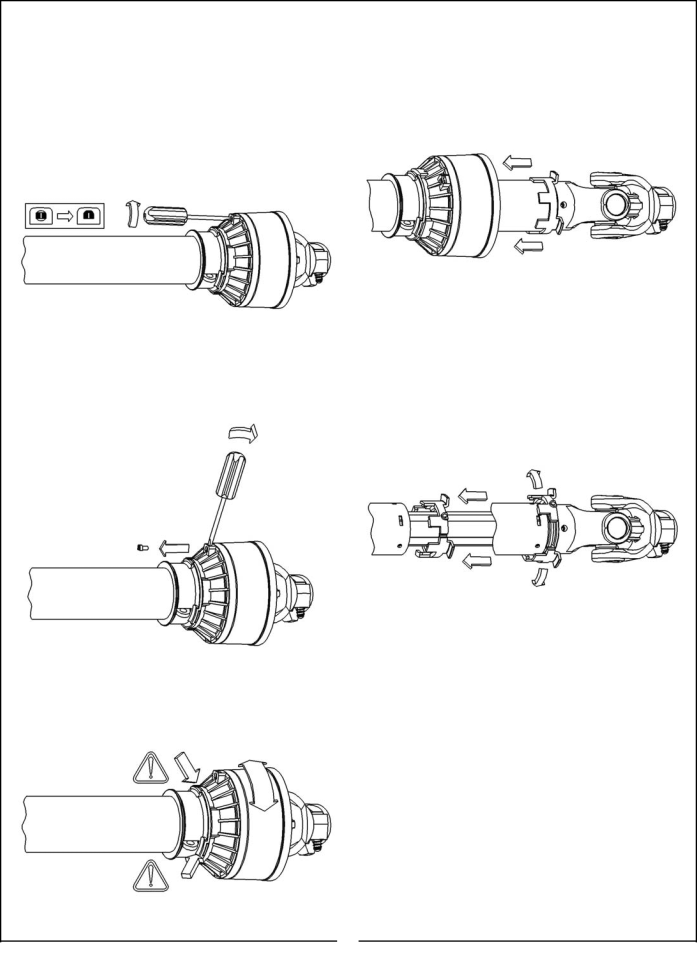
NOTE: In some instances, sliding the yoke shield back will make lubrication, inspection and cleaning of the universal joints more convenient. Proceed as follows:

1.Using a flat blade screwdriver, rotate the fasten- ing pin in its seat 1/2 turn until the head of the pin becomes unlocked in its housing on the cones. (Figure 4-2)

Figure 4-2

2.Lever up the pin through the slot, until the pin comes out. (Figure 4-3)

Figure 4-3

4.Remove the cones from the half-joint. (Figure 4-5) Figure 4-5

5.Remove the connecting ring from its housing on the yoke and, at the same time, from the slots of the guard tube, then move away the ring and the tube. (Figure 4-6)

Figure 4-6

3. Rotate the soft cone until the slots are aligned

Reassembly is in the reverse order

with the corresponding ones of the rigid cone.


(Figure 4-4)


Figure 4-4


11

Image 13
Contents Bush HOG Congratulations Retail CUSTOMER’S Responsibility Under the Bush HOG Warranty Table of ContentsDisclaimer of Implied Warranties & Consequential Damages This Limited Warranty Shall not ApplyRotary Tillers Dealer Preparation Check ListImportant Safety Precautions Employee Tractor Operating Instructions EMPLOYERS, Employees and OperationsIntroduction Introduction and DescriptionAttaching to Tractor Section Preparation for USEStabilizer Bars Lift Arms Adjusting for Work General SafetySection Operating Instructions OperationMaintenance Check List Section MaintenanceWith the corresponding ones of the rigid cone Slip Clutch Adjustment Blade ReplacementSlip Clutch Operational Check Troubleshooting TroubleshootingSection Dealer Assembly Page Safety Decals American Torque Specifications