ENGLISH
Contents
Five Important Safety Warnings
General Instructions
Installation Instructions
Periodic Inspections
Troubleshooting
Limited Warranty
Table des matières
1 | Cinq avertissements de sécurité importants | 1 |
2 | Directives générales | 10 |
2 | Directives d’installation | 10 |
8 | Inspections périodiques | 16 |
8 | Dépannage | 16 |
9 | Garantie limitée | 17 |
FRANÇAIS
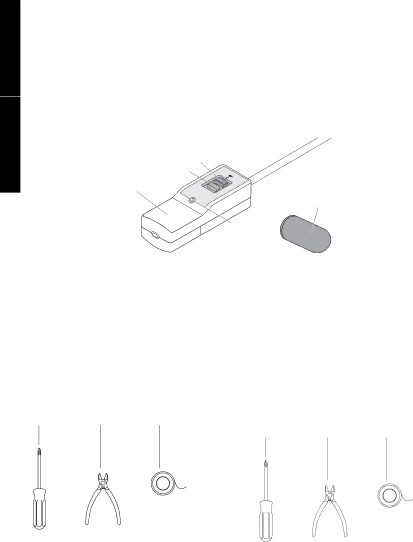
9800 FlexFit plug
Reset button
Test button |
|
|
|
rder |
| TEST | |
| Ga |
|
|
|
| au | s |
|
|
| ec |
K |
|
eep | dry |
|
Indicator light
Before You Begin
Make sure your 9800 FlexFit Plug Kit is complete. It should contain: 1 9800 FlexFit plug
1
2 Orange warning labels in English
2 Orange warning labels in French
1 White tape strip
1 Installation instruction
Make sure you have sufficient braided Frostex heating cable for the job. Do not use earlier versions of Frostex heating cable that have no braid. Also make sure you have the following items:
#2 Phillips | Wire cutters |
screwdriver | (13 |
| tape* |
*Frostex 9610 application tape is recommended.
Two 10" (25 cm) plastic cable ties (not included) may be used to secure
If you have any questions after reading this guide, call this
Save this installation instruction and user guide. It con- tains important safety warnings and maintenance infor- mation.
Avant de débuter
1 Fiche 9800 FlexFit
1 Obturateur à pousser
2 Étiquettes oranges d’avertissement en anglais
2 Étiquettes oranges d’avertissement en français
1 Bande de ruban blanc
1 Manuel des directives d’installation
Tournevis | Un | Du ruban * |
Phillips°2 | de 13 | |
|
|
*Le ruban de fixation Frostex 9610 est recommandé.
Deux colliers de serrage en plastique de 25 cm (10 po) (non inclus) peuvent être utilisés pour fixer le disjoncteur différentiel à l’isolant de tuyaux.
Si vous avez des questions après la lecture du présent guide, contactez le numéro sans frais de Tyco Thermal Controls au : (800)
Conservez ces directives d’installation ainsi que le guide de l’utilisateur. Ils contiennent d’importants avertissements de sécurité et une notice d’entretien.