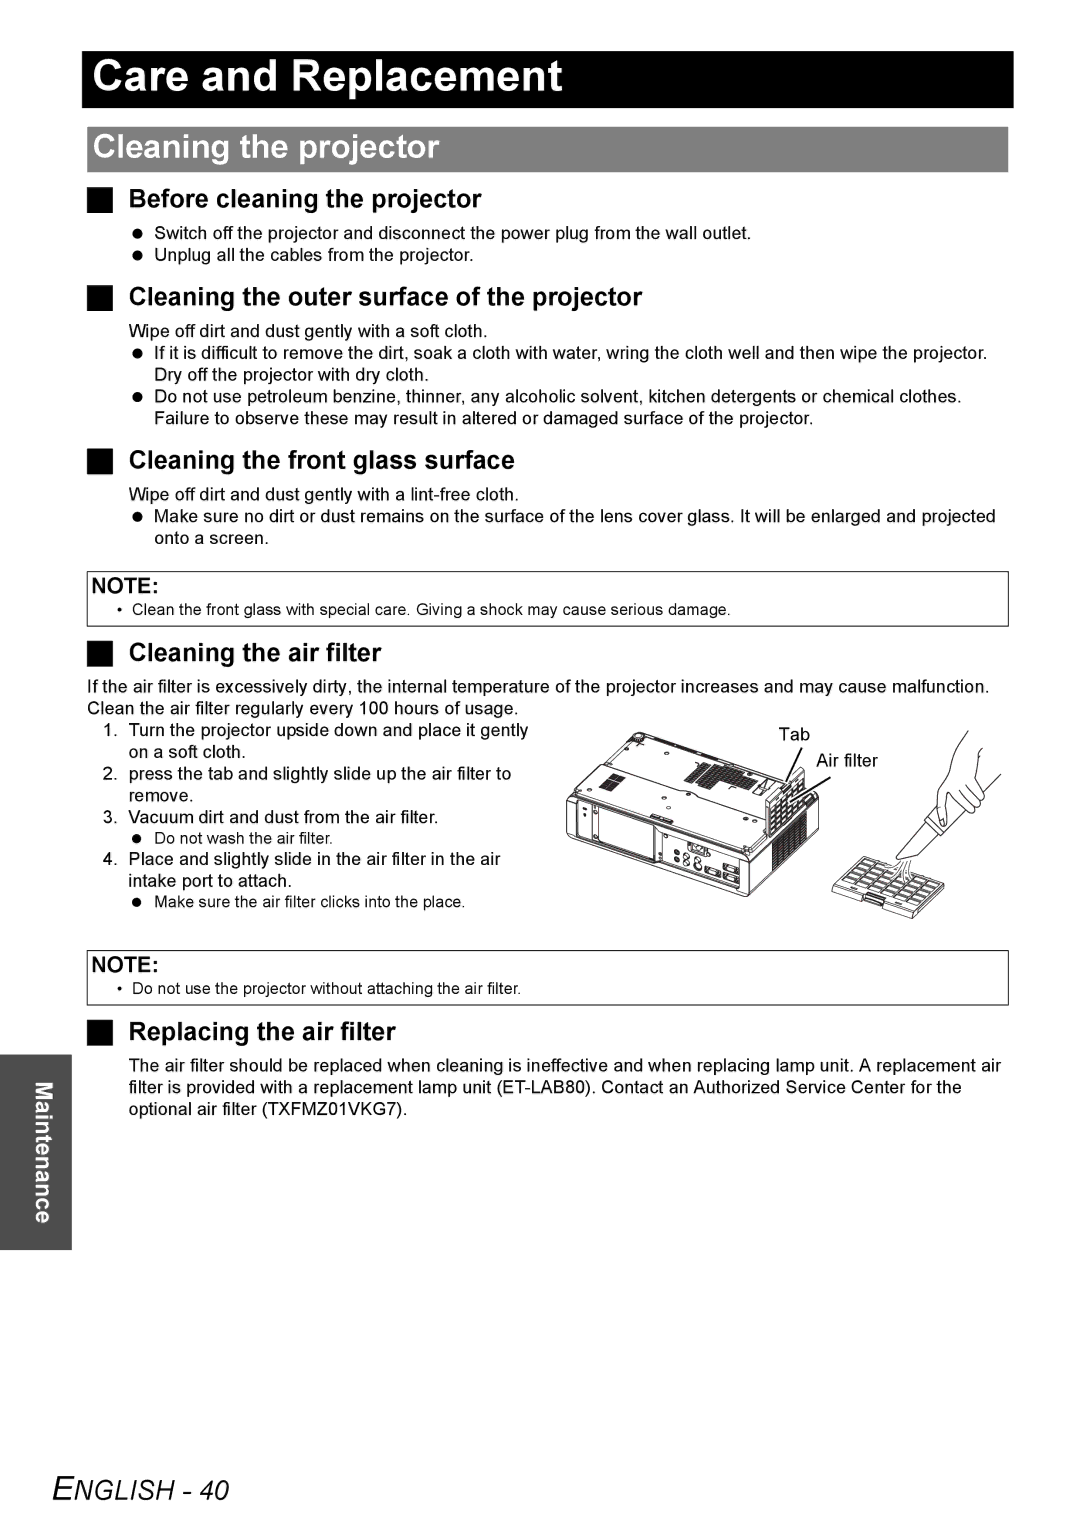

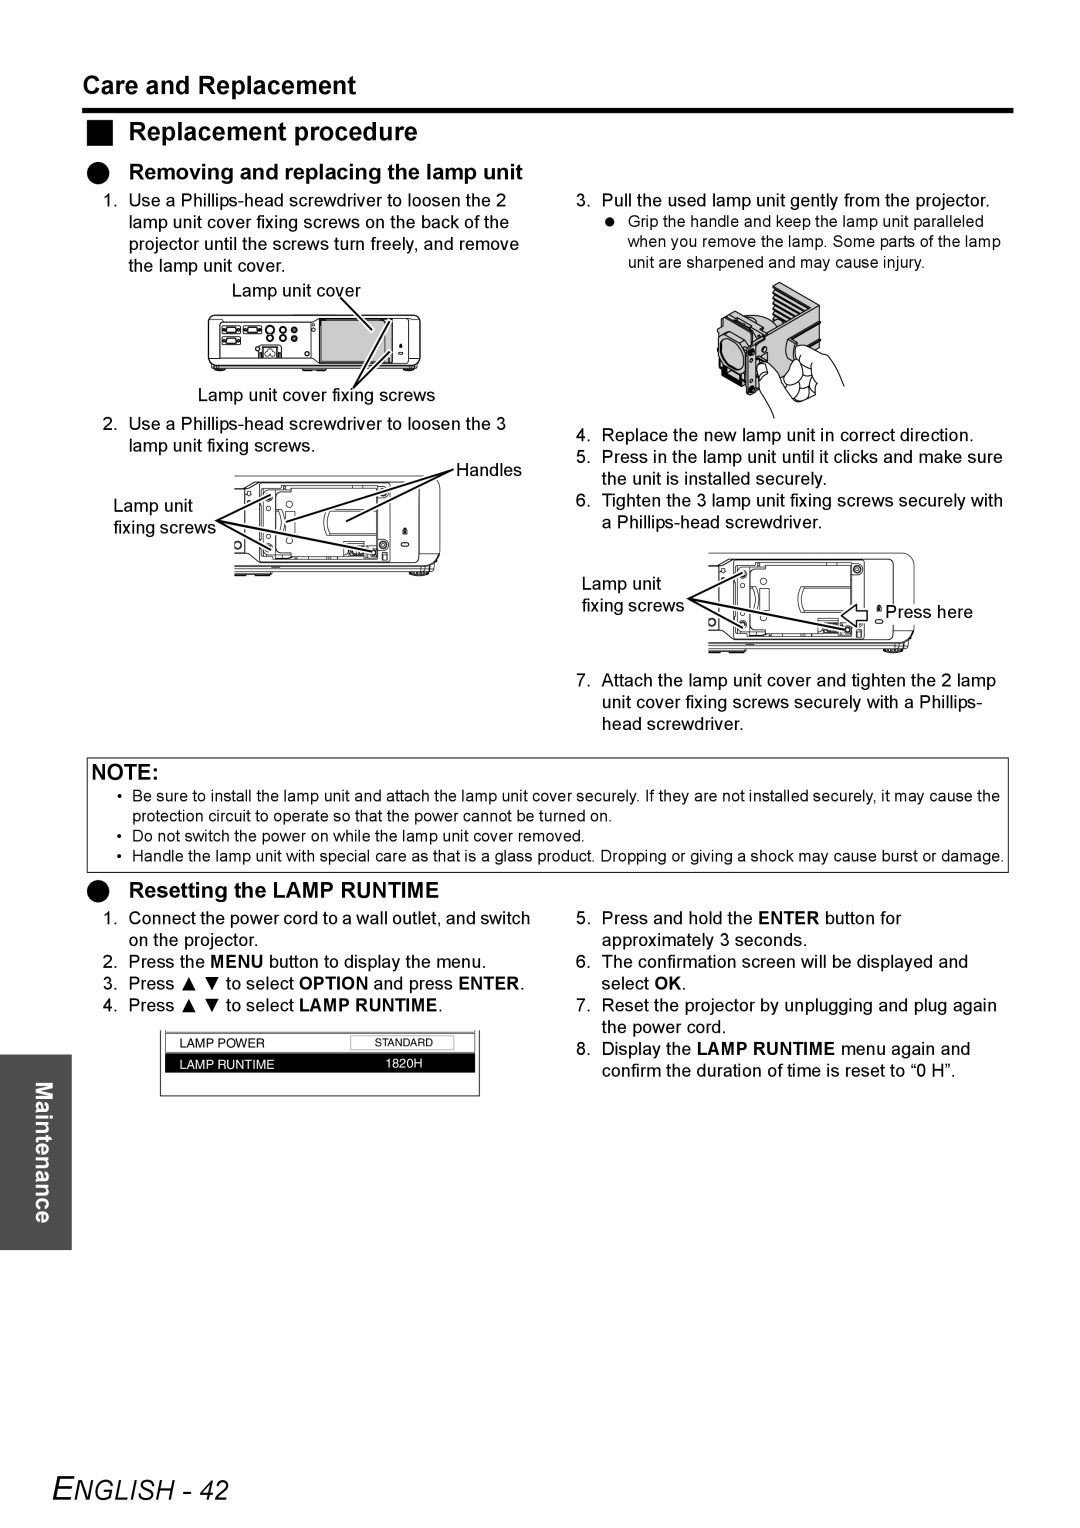


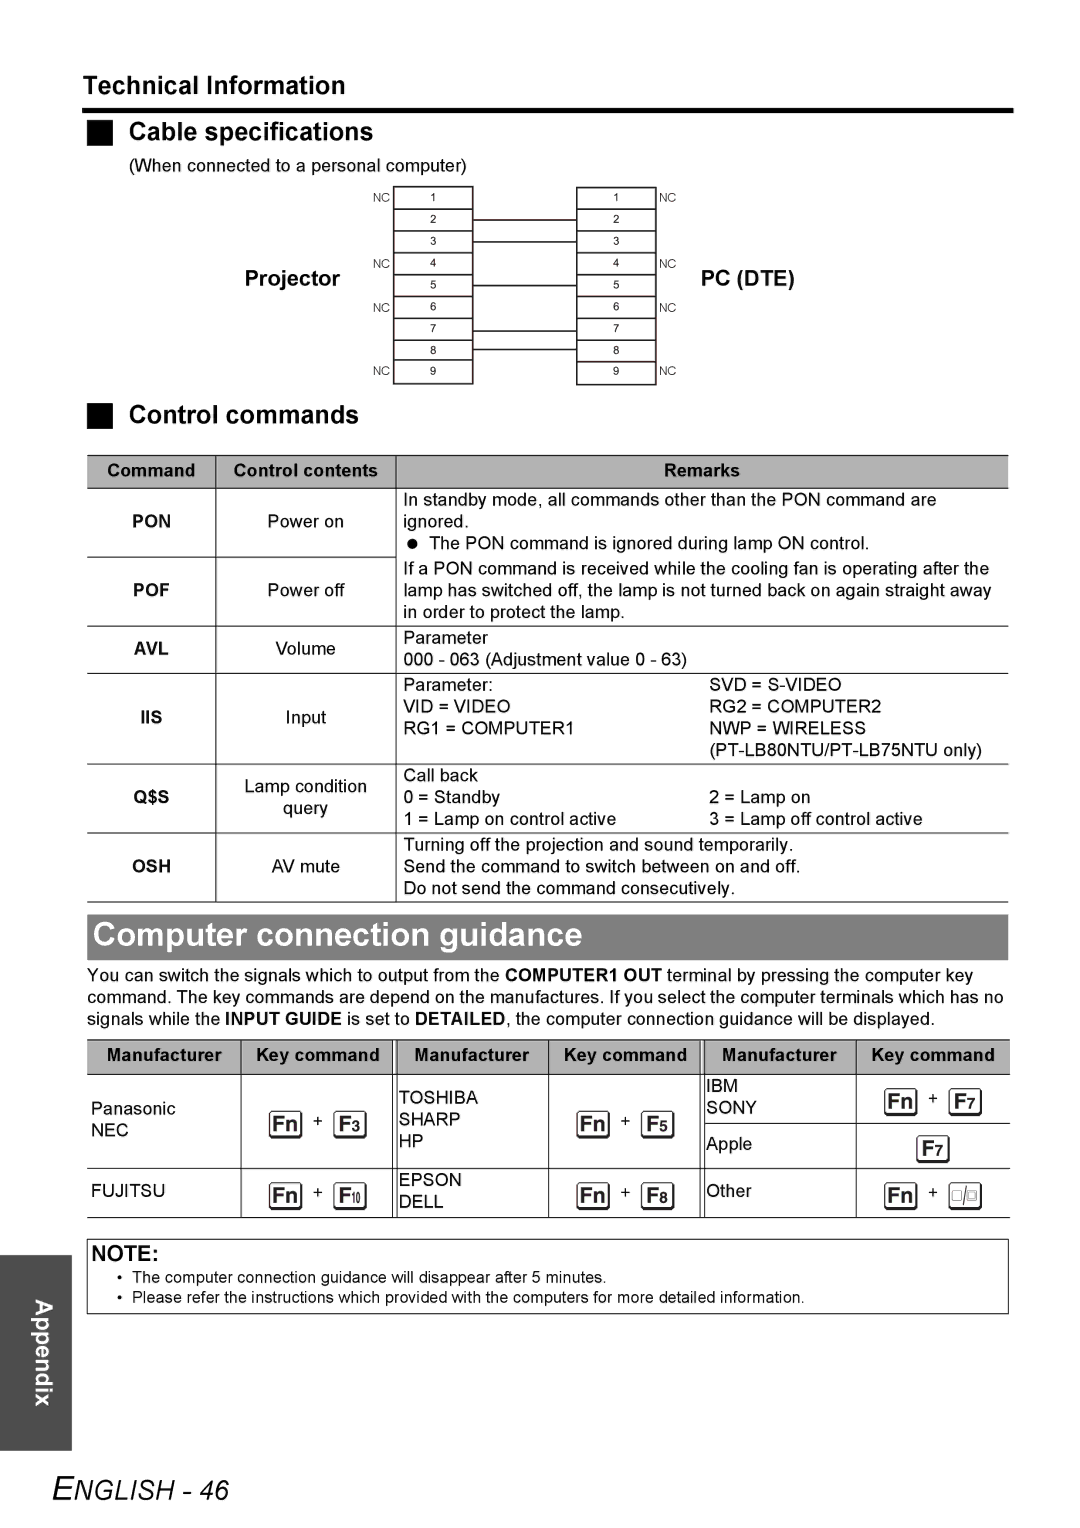
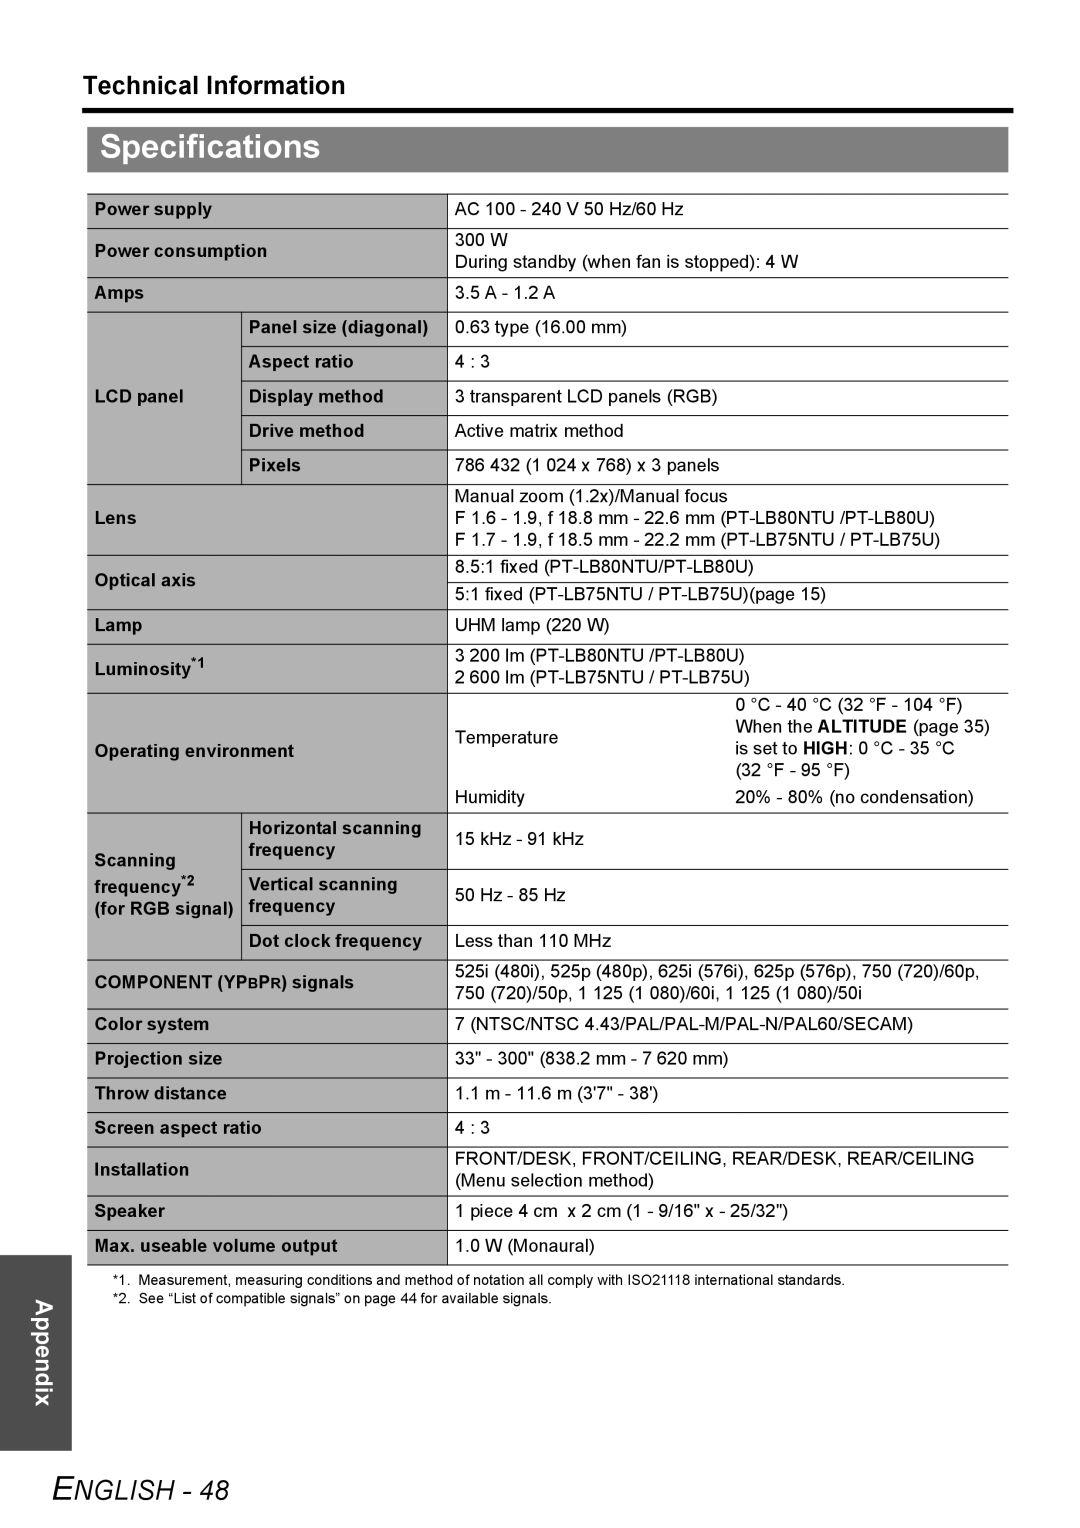
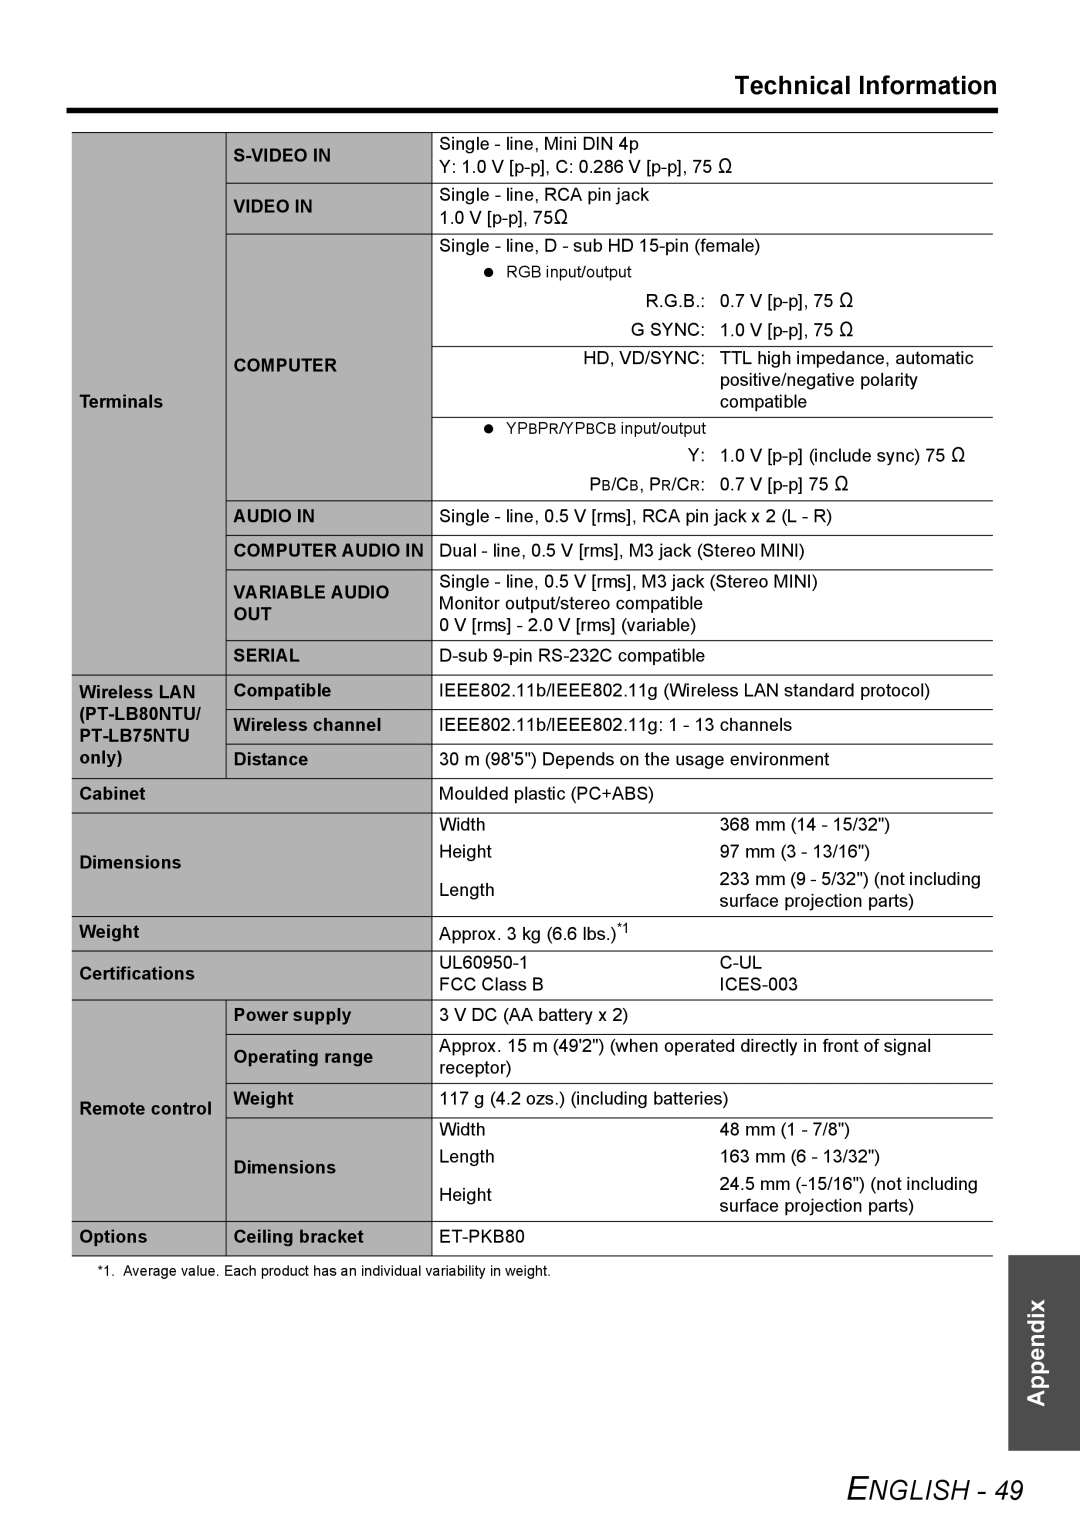
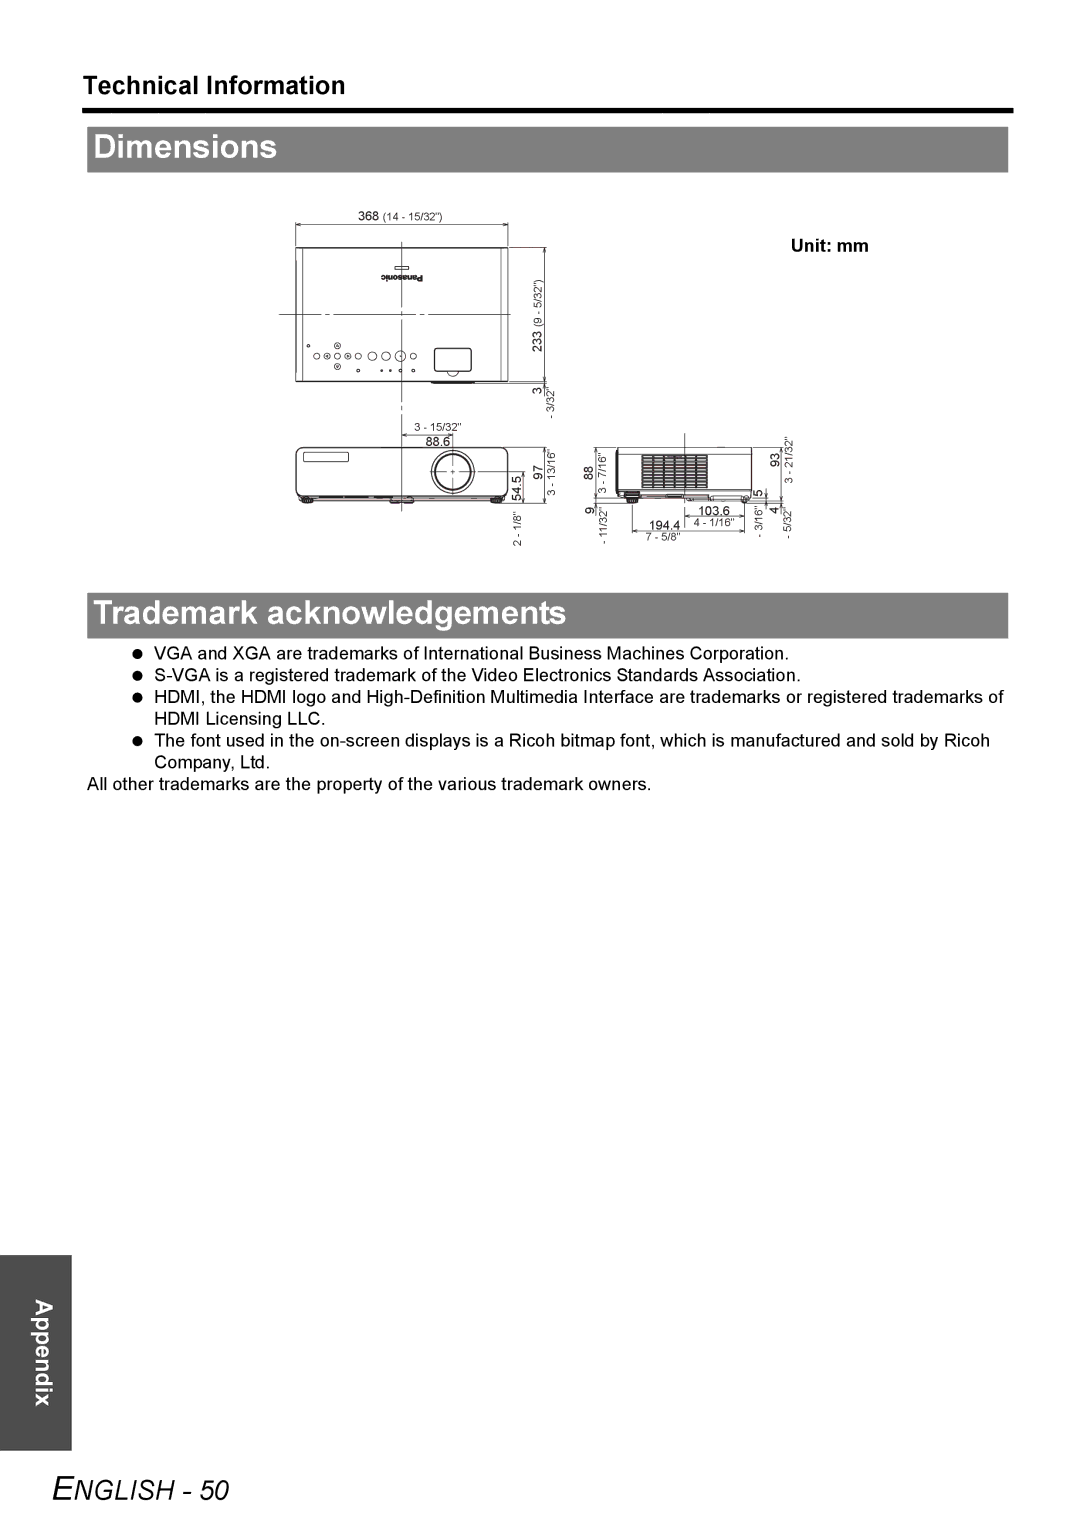


Appendix
Technical Information
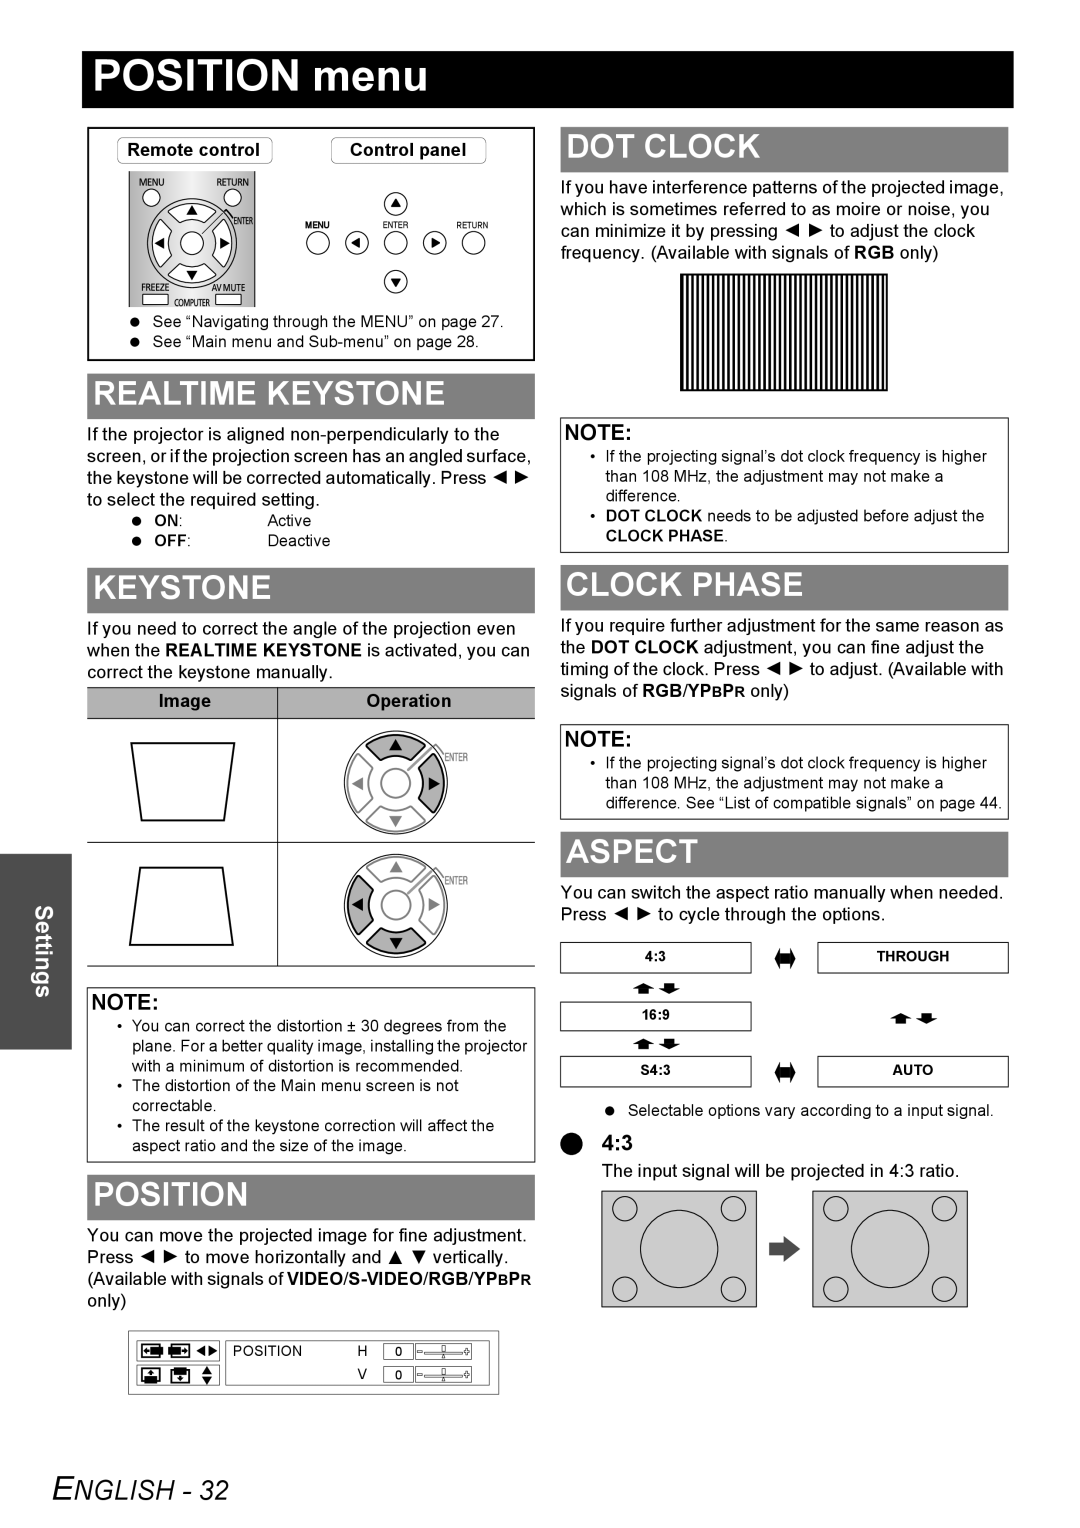
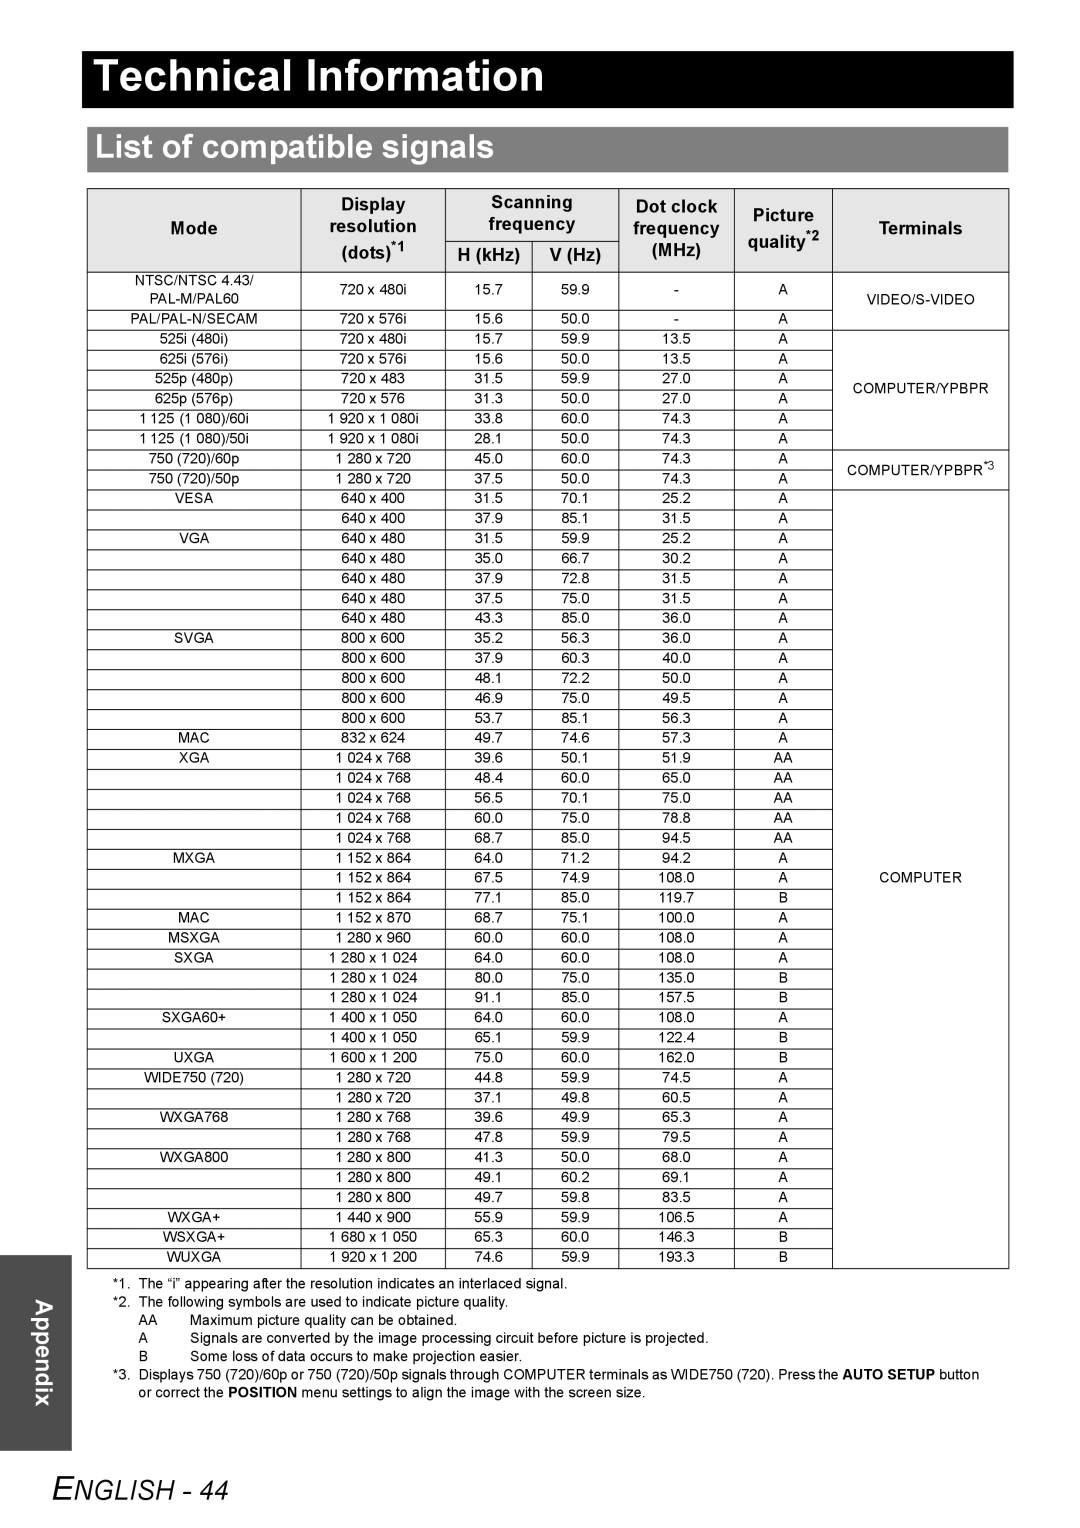
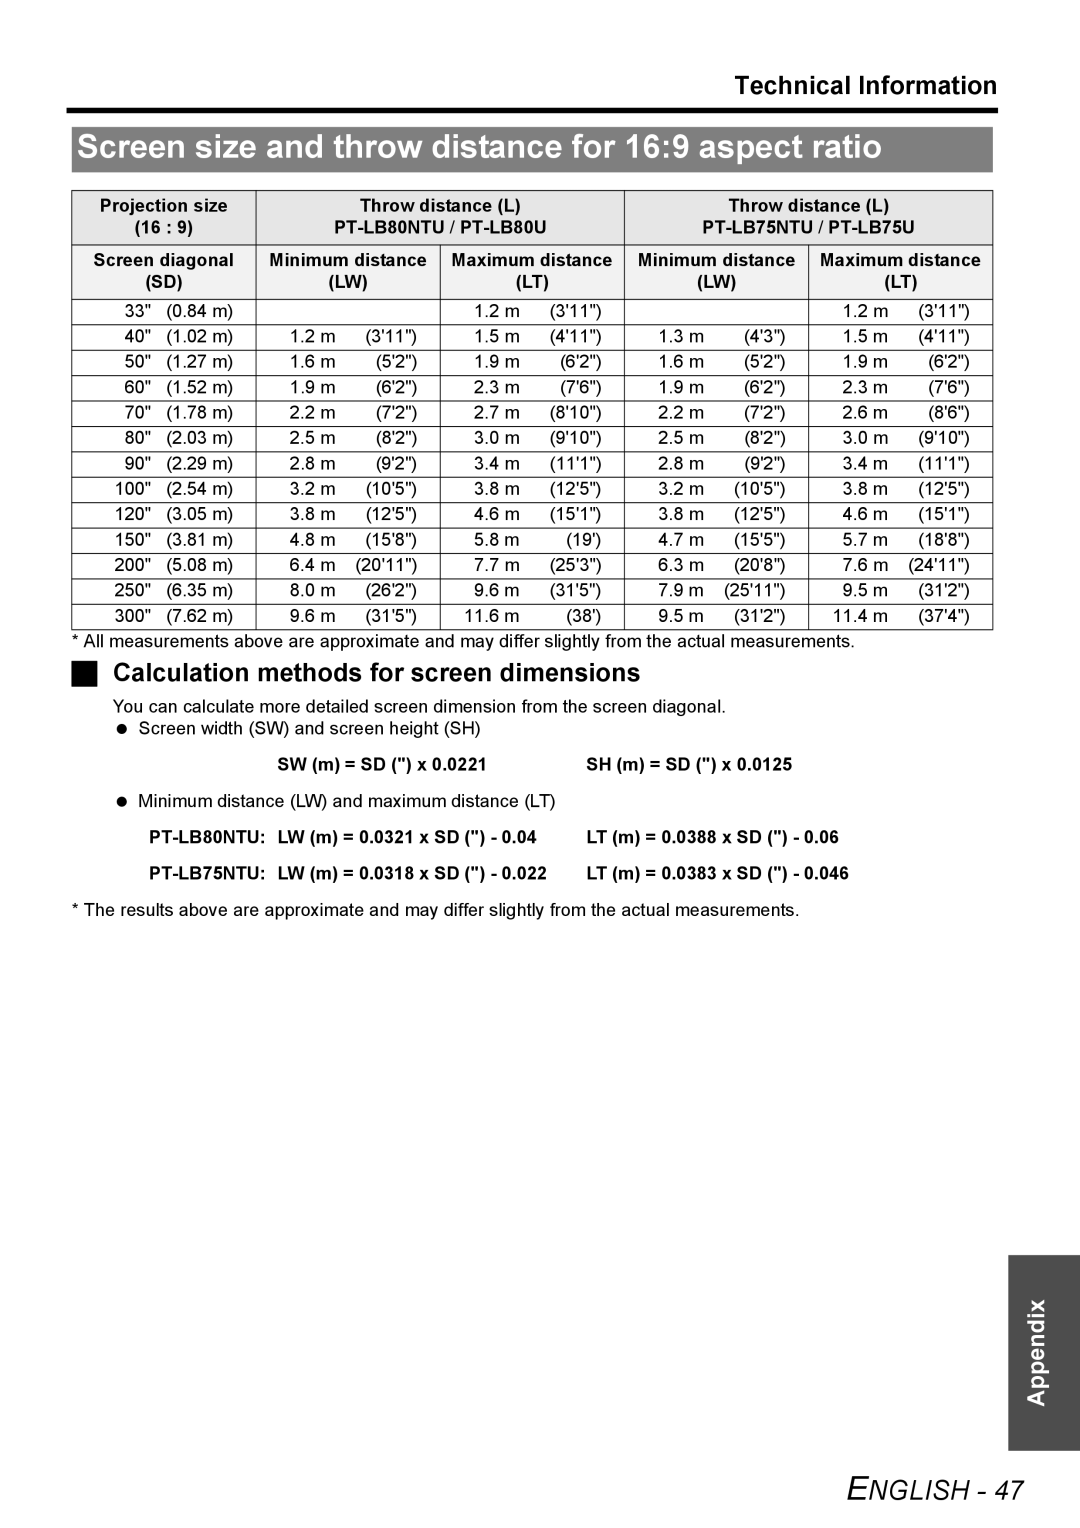
List of compatible signals
| Display | Scanning | Dot clock | Picture |
| ||
Mode | resolution | frequency | frequency | Terminals | |||
quality*2 | |||||||
| (dots)*1 | H (kHz) | V (Hz) | (MHz) |
| ||
|
|
| |||||
NTSC/NTSC 4.43/ | 720 x 480i | 15.7 | 59.9 | - | A |
| |
|
|
|
|
| |||
720 x 576i | 15.6 | 50.0 | - | A |
| ||
525i (480i) | 720 x 480i | 15.7 | 59.9 | 13.5 | A |
| |
625i (576i) | 720 x 576i | 15.6 | 50.0 | 13.5 | A |
| |
525p (480p) | 720 x 483 | 31.5 | 59.9 | 27.0 | A | COMPUTER/YPBPR | |
625p (576p) | 720 x 576 | 31.3 | 50.0 | 27.0 | A | ||
| |||||||
1 125 (1 080)/60i | 1 920 x 1 080i | 33.8 | 60.0 | 74.3 | A |
| |
1 125 (1 080)/50i | 1 920 x 1 080i | 28.1 | 50.0 | 74.3 | A |
| |
750 (720)/60p | 1 280 x 720 | 45.0 | 60.0 | 74.3 | A | COMPUTER/YPBPR*3 | |
750 (720)/50p | 1 280 x 720 | 37.5 | 50.0 | 74.3 | A | ||
| |||||||
VESA | 640 x 400 | 31.5 | 70.1 | 25.2 | A |
| |
| 640 x 400 | 37.9 | 85.1 | 31.5 | A |
| |
VGA | 640 x 480 | 31.5 | 59.9 | 25.2 | A |
| |
| 640 x 480 | 35.0 | 66.7 | 30.2 | A |
| |
| 640 x 480 | 37.9 | 72.8 | 31.5 | A |
| |
| 640 x 480 | 37.5 | 75.0 | 31.5 | A |
| |
| 640 x 480 | 43.3 | 85.0 | 36.0 | A |
| |
SVGA | 800 x 600 | 35.2 | 56.3 | 36.0 | A |
| |
| 800 x 600 | 37.9 | 60.3 | 40.0 | A |
| |
| 800 x 600 | 48.1 | 72.2 | 50.0 | A |
| |
| 800 x 600 | 46.9 | 75.0 | 49.5 | A |
| |
| 800 x 600 | 53.7 | 85.1 | 56.3 | A |
| |
MAC | 832 x 624 | 49.7 | 74.6 | 57.3 | A |
| |
XGA | 1 024 x 768 | 39.6 | 50.1 | 51.9 | AA |
| |
| 1 024 x 768 | 48.4 | 60.0 | 65.0 | AA |
| |
| 1 024 x 768 | 56.5 | 70.1 | 75.0 | AA |
| |
| 1 024 x 768 | 60.0 | 75.0 | 78.8 | AA |
| |
| 1 024 x 768 | 68.7 | 85.0 | 94.5 | AA |
| |
MXGA | 1 152 x 864 | 64.0 | 71.2 | 94.2 | A |
| |
| 1 152 x 864 | 67.5 | 74.9 | 108.0 | A | COMPUTER | |
| 1 152 x 864 | 77.1 | 85.0 | 119.7 | B |
| |
MAC | 1 152 x 870 | 68.7 | 75.1 | 100.0 | A |
| |
MSXGA | 1 280 x 960 | 60.0 | 60.0 | 108.0 | A |
| |
SXGA | 1 280 x 1 024 | 64.0 | 60.0 | 108.0 | A |
| |
| 1 280 x 1 024 | 80.0 | 75.0 | 135.0 | B |
| |
| 1 280 x 1 024 | 91.1 | 85.0 | 157.5 | B |
| |
SXGA60+ | 1 400 x 1 050 | 64.0 | 60.0 | 108.0 | A |
| |
| 1 400 x 1 050 | 65.1 | 59.9 | 122.4 | B |
| |
UXGA | 1 600 x 1 200 | 75.0 | 60.0 | 162.0 | B |
| |
WIDE750 (720) | 1 280 x 720 | 44.8 | 59.9 | 74.5 | A |
| |
| 1 280 x 720 | 37.1 | 49.8 | 60.5 | A |
| |
WXGA768 | 1 280 x 768 | 39.6 | 49.9 | 65.3 | A |
| |
| 1 280 x 768 | 47.8 | 59.9 | 79.5 | A |
| |
WXGA800 | 1 280 x 800 | 41.3 | 50.0 | 68.0 | A |
| |
| 1 280 x 800 | 49.1 | 60.2 | 69.1 | A |
| |
| 1 280 x 800 | 49.7 | 59.8 | 83.5 | A |
| |
WXGA+ | 1 440 x 900 | 55.9 | 59.9 | 106.5 | A |
| |
WSXGA+ | 1 680 x 1 050 | 65.3 | 60.0 | 146.3 | B |
| |
WUXGA | 1 920 x 1 200 | 74.6 | 59.9 | 193.3 | B |
| |
*1. The “i” appearing after the resolution indicates an interlaced signal.
*2. The following symbols are used to indicate picture quality.
AA Maximum picture quality can be obtained.
ASignals are converted by the image processing circuit before picture is projected.
BSome loss of data occurs to make projection easier.
*3. Displays 750 (720)/60p or 750 (720)/50p signals through COMPUTER terminals as WIDE750 (720). Press the AUTO SETUP button or correct the POSITION menu settings to align the image with the screen size.