REMOTE TEMPERATURE SENSOR
*Remote temperature transmission to the main unit via 433MHz signal.
*Case can be wall mounted using
*100 feet transmission range without interference
*LCD display of measured temperature
*Temperature display unit (˚C or ˚F) selection
*Transmission channel selection
BEFORE YOU BEGIN
1. We recommend using alkaline batteries for main unit and |
remote sensor. |
2. Avoid using rechargeable batteries . |
3. Insert batteries before first use, matching the polarity as |
shown in the battery compartment. |
4. Always insert batteries in the remote sensor first. |
5. Press RESET after each battery change, using a paper |
clip or similar tool. |
6. During the initial setup, place the main unit as close as |
4 3 3 M H z W I R E L E S S
1
2
3
THERMO – SENSOR
A
C
| 1 | 2 | 3 |
|
RESET | CHANNEL | ˚C/˚F | ||
E F
D B
possible to the remote sensor. |
7. After reception is established, position the remote sensor and |
main unit within the effective transmission range of 100 feet. |
NOTE: 1. Avoid setting the time and date on the main unit before the remote temperature is displayed.
2. The effective operating range may be influenced |
by the surrounding building materials and how |
the receiver and transmitter are positioned. |
3. Place the remote sensor so that it faces the main |
unit (receiver), minimizing obstructions such |
as doors, walls and furniture. |
4. Though the remote sensors are weather resistant, |
they should be placed outdoors away from direct |
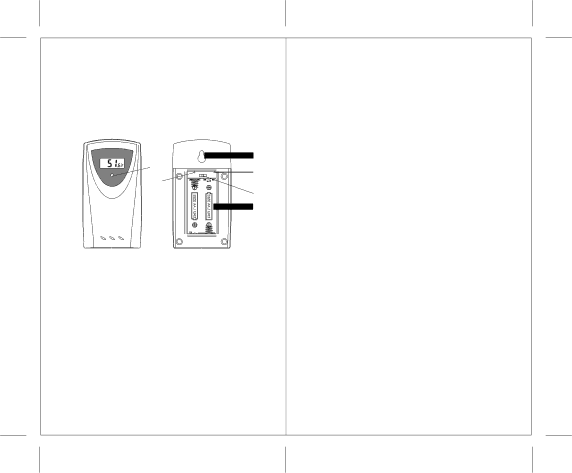
A LED INDICATOR
Flashes once when the remote sensor transmits a reading Flashes twice when battery power is low
B BATTERY COMPARTMENT
Accommodates two
C RESET
Resets all previous settings
D CHANNEL SELECTOR
Selects the desired channel before installing batteries
E WALL-MOUNT RECESSED HOLE
Keeps remote sensor on the wall.
F˚C/˚F SWITCH
Selects the temperature display in Fahrenheit or Celsius
4
sunlight, rain or snow. |
BATTERY INSTALLATION
TEMPERATURE SENSOR
NOTE: Install the batteries; select the channel and temperature unit (˚C/˚F) before you mount the remote sensor.
1.Remove the screws in the battery compartment with a small Phillips screwdriver.
2.Select the channel. The switch is located in the battery compartment. Channel 1 is typically selected if only 1 remote is being used.
3.If you are using more than one sensor, select a different channel for each sensor.
4.Install 2 “AA” size batteries (not included) matching to the polarities shown in the battery compartment.
5.Replace the battery compartment door and secure the screws.
6.Secure the remote sensor in the desired location.
5