JVC 1004MKH-CR-VP, LCT1774-001A Using the TV’s menu, Press the Hbutton to display the menu bar

Page 25

Using the TV’s menu

ENGLISH

This TV has a number of functions you can operate using menus. To use all your TV’s functions, you need to understand the basic menu operating techniques fully.

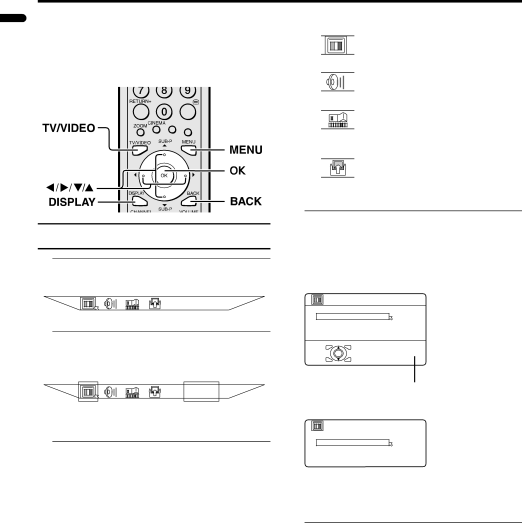
Buttons used to operate the menus

Types of menu


PICTURE menu


Choose to set the screen

D0106

settings.


SOUND menu

D0107

Choose to set the sound settings.


FEATURES menu


Choose to set the sleep timer

D0108

and child lock settings.

SET UP menu

Choose to edit the channels or

D0109set the display language settings.

Basic operation

1Press the Hbutton to display the menu bar

PICTURE

D0105-EN

2Press the 5 buttons to choose the menu you want to use and then press the a button


PICTURE

D1105-EN Chosen

Chosen

menu

menu name

3Press the 6 buttons to choose the item to be set, press the 5 buttons to set the item, and then press the a button

If there are sub-menus, use the 7 buttons to operate them.

Press the bbutton to return to the previous menu.

Press the 4or H button to exit from the menu.

The menu guide area can be made to appear and disappear for some menus.

While the menu is displayed, press the 5button to change between the guide area being displayed and not displayed.

>> 4:3 AUTO ASPECT

PANORAMIC

REGULAR 14:9 ZOOM

OK

D0017-EN

Guide area

>> 4:3 AUTO ASPECT

PANORAMIC

REGULAR 14:9 ZOOM

D1017-EN

The guide area for some menus will still be displayed even if the 5 button is pressed. This is not a fault.

24

Image 25
Contents PD-Z42DX4 Distance recommendations Burn-in „ Do not view for long periods of time in the Regular modeAvoid burn-in as follows If Burn-in has occurredEffect on infrared devices Pixel defectsPicture Management demonstration Contents Checking the contents of packages Installation Setting up your TV„ Only use JVC approved accessories with your model „ If not connecting a VCR see Fig. a Connecting the aerial and video cassette recorder VCR„ If connecting a VCR see Fig. B „ Rear Panel Connecting the power cord to the AC outletBack of the TV Initial settings Setup tour Putting the batteries into the remote controlPress the Abutton on the TV Press the a button Now, setting up is complete. Please enjoy your new JVC TVAdjust the volume Turn the TV on from standby modeUsing the Menu TV buttons and functionsTurn the TV on or off from standby mode Remote control buttons and functionsPress the # standby button to turn the TV on or off To return to a TV channel Choose a TV channel and watch images from external devicesTo use the programme number PR 0 AV Display function Press the 7q buttons to adjust the volumePR List Channel number displayZoom function „ Choose the Zoom mode„ Adjusting the visible area of the picture Using the Freeze functionCinema Surround function To cancel the Freeze function Using the MULTI-PICTURE functionPress the Xbutton Pictures multi„ Return Plus Return Plus function and Return function„ Return function Favourite channel function „ Setting the picture effect„ Favourite channel registration „ Calling the favourite channelOperating a JVC brand DVD player Set the PIP/TV/DVD Switch to the DVD positionPress the DVD Control Button to control your DVD player Teletext function Using the List ModeBasic operation „ To store the page numbersReveal Sub-pageHold SizePress H Cancel button CancelIndex Press the G Index buttonPress the Hbutton to display the menu bar Using the TV’s menuUsing the TV’s menu Picture menu „ Digital VNR Features„ Super DigiPure „ Pull Down „ Colour Management„ Picture Management „ Colour SystemMain „ 43 Auto AspectSUB PALSound menu Speaker BBECenter Sleep Timer Features menuChannel Guard „ To set the Channel Guard function„ To view a locked TV channel AppearanceBlue Back Favourite SettingChild Lock Auto ShutoffAuto Program SET UP menuEDIT/MANUAL Move„ Move „ Basic operationDelete Manual„ ID „ Delete„ Insert Press the green or red button to search for a TV channel „ ManualVIDEO-1 SETTING/VIDEO-3 Setting AI VolumeLanguage VideoTeletext Language Picture Shift Hdmi SettingSlow FastTable of signals for each type of computer Connecting to the computerWhen a picture is not displayed Displaying a computer screen„ Connecting the PC Connecting external equipmentBefore connecting anything Additional preparation„ Connecting speakers/amplifier „ Connecting headphones„ Using the TV speaker as the surround centre speaker „ TV output from the OUT terminalConditions to use the AV Compu Link remote control system „ Connecting AV Compu Link supported devicesIf a DVD player is connected to the VIDEO-1 terminal If a VCR is connected to the VIDEO-1 terminalIf a VCR is connected to the VIDEO-2 terminal If a DVD player is connected to the VIDEO-2 terminal„ Connecting a Hdmi compatible device Using the Hdmi terminal„ Setting Hdmi Setting When setting Audio When setting SizePress the 6 buttons and choose Size or Audio Oirt CH/CC numbers„ If you cannot turn on the TV Troubleshooting„ If you cannot turn off the TV „ No picture or no sound„ Other issues „ If the TV does not respond to the remote control„ Poor sound We may change the design and specifications without notice SpecificationsEnglish Victor Company of Japan, Limited 1004MKH-CR-VP