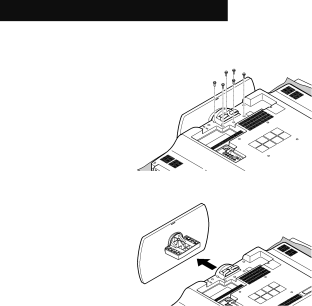
JVC LT-32JM30 manual Disconnecting the stand

Page 12

Package Contents

Disconnecting the stand

1)Place the TV face down on a soft cloth on a table.

2)Remove the screws from the back of the TV.

3) Pull out the stand from the TV.

Notes:

To re-install the stand, reverse the procedure from 3) to 1).

If you find it difficult to remove the screws from inset screw wells, use a magnetized screwdriver.

12

Image 12
Contents Important Note Serial Number Model NumberDo not attempt to service the product yourself Risk of Electric Shock Do not OpenImportant Safety Instructions Important Safety Instructions FCC NoticeTable of Contents Key Features Full or Widescreen ModeLogos & Licenses Package Contents Caring for the frame and stand Caring for the ScreenPackage Contents Install your TV Tidying the cablesConnect the stand Disconnecting the stand Photo Viewer Connector TV Basic ControlsFront Panel Side PanelTV Basic Controls Rear PanelHdmi Video AudioCompatible Signal Remote Control On Timer / Input / Sleep TimerFull / Regular / Slim / Panorama / Cinema / Full Native Basics Standard / Dynamic / Theater / Game Speech / Jazz / Classic / Rock / UserFAVORITE. Move Initial Setup Set the modeTurn on the TV Set the language Set time attributeThank you! Setup is now complete Set TV attributeUsing the menus Customizing Your TVDisplay the menu bar Display the desired menu Change or adjust the setting Close the menuVideo Status Video Reset Color TempColor Management Dynamic GammaVideo Input Label Photo ViewerThumbnail View Slide ShowInterval Aspect Setting Closed CaptionType Tuner Mode AutoscanAdd Channel When entering the password Edit ChannelChip When you lock or unlock channels PasswordSet a new password Confirm and setSexual Content Strong Language NR Not RatedGeneral Audience PG Parental Guidance SuggestedCan. Eng Can. FreGuide Auto Adjustment Phase AdjustmentReset PC H-PositionAudio Reset Digital Audio MLSurround Sound StatusPower Power IndicatorPlug In Menu Time ZoneLanguage Noise MuteControl with Hdmi System InfoAuto Demo Optical Out Connect an Antenna or Basic Cable Connect a Cable BoxConnect a VCR / DVD Player using Component Video Connect a VCR / DVD Player using Composite VideoConnect an Amplifier using the Digital Audio Optical OUT Connect an Amplifier or Home Theater SystemConnect a Digital Source Device Connect a CamcorderConnect a Blu-ray or Hdmi Device Connect a Computer Troubleshooting Picture is slightly cut off when you use 1080p format only No signal or signal can not be displayedPicture is snowy image noise Screen is 80% blackSpecifications subject to change without notice SpecificationsPage Page Page Canada Digital Television Transition Notice