RCA L32HD32D, L26HD32D owner manual Setting the picture size, Film Mode

Page 22

5Press EXIT/CANCEL to return to the normal screen.

Setting the picture size

You can view 480i and 480p format programs in a variety of picture sizes— Natural, Cinema Wide1, Cinema Wide2, Cinema Wide3 and Full.

Selecting the picture size

1Press SETUP/TV MENU in the TV mode. The TV menu screen will appear.

2

Press

or

to select “Picture”, then press or


ENTER.


3

Press

or

to select “Picture Size”, then press

or ENTER to display Picture Size menu. Press

/or corresponding Number buttons (0-4) to select the desired picture size, as described below.

Picture Size

0.Natural

1.Cinema Wide1

2.Cinema Wide2

3.Cinema Wide3

4.Full

[0-4]:Select

NOTE:

Selectable picture sizes may vary depending on the input source or broadcast signal.

Picture Size menu also can be displayed by pressing SCREEN SIZE on the remote control.

4Press EXIT/CANCEL to return to the normal screen.

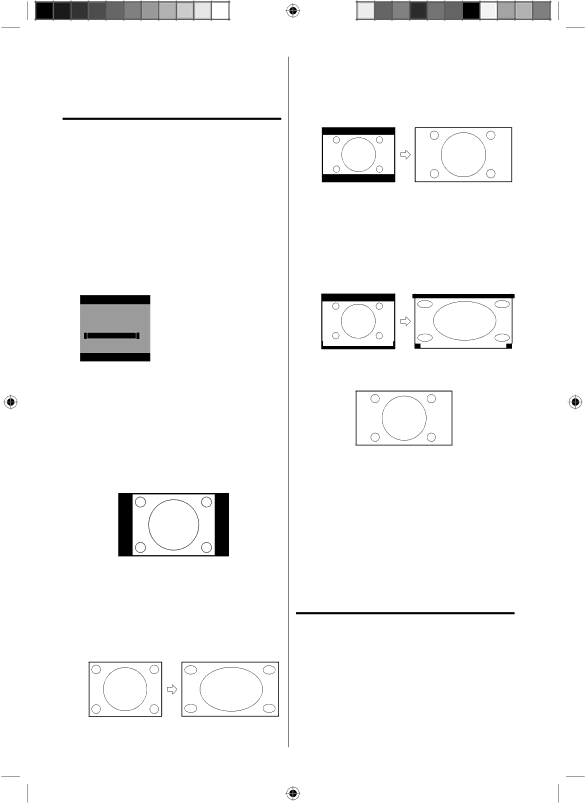
Natural picture size

In some cases, this image will display the size of standard 4:3 with a black side bar.

Cinema Wide1 picture size (for 4:3 format programs)

To fill the screen, the right and left edges are extended,

however; the center of the picture remains near its former ratio.

The top and bottom edges of the picture may be hidden.

Cinema Wide2 picture size (for letter box programs)

22

51F0101A_eng.indd 22

The entire picture is uniformly enlarged—it is stretched the same amount both wider and taller (retains its original proportion).

The top and bottom edges of the picture may be hidden.

A B C D E F G - - - - - - - - - - - - - - - -

Cinema Wide3 picture size (for letter box programs with subtitles)

To fill the width of the screen, it is extended horizontally. However; it is only slightly extended at the top and the bottom.

The top and bottom edges of the picture may be hidden.

A B C D E F G - - - - - - - - - - - - - - - -

A B C D E F G - - - - - - - - - - - - - - - - - - - - - - - - - -

Full picture size (for 16:9 source programs)

Full will display the picture at the maximum size.

NOTE:

Some High Definition and/or Digital broadcasts may not allow you to change the picture size.

In HDMI or COMPONENT mode with a scanning rate of 720p or 1080i, only the Cinema Wide2 and Full picture size features are available.

In PC Mode, only the Natural and Full picture size features are available. Additionally this feature will not work when display mode is WXGA.

In Cinema Wide2 picture size, some of the on screen display items may be positioned off the visible portion of the screen.

Film Mode

A smoother motion may be obtained by setting the Film Mode to “On” when you view a DVD.

1Press SETUP/TV MENU in the TV mode. The TV menu screen will appear.

2

Press

or

to select “Picture”, then press or


ENTER.


3

Press

or

to select “Film Mode”.


Press

or

to select “On” or “Off”.

3/5/08 5:05:57 PM

Image 22
Contents L26HD32D L32HD32D Digital Television Transition NoticeQualified Service Personnel Location of the required MarkingImportant Safety Instructions S3126AHOW to Handle the LCD Panel CondensationSafety Precautions Features Digital Audio Jack CoaxialContents Disc Front Remote sensor Power indicatorLocation of controls Left sideAC Input jack Rear sideRF ANT in jack JackRemote control To USE AC Power Power sourceOpen the battery compartment Install two AAA batteries Inserting BatteriesAntenna Antenna connectionsAntenna Jack Ohm Coaxial Cable Ohm Matching Transformer UHF 300 ohm CombinerCable TV connections Air/Cable selection Setting the on-screen languageMemorizing channels Automatic searchAdd/Delete channel TV operationAdding Channel Clear AllTo create channel labels Labeling channelsTo select the video input source VHF/UHF/CABLE ChannelsTo set the V-Chip Labeling video inputsTo clear a Ch Label Number buttons 0-9 , then press EnterTo change the password Downloading the additional V-Chip rating systemClosed Caption CC advancedPicture control adjustment Adjusting the picture preferenceSelecting the color temperature Setting the picture size Film ModeSelecting Stereo/Second Audio Program SAP Speakers Adjusting the backTurning off the built-in Selecting the audioPreparation Setting the Auto Shut OffResetting your settings Status display of discPlayback procedure Special playbackLimitations on MP3/WMA/JPEG CD playback MP3/WMA/JPEG and Audio CD playbackApple-HFS-System cannot be played Limitations on displayProgram playback CD Setting the Jpeg intervalSelect Files Zooming CancelRepeat playback CD Marking desired scenes Repeat playbackChanging soundtrack language Title selection SubtitlesChanging angles DVD menuSetting on screen display Setting the languageSetting the aspect ratio of TV screen Setting the picture modeDigital Out Night ModePassword and setting Parental controlEnter Password Setting the new passwordOr Enter Press or to select Password, then press or Enter Temporary disabling of rating level by DVD discLanguage code list To connect the LCD TV/DVD to a VCR with an S-Video cord Connections to other equipmentTo connect the LCD TV/DVD to a VCR To connect to a DVD player with Component Video InputTo Hdmi 1/DVI in Hdmi to DVI adapter cable Using an AV Amplifier with built-in digital surroundTo connect a Hdmi or a DVI device to the unit Not supplied To PC/DVI AudioTo connect the TV/DVD to a camcorder, or a TV Game To return to normal mode Press Input Select againTo connect an audio system To connect the TV/DVD to a PC Personal ComputerReception disturbances IgnitionTV Broadcast Reception Problems and troubleshootingSymptoms ChannelsRemote Control DVDModel SpecificationsAccessories GeneralWhat your warranty does not cover How to get serviceWhat we will do TTE Technology, Inc Product Registration Limitation of WarrantyHow State Law relates to this warranty West 103rd Street Indianapolis,
Related manuals
Manual 2 pages 58.67 Kb