Pioneer S-DV9, XV-DV9 manual Changing discs, Press Exchange to open the disc tray

Page 37

Getting started

04

For DVD discs only: If you change discs using the DISC SKIP, DISC or DIRECT PLAY buttons, or take the disc out of the player, the play posi- tion is stored in memory. When you load the disc next time, the display shows Last Mem and you can resume playback (this works for up to five discs).

If you want to clear the resume/last memory point, press (stop) while Resume or Last Mem is displayed.

When a Video CD is loaded, the Resume point is lost if the system is switched off, or switched to a function other than DVD/CD.

For the Last Memory function to work, you

must press (stop) to stop playback before opening the disc tray or changing the disc.

The Last Memory function doesn’t work with VR format DVD-RW discs.

Changing discs

You can change any of the discs not in the play position using the EXCHANGE button on the front panel. Because the disc in the play position is unaffected, you can use this button to change discs even during playback.

1Press EXCHANGE to open the disc tray.

The EXCHANGE button only works when there is at least one disc loaded.

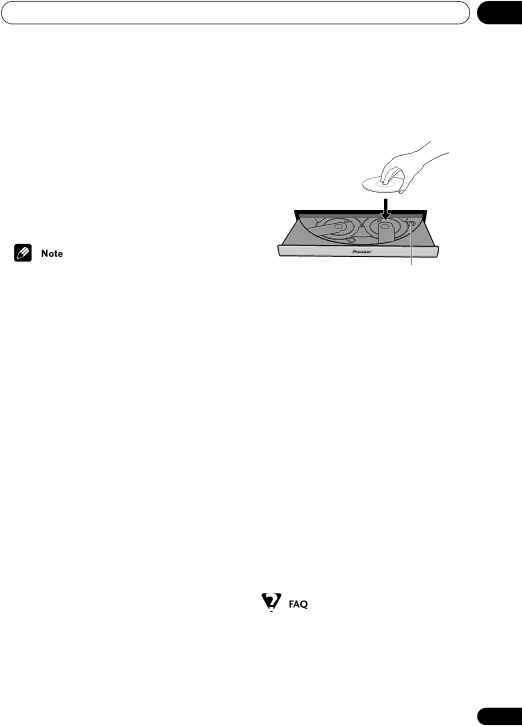
2Load a disc with the label side facing up, using the disc tray guide to align the disc.

Disc number

If you want to load more discs, press DISC SKIP to rotate the disc tray two disc spaces.

Before loading or removing discs, always wait for the disc mechanism to come to a complete stop.

Load discs only in the two fully accessible disc spaces. Do not try and load discs into any of the other spaces; they may not load correctly and cause the system to malfunction.

Do not rotate the disc tray by hand. Always use the DISC SKIP button.

Do not obstruct the movement of the disc tray.

3 Press EXCHANGE or OPEN/CLOSE to close the disc tray.

• Always use the OPEN/CLOSE or EXCHANGE button to close the disc tray after exchanging discs. Never push the disc tray shut by force.

After I load a DVD disc, it ejects automatically after a few seconds!

37

En

Image 37
Contents XV-DV9 For XV-DV9 Location Rear of the unitFor XW-DV1WS Operating EnvironmentFollowing does not apply to the Asian and Oceanic models LASERPRODUCTCLASS1Voltage selector For XV-DV9 onlyContents Surround sound and other settings Using the timerVideo Adjust menu Initial Settings menuWidescreen TV users Standard TV users Recording mode Troubleshooting GeneralBefore you start FeaturesBefore you start Chapter What’s in the boxUsing the remote control Disc / content format playback compatibilityBefore you start File format used by digital still cameras Jpeg file compatibilityConnecting up Chapter Connecting upConnecting the speakers and wireless speaker system Connecting up Placing the speakers Before mounting Wall-mounting the center speakerConnecting using the S-video output Connecting up Connecting to your TVConnecting using the component video output Listening to TV audio through this system When TV format is set to PALUsing the SR+ mode with a Pioneer plasma display Connecting up Using this unit with a Pioneer plasma displayTo switch SR+ mode on/off, press SR+ Shift + Connecting up Pull off the protective shields of both AM antenna wires Connecting up Connecting the supplied antennasAssembling the loop antenna AM loop antennaFM wire antenna Connecting the powerControls and displays Chapter Controls and displaysFront panel 16 1518 17 16 Controls and displaysSpeaker indicators Timer indicatorsRPT and RPT-1 12 2 PRO Logic IIControls and displays Remote control Tune + Cursor buttons, Enter and tuning buttonsST + QUIET/MIDNIGHTProgram Shift + 1 Timer Shift + 6Repeat Shift + 2 Random Shift + 3Channel indicators Wireless speakerControls and displays Transmitter CH 1 CH 2 CH 3 CHPower indicator Wireless Mode switchTuned indicator Getting started Switching on and setting upGetting started Chapter Setting the clock Using the Room SetupGetting started Button Setting up the remote to control your TV Playing discs Getting started Using the on-screen displaysPress OPEN/CLOSE to open the disc tray Load a disc Basic playback controlsResume and Last Memory Using the front panel controlsButton What it does Resume and Last MemoryPress Exchange to open the disc tray Changing discsPress Exchange or OPEN/CLOSE to close the disc tray DVD-Video disc menus Why won’t the disc I loaded play?Listening to the radio Video CD/Super VCD PBC menusImproving poor FM reception Press Enter to save the station presetMemorizing stations Tune to a frequencyListening to other sources Listening to station presetsSinging karaoke Press System Setup Getting started Using the wireless speaker systemSwitch the main unit and wireless speaker back on Front left Center Front right Press Surround to select the ‘Auto’ listening mode Auto listening modeListening to your system Listening to your system ChapterUse the cursor up/down buttons to adjust the setting Dolby Pro Logic II Music settingsListening to your system Listening in surround sound Use the cursor up/down buttonsUsing Front Surround Listening to your system Using the Advanced Surround effectsTo adjust the effect level Listening with headphonesListening in stereo Djusting the Advanced and Front rround effect levelListening to your system Enhancing dialogue Using Quiet and Midnight listening modesListening with a virtual surround back speaker Press Sound Mode Listening to your system Adjusting the bass and trebleTo adjust the sound To select ‘Bass’ or ‘Treble’Playing discs Chapter Playing discsScanning discs Playing in slow motion Using the Disc Navigator to browse the contents of a discFrame advance/frame reverse Looping a section of a disc Using repeat playTo resume normal playback, select ‘Off’ from the menu During playback, press Home Menu and select ‘Play Mode’Select ‘Repeat’ from the list of functions on the left Using random playSelect a repeat play option Select a random play optionPress Home Menu and select ‘Play Mode’ Creating and editing a DVD program listSelect ‘Program’ from the list of functions on the left Select ‘Create/Edit’ from the list of program optionsPress Enter to add the highlighted item to the program list Creating and editing a non- DVD program listAdd further items to the program list in the same way To play the program list, press playProgram Program Step Disc Folder Track Searching a disc Select a search modeOther functions available from the program menu Press Enter to start playbackSwitching DVD audio language Playing discs Switching subtitlesSwitching audio channels when playing a Video CD/ Super VCD Zooming the screenDisplaying disc information Switching camera anglesOSD disc information Front panel display informationViewing Jpeg discs Using the Jpeg Disc Navigator and Photo BrowserViewing Jpeg discs Chapter Playing a Jpeg slideshowViewing Jpeg discs Using the Photo BrowserUse the cursor buttons Navigate Using the timer Chapter Using the timerSetting the wake-up timer Set the switch-off timeSetting the sleep timer Using the timerTurning the wake-up timer on/off Press Timer Shift + 6 twice to reach the timer menu UseTo check how much time is left, repeat steps 1 Using the System Setup menu Surround sound and other settings ChapterSurround and sound setup options SR+ control options for Pioneer plasma displays Surround sound and other settingsFunction setting for DVD input Setting the channel levelsFunction setting for TV input Function setting for L1 inputWhen you’re done, press Enter to exit test tone setup Video Adjust menu Chapter Video Adjust menuVideo Adjust Creating your own presetsInitial Settings menu Chapter Initial Settings menuUsing the Initial Settings menu Video Output settingsLanguage settings Initial Settings menuDisplay settings SettingOptionOptions Registering a new passwordParental Lock Setting/changing the Parental Lock Changing your passwordSetting/changing the Country code Select ‘Password Change’System Setup menu options in standby Optional system settingsAdditional information Additional information ChapterAdditional information Resetting the systemWatching Ntsc on a PAL TV MOD. PAL Titles, chapters and tracks Using and taking care of discsDVD Video regions Handling discsHints on installation Proper installation and maintenance of this systemStoring discs Discs to avoidWireless speaker system maintenance and precautions AC adapter and power cord caution Moving the wireless speakerRadio wave reflections Radio wave cautionScope of operation For safety in operationStatic electricity Connecting auxiliary components Additional information Connecting external antennasExternal AM antenna External FM antennaPress Sound Mode Use the Use Recording modeButtons to select ‘Rec Mode?’ To select ‘R.Mode On’ or ‘R.Mode Off’ProblemRemedy Additional information TroubleshootingGeneral DVD/CD/Video CD/Super VCD player Problem RemedySound Demo shows STANDBY/ON buttonTuner WMA/MP3/JPEG discsConnecting external antennas on Wireless speaker systemMessage Description Error MessagesAdditional information Screen sizes and disc formats Selecting languages using the language code listWidescreen TV users Standard TV usersCountry code list Additional information Language code listMarantz Additional information Preset code listDolby Digital Additional information GlossaryAdditional information Specifications Wireless speaker Digital Wireless Speaker System XW- DV1WS GeneralAccessories Digital Wireless Speaker System TransmitterPioneer Corporation