Contents
Model Number Serial Number
Customer’s Record
India Only
English
Operating Instructions
Page
Contents
Safety Precautions
Do not apply strong force or impact to the display panel
Transport only in upright position
Built-in wireless LAN
Built-in wireless LAN / Bluetooth
Bluetooth wireless technology
Radio waves
Standard accessories
Accessories / Options
Optional accessories
Accessories / Options
Wall-hanging bracket
Installing / removing remote’s batteries
Assembly screw Neck
Assembly screw Bracket Cover Base
Attaching / removing the pedestal
Do not disassemble or modify the pedestal
Securing the TV
Assembling the pedestal
Removing the pedestal from the TV
Adjusting the panel to your desired angle
Preventing the TV from falling over 42 / 50 class
Identifying Controls
Remote Control
Using the On Screen Displays Operation guide
Indicator / Control panel
Auto power standby function
Identifying Controls
Terminals
Basic Connection
Connections
Mains lead and aerial
Player / 3D compatible player
AV devices
DVD Recorder / VCR
Set top box
Wired connection
Using clamper
Wireless connection
Network
Plug the TV into mains socket and switch on
Auto Tuning
Setup the network connection
SelectCountry your country
Tuning
Wired
Wireless
Auto
Shop viewing environment for shop display only
Select Home
WPSPush button
Select
Access Viera Connect
Using Viera Connect
Turn power on
Watching TV
Select TV mode Select a channel
Other useful functions
Display Information banner
Off Timer
Display the selectable settings for the current status
Aspect
2While the list is displayed, select the mode
Change OSD language
Last view
Viewing Teletext
Switch to Teletext
Select
Reveal hidden data
View in multi window
Watch TV while waiting for update
Store frequently viewed pages
View sub
Watching External Inputs
If input mode is not switched automatically
Turn the TV on
Display the input selection menu
How to change the code
Viewing 3D images
Viewing 3D images
3D Eyewear Use
Storing and cleaning the 3D Eyewear
3D Eyewear
Part names and functions
Indicator lamp status
Registration
1Turn on the TV 2Slide the power switch from OFF to on
Viewing range for the 3D Eyewear
First registration
3Replace and fasten the cover
Replacing the battery
2Replace the battery
Turn the 3D Eyewear on and put it on
Changing 2D 3D mode
View the 3D images
To view the 3D images
To change 3D format manually
Return button to go to Effect setting
3D Settings
Adjustments / Configurations alternatives
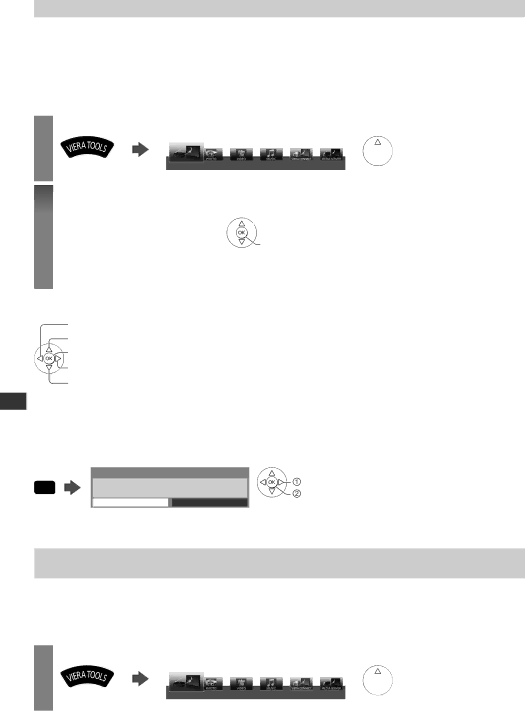
Display icons of the feature Select a feature
How to Use Viera Tools
Follow the operations of each feature
How to Use Viera Tools
Display the menu
How to Use Menu Functions
How to Use Menu Functions
Menu list
Picture
Menu
Picture Sound
TV remote control TV / Audio Out TV Off / TV and Audio Out
Surround sound settings
Mono When stereo signal cannot be received
M1 / M2 Available while mono signal is transmitted
Timer Setup
Power off Link
Power on Link
Standby Power
Power Save
Select TV mode Display the menu and select Setup
Tuning and Editing Channels
Select Tuning Menu
Tuning and Editing Channels
To edit channels
Set all channels automatically Auto Tuning
Skip unwanted channels, Edit Channels Channel List Edit
Auto Tuning using the buttons on the TV
Set TV channel manually Manual Tuning
Fine Tuning
1Select the channel position
Select Child Lock
Child Lock
Control channel audience Child Lock
Child Lock
Select System Menu
Restore Settings Shipping Condition
Select Shipping Condition
1Check the message and initialise
Menu Adjustments / Configurations alternatives
PC menu setting
Displaying PC Screen on TV
Select the external input Select PC
Select Viewing Mode and set the mode
Advanced Picture Settings
Select Advanced Settings
Adjust the detailed picture settings Advanced Settings
Using Media Player
Using Media Player
To insert or remove the SD Card / USB Flash Memory
USB Flash Memory
Insert the SD Card or USB Flash Memory to the TV
Select the device to access
Start Media Player
Starting Media Player
Photo mode
Change the contents
To sort by folder, recorded date or recorded month
Multi Shot 3D
To enjoy the saved 3D photos
Photo Settings
Slideshow
How to operate in the playback
Video mode
To turn off the auto resume Auto Resume Setup p
To repeat playback Video Setup p
Video Setup / Auto Resume Setup
Video Setup Auto Resume Setup
Access / store
Select Access
Spdif Selection
Audio output Settings
Music Setup / Auto Resume Setup
Music mode
Music Setup
Playback from File view
Using Network Services Dlna / Viera Connect
Using Network Services Dlna / Viera Connect
Dlna Remote Control
Viera Connect
Viera Connect
Network connections
Example
Network Link Settings
Network Setup
Acquire IP Address / Acquire DNS Address
Wired connection settings
Proxy
Proxy Port
Wireless connection settings
6Select Connection Test and access to test
Update TV’s software
Select Software Update
Wpspin
Using Dlna features
Select one of the media servers to access
Display Viera Tools and select Media Server
Select the file
For music file
Using
For video file
Option menu for each content
Viera Connect
Audio output settings for video contents
Link Functions Viera Link
Summary of features
Viera Link Hdmi connection
Link Functions Viera Link
Link
Viera Link Hdmi and Audio out connections
Power off link
Power on link
Viera Link ∗
Channel download
Display Viera Tools and select Viera Link
Summary of features p , 73, Preparations p
Select Direct TV Rec and start recording
To stop recording
Pause Live TV programme Pause Live TV
Select Pause Live TV and pause
Viera Link
To operate Pause Live TV
If you access non-VIERA Link equipment
Select the equipment to access
Operate the menu of the equipment
If multiple recorders or players are connected
Speaker control Speaker Selection
Set to Home Cinema or TV
Multi-channel sound
Home Cinema
Hdmi equipment
External Equipment
To watch DVDs
Camcorder / Game equipment
USB devices
Headphones
Headphone Volume p
AV2 IN∗1
Hdmi 1 USB 1 Features
Types of connectable equipment to each terminal Terminal
Technical Information
Technical Information
Channel Allocation
Stereo / Bilingual Sound Selection
Video
Supported file format in Media Player and media servers
Photo
Codec File extension Restrictions
Music
Subtitle text file of DivX
DivX
To show DivX VOD registration code
DivX VOD p
USB Flash Memory
Devices for playing back
SD Card
Hdmi connection
Applicable Hdmi features
PC connection
DVI connection
Characters table for numeric buttons
USB connection
Technical
Information
Component Y, PB, PR from AV2 in terminal, Hdmi
Input signal that can be displayed
PC from D-sub 15P
PC from Hdmi terminal
FAQs
FAQs
Problem Causes / Actions
Network
Cannot connect to
FAQs Maintenance
Maintenance
First, remove the mains plug from the socket outlet
Display panel, Cabinet, Pedestal
Specifications
Specifications
Standard compliance
Card slot
Frequency
Range∗1
Power rating
Power Source
Dimensions W × H × D
Headphones
Usage temperature range
3D Eyewear Dimensions W × H × D
Battery∗
Lens type
Licence
Licence
Memo