LG Electronics XBR446 owner manual Connections Connecting to a TV

Page 17

Connections (Continued)
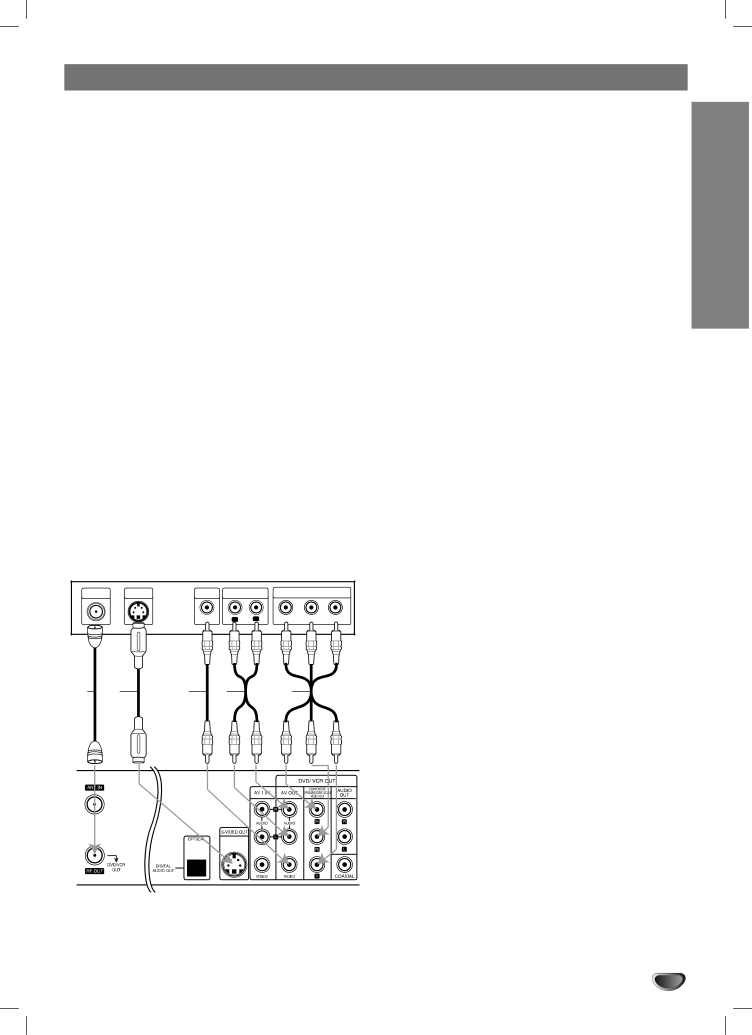
Connecting to a TV

Make one of the following connections, depending on the capabilities of your existing equipment.

RF coaxial connection

Connect the RF.OUT jack on the VCR/DVD Recorder to the antenna in jack on the TV using the 75-ohm Coaxial Cable supplied (R).

ote

If you use this connection, tune the TV to the VCR/DVD Recorder’s RF output channel (CH 3 or 4).

How to set the VCR/DVD Recorders RF output channel

When the VCR/DVD Recorder is turned off, press and hold CH (v/V) on the front panel for about five seconds to change the RF output channel (CH 03 or CH 04). “RF-03” or “RF-04” appears in the display win- dow.

Audio/Video connection

1Recorder to the video in jack on the TV using the video cable (V).Connect the VIDEO OUT jack on the VCR/DVD

Connect the Left and Right AUDIO OUT jacks

from

2 the VCR/DVD Recorder to the audio left/right in

jacks from the TV using the audio cables (A).


Rear of TV


ANTENNA

S-VIDEO

VIDEO

AUDIO INPUT

COMPONENT/PROGRESSIVE VIDEO INPUT

INPUT

INPUT

INPUT


L R

Pr

Pb

Y

R S V A C

Rear of VCR/DVD Recorder

S-Video connection

1Recorder to the S-Video in jack on the TV using the S-Video cable (S).Connect the S-VIDEO OUT jack on the VCR/DVD

2 Connect the Left and Right AUDIO OUT jacks from the VCR/DVD Recorder to the audio left/right in jacks on the TV using the audio cables (A).

Component Video (Color Stream®) connection

1VIDEO OUT jacks on the VCR/DVD Recorder to

the corresponding in jacks on the TV using an Y Pb Pr cable (C).Connect the COMPONENT/PROGRESSIVE SCAN

2 Connect the Left and Right AUDIO OUT jacks from the VCR/DVD Recorder to the audio left/right in jacks on the TV using the audio cables (A).

Progressive Scan (ColorStream® pro) connection

If your television is a high-definition or “digital ready” television, you may take advantage of the VCR/DVD Recorder’s progressive scan output for the highest video resolution possible.

If your TV does not accept the Progressive Scan for- mat, the picture will appear scrambled if you try Progressive Scan on the VCR/DVD Recorder.

1VIDEO OUT jacks on the VCR/DVD Recorder to

the corresponding in jacks on the TV using an optional Y Pb Pr cable (C).Connect the COMPONENT/PROGRESSIVE SCAN

2 Connect the Left and Right AUDIO OUT jacks from the VCR/DVD Recorder to the audio left/right in jacks on the TV using the supplied audio cables

(A).

otes

Set Progressive Scan option to “ON” in the General menu, see page 22.

Progressive Scan does not work with the RF, Audio/Video or S-Video connections.

DVR HOOKUP

17

Image 17
Contents VCR / DVD Recorder Regulatory Information FCC Part Safety PrecautionsImportant Safety Instructions Table of Contents Table of Contents Recordable Discs OverviewPlayable Discs Otes on DVDs and Video CDsTypes of video CDs About SymbolsDisc-related terms What are Recording modes? About Recordable discsIs editing a DVD like editing a video tape? About word ‘Original’ and ‘Playlist’About DVD recording Disc types and recording formats, modes, and settingsCards capable of displaying and saving Precautions Front Panel Repeat Indicates repeat mode Disc type indicatorsFunction Display Window Indicates the type of disc loadedRemote Control Overview COMPONENT/PROGRESSIVE Scan Video OUT Y Pb Pr Rear PanelAudio OUT Left/Right Optical Digital Audio OUT jackCable Service Without Cable Box Connecting Antenna/Cable TV to VCR/DVD RecorderCable Service With Cable Box ConnectionsConnections Connecting to a TV Amplifier Receiver Connections Connecting to Optional EquipmentDigital Multi-channel sound Front of VCR/DVD Recorder Connecting a Digital CamcorderTuning Band Select Before Operation Initial SettingsGeneral Operation Auto Channel SetManual Clock Set Auto Clock SetBefore Operation DRC Dynamic Range Control Dolby DigitalVocal Sampling Freq. FrequencyBefore Operation Lock Parental Control Set PasswordMovie Rating Changing the 4-digit codeCountry Code Disc Record ModeVCR Record Mode DV Record Audio Disc Initialize Mode VR Mode or Video Mode Then press EnterAuto Chapter Disc InitializeDisc Protect Disc FinalizeAutoPlay Follow steps 1-3 as shown on page 26 DiscCharacter then press Enter to confirm your selection Disc LabelKeyboard menu appears.Press Enter Before Operation General Explanation On-Screen Display Menu Options Before Operation OSD Menu Options by Media TypeSelection Method Selection MethodMode Moving to another Title Operation with DVD and Video CD Playing a DVD or Video CDMoving to another CHAPTER/TRACKs Slow MotionSearch Operation with DVD and Video CDRepeat Chapter Repeat A-BZoom Time SearchDisc Menus DVD Title Menus DVDChanging the Audio Language DVD Camera Angle DVDChanging the Audio Channel 3D Surround NormalMusic menu options Audio CD and MP3/WMA OperationSearch CD Moving to Another TrackRepeat A-B CD About MP3Erasing MP3/WMA files or folders From the Memory Card M/C Copying MP3/WMA files on the disc To Memory CardSelecting multiple files folders Use v / V to selectMove Programmed Playback with Audio CD and MP3/WMAProgram List menu options Erasing a Track from the Program List Repeat Programmed TracksErasing the multi tracks on Program List Changing the order of Program ListPhoto menu options Photo Disc Operation Viewing a Jpeg File Jpeg M/CPhoto-CD menu options Jpeg Photo-Memory menu options M/CPhoto Disc Operation Normal Playback VHS VCR Mode Tape Playback PreparationSpecial Effect Playback VHS Tracking Control VHSBasic Recording Basic Recording from a TV Instant Timer RecordingPress the Dubbing button on the Remote Dubbing from VCR to DVDControl or DUB on the front panel Dubbing menu appearsChecking Timer Recording Details Timer RecordingCanceling a Timer Recording Stopping a Timer Recording in ProgressRecording from an External Input DV-Related Messages Recording from an External Input What is DV?Troubleshooting Title List and Chapter List Menu Using the Title List-Original menu VRUsing the Chapter List-Original menu Using the Chapter List-Playlist Menu Using the Title List-Playlist Menu VRIf the disc has already been finalized Using the Title List menu VideoDeleting a Title Video Using the Chapter List menu +RW Using the Title List menu +RWUsing the Chapter List menu +R Using the Title List menu +RTitles, Chapters and Parts VR Title and Chapter EditingAdding Chapter Markers Changing Title ThumbnailsMaking a New Playlist VR Title appears in the updated Playlist menuAdding Additional Titles/Chapters to Playlist VR If you want to display the Chapter List-OriginalDeleting a Part VR Deleting a Title/ChapterCombining Two Chapters Into One Naming a Title VR Video +RW +RUse v/V to select Title Name option then press Enter CombineSelect a chapter from the Chapter List-Playlist menu This function is not available if there is only one chapterSelect Protect option on the options If you select Protect on Title List-Original menuWant to divide the title. The Done option is selected Divide One Title Into Two +RWSelect ‘Hide’ option on the options Overwrite Recording +RW Clean-up Recording Video VR +RWControlling other TVs with the remote Controlling Your TV with the Supplied RemoteCode numbers of controllable TVs TV Control Buttons By pressing You canChoose a country code from this list Language Code and Country Code ListSymptom Cause Solution TroubleshootingIf you observe any of the following symptoms Reset the VCR/DVD RecorderSpecifications Outputs AccessoryVp-p 75 Ω, sync negative, RCA jack x P-p, 75 Ω, negative sync, Mini DIN 4-pin x P-p 75 ΩIssue O LG Electronics, Inc Limited Warranty USA