VIZIO VX37L HDTV10A User Manual
Installation Preparation
Please read this user manual carefully before installing your VIZIO HDTV.
The power consumption of the TV is about 210W, please use the power cord designated for TV. When an extension cord is required, use one with the correct power rating. The cord must be grounded and the grounding feature must not be defeated.
The TV should be installed on a flat surface to avoid tipping. For proper ventilation, you must allow space between the back of the TV and the wall. If you would like to mount your TV on the wall, please see below ‘Preparing Your LCD HDTV for Wall Mounting’ for additional information. Avoid installing the TV in places with high humidity, dust or smoke so as not to shorten the service life of the electronic components.
Install the TV in landscape orientation; any 90˚ clockwise or
VIZIO offers professional installation services. Please contact VIZIO for more information on these services at
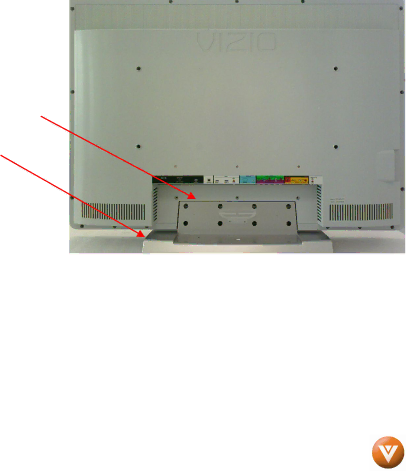
Preparing Your LCD HDTV for Wall Mounting
The VIZIO VX37L can either be kept on the stand base or mounted on the wall for viewing. If you choose to mount the VX37L on the wall, please follow the instructions below for removing the stand base.
To remove the stand base
1.Unplug all of the cables and cords from your VX37L.
2.Place the VX37L face down on a soft and flat surface (blanket, foam, cloth, etc) to prevent any damage to the TV.
3.Remove the eight (8) screws holding the base to the VX37L.
4.Carefully remove the stand base.
To find the perfect mount for the VIZIO VX37L, browse VIZIO’s certified mount selection at www.VIZIO.com or call directly
Version 1/25/2007 | 5 |
| www.VIZIO.com |