Contents
Standish Court Mississauga, Ontario L5R 4B2
Web Site Address
Ridgefield Park, NJ
Standish Court Mississauga, Ontario L5R 4B2 Canada
Other countries
A Only
User Instructions
Contents
Assembling the Cables
Connecting and Preparing Your TV
List of Features
Checking Parts
+ VOL
Press to see an on-screen menu of your TV’s features
Aim the remote control towards this spot on the TV
Viewing the Control Panel
Hdmi in 1, 2DVI
Viewing the Connection Panel
Installing Batteries in the Remote Control
Remote Control
Connecting Cable TV
Connecting VHF and UHF Antennas
Connections
ANT
Connecting to a Cable Box that Descrambles Some Channels
Hdmi Cable Not supplied
Using a Video / Audio Cable
Connecting a Camcorder
Video Connection
Connecting a VCR
Using an Hdmi Cable
Each Camcorder has a different back panel configuration
Connecting an Amplifier / DVD Home Theater
Connecting a Digital Audio System
Using an HDMI/DVI Cable
Connecting a PC
Changing Channels
Adjusting the Volume
Operation
Turning the TV On and Off
Viewing the Display
Using the Tools Button
13-1
Application, Support
Example Setting the TV’s Brightness in the Picture Menu
Adjusting the Brightness to
Viewing the Menus
Message Select the Antenna source to memorize. is displayed
Plug & Play Feature
If you want to reset this feature
Displayed
Storing Channels
Channel Control
Managing Channels
Channel List Tools Menu in Programmed
Mode
Changing the Picture Settings
Advanced Settings
Picture Control
Picture Options
Hdmi Black Level
Film Mode
Screen Burn Protection
Picture Reset
Picture Reset → Reset Picture Mode / Cancel
Press any key on the remote control to cancel this feature
Resets all picture settings to the default values
Sound Control
Changing the Sound Settings
Function Description
Configuring the Setup Menu
Sound Reset
Game Mode is not available in regular TV mode
Chip
Analog
Caption Mode Default, CC1~CC4, Text1~Text4 Digital
Caption On-Screen Text Messages
Change PIN
Energy Saving
Melody
Melody
Time
Setting the Time
Edit Name
Using the Color buttons on the remote with the Source list
Source List / Edit Name
Source List
PC Display
Using Your TV as a Computer PC Display
Display Modes
Picture Test
Signal Strength Digital
Support
Self Diagnosis
Contact Samsung
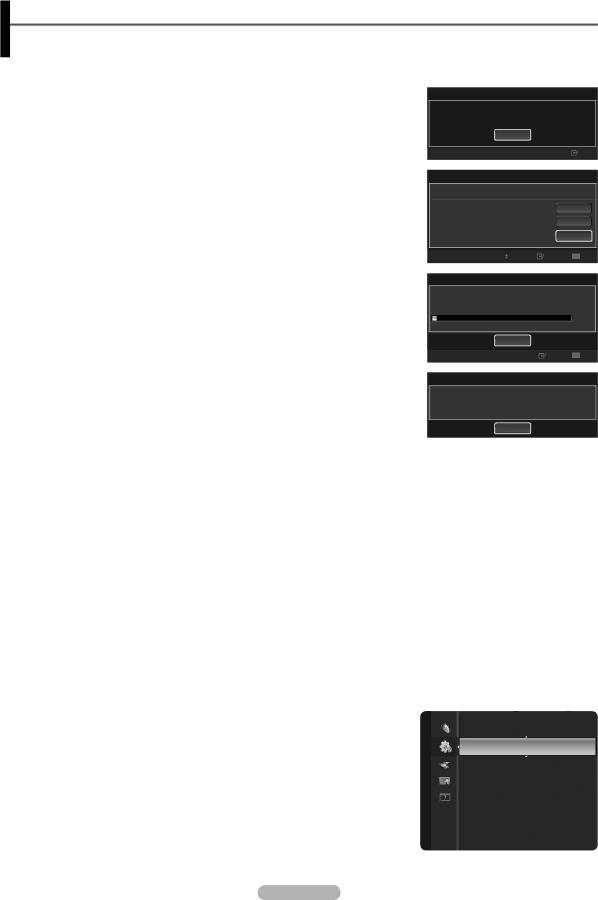
Software Upgrade
Software upgrade
HD Connection Guide
Connect only one Home Theater
Connecting Anynet+ Devices
Anynet+
To connect to a Home Theater
Scanning and Switching between Anynet+ Devices
Setting Up Anynet+
Listening through a Receiver Home theater
Recording
Troubleshooting for Anynet+
Appendix
Troubleshooting
How to attach the Stand-Base
Preparation before installing the Wall-Mount
Using the Stand-Base
Wall
Accessaries
Securing the TV to the Wall
To prevent the TV from falling
Product Family Inch Vesa Spec. a * B Standard Screw Quantity
Wall Mount Kit Specifications Vesa
Specifications
Jack Panel Detail 7.2 x 3.7 inches
Dimensions PN50B530S2F
Dimensions PN58B530S2F
Téléviseur à écran à plasma
Autres pays
États-Unis seulement
Aux États-Unis 1-800-SAMSUNG
Mode d’emploi
Appuyer Remarque Touche à effleurement
Symbole
Table des matières
Branchement d’un lecteur DVD/Blu-Ray, d’un câblosélecteur
Assemblage des câbles
Branchement et préparation de votre téléviseur
Liste des caractéristiques
Vérification des pièces
TV, AV, Composante1, Composante2, HDMI1, HDMI2/DVI, HDMI3
Présentation du panneau de commande
Et de la télécommande
Pointez la télécommande vers ce capteur sur le téléviseur
Ce connecteur ne sert qu’aux réparations
Présentation du panneau de branchement
Connecteur pour entretien seulement
Brancher à une composante audionumérique
Insertion des piles dans la télécommande
Télécommande
Branchement des antennes VHF et UHF
Branchements
Branchement à la câblodiffusion
Câble d’ Entrée Répartiteur
Câble Hdmi non compris
’aide d’un câble vidéo/audio
Branchement d’un caméscope
Branchement vidéo
La configuration arrière de chaque caméscope varie
Branchement d’un magnétoscope
’aide d’un câble Hdmi
Branchement d’un système audionumérique
’aide d’un câble HDMI/DVI
Branchement d’un ordinateur
Changement de canal
Réglage du volume
Fonction
Mise sous tension et hors tension du téléviseur
Visualisation de l’affichage
La touche Tools
Appuyez sur la touche TOOLS. Le menu Outils s’affiche
Touche Fonctions
Visualisation des menus
Le message Mémoriser une source d’antenne
Fonction Prêt à l’emploi
Si vous souhaitez réinitialiser ce paramètre
Enregistrement des canaux
Commande des canaux
Gestion des canaux
Écoute par minuterie
Ajouter ou Supprimer
Ajouter aux favoris / Supprimer des favoris
→ Ajouter aux favoris ou Supprimer des favoris
Modification des paramètres de l’image
Commande de l’image
Réglages avancés
Options d’image
Protection contre la brûlure d’écran
Source d’entrée Format de l’image
Réduct. bruit num
Nv nr Hdmi
Réinitialisation de l’image
Réduction des effets de la brûlure d’écran
Modification des paramètres du son
Commande du son
Réinitialisation du son
Réglage du menu Configuration
Description des fonctions
Sélect. le haut-parleur
Sous-catégories
Blocage V-Chip → Off / On
Cont. paren. TV
Catégories de base
Sous-titres texte à l’écran
Économiseur énergie
Mélodie
Mélodie Moyen
Manuel
Réglage de l’horloge
Fuseau hor
Mise en veille
TV, AV, Composante1, Composante2, HDMI1, HDMI2/DVI, HDMI3
Liste source / Entrer le nom
Liste source
Entrer le nom
Modes d’affichage
Configuration du logiciel sur votre PC sous Windows XP
Écran d’ordinateur
Utilisation de votre téléviseur comme écran d’ordinateur PC
Essai d’image
Autodiagnostic
Puissance du signal canaux numériques
Support technique
Clé USB Panneau latéral Du téléviseur
Mise à jour du logiciel
Guide de connexion HD
Contacter Samsung
Branchement d’un cinéma maison
Branchement de dispositifs Anynet+
Maximum de 3 appareils de même type
Balayage et permutation entre les appareils Anynet+
Configuration d’Anynet+
Menu Anynet+ Description
Enregistrement
Écoute par l’intermédiaire d’un récepteur cinéma maison
Menu Anynet+
Dépannage de la fonction Anynet+
Dépannage
Annexe
Utilisation du support
Préparation avant l’installation du support mural
Cas A. Installation du support mural Samsung
Assemblage du socle
Pour empêcher le renversement du téléviseur
Accessoires
Fixation du téléviseur au mur
Supportdu téléviseur
Pouces
Spécifications pour la trousse de fixation murale Vesa
Plasma
Spécifications
VUE Latérale VUE Arrière
Détails DU Panneau DES Prises 7,2 x 3,7 Pouces
Dimensions PN58B530S2F
Cette page est laissée Intentionnellement en blanc