FCC regulations
NOTE: THE MANUFACTURER IS NOT RESPONSIBLE FOR ANY RADIO OR TV INTERFERENCE CAUSED BY UNAUTHORIZED MODIFICATIONS TO THIS EQUIPMENT. SUCH MODIFICATIONS COULD VOID THE USER AUTHORITY TO OPERATE THE EQUIPMENT.
This equipment has been tested and found to comply with the limits for a Class B digital device, pursuant to Part 15 of the FCC Rules. These limits are designed to provide reasonable
protection against harmful interference in a residential installation. This equipment generates, uses and can radiate radio frequency energy and, if not installed and used in accordance with the instructions, may cause harmful interference to radio communications. However, there is no guarantee that interference will not occur in a particular installation.
If this equipment does cause harmful interference to radio or television reception, which can be determined by turning the equipment off and on, the user is encouraged to try to correct the interference by one or more of the following measures:
–
–Increase the separation between the equipment and receiver.
–Connect the equipment into an outlet on a circuit different from that to which the receiver is connected.
–Consult the dealer or an experienced radio/TV technician for help.
Ventilation
IMPORTANT – The unit will become hot when in use. Do not stack multiple units on top of each other. Do not place in an enclosed area such as a bookcase or in a cabinet without sufficient ventilation.
Ensure that small objects do not fall through any ventilation grille. If this happens, switch off immediately, disconnect from the mains supply and contact your dealer for advice.
Positioning
Choose the installation location carefully. Avoid placing it in direct sunlight or close to a source of heat. No naked flame sources, such as lighted candles, should be placed on the unit. Also avoid locations subject to vibration and excessive dust, cold or moisture. The unit can be used in a moderate climate.
This unit must be installed on a sturdy, level surface. Do not place in a sealed area such as a bookcase or in a cabinet. Do not place the unit on an unstable surface or shelf. The unit may fall, causing serious injury to a child or adult as well as serious damage to the product. Do not place other equipment on top of the unit.
Due to stray magnetic fields, turntables or CRT TVs should not be located nearby due to possible interference.
Electronic audio components have a running in period of around a week (if used several hours per day). This will allow the new components to settle down and the sonic properties will improve over this time.
Power sources
The unit should be operated only from the type of power source indicated on the marking label. If you are not sure of the type of
This unit can be left in Standby mode when not in use and will draw <1W in this state. To turn the unit off, switch off at the rear panel. If you do not intend to use this unit for a long period of time, unplug it from the mains socket.
Overloading
Do not overload wall outlets or extension cords as this can result in a risk of fire or electric shock. Overloaded AC outlets, extension cords, frayed power cords, damaged or cracked wire insulation and broken plugs are dangerous. They may result in a shock or fire hazard.
Be sure to insert each power cord securely. To prevent hum and noise, do not bundle the interconnect leads with the power cord or speaker leads.
azur 650BD
Cleaning | ENGLISH |
| |
To clean the unit, wipe its case with a dry, |
|
cleaning fluids containing alcohol, ammonia or abrasives. Do not spray an |
|
aerosol at or near the unit. |
|
Battery disposal |
|
Please dispose of any discharged batteries according to local |
|
environmental/electronic waste disposal guidelines. |
|
Connections |
|
Before making any connections, make sure all power is turned off and |
|
only use suitable interconnects. |
|
Servicing |
|
These units are not user serviceable. Never attempt to repair, |
|
disassemble or reconstruct the unit if there seems to be a problem. |
|
A serious electric shock could result if this precautionary measure is |
|
ignored. In the event of a problem or failure, please contact your dealer. |
|
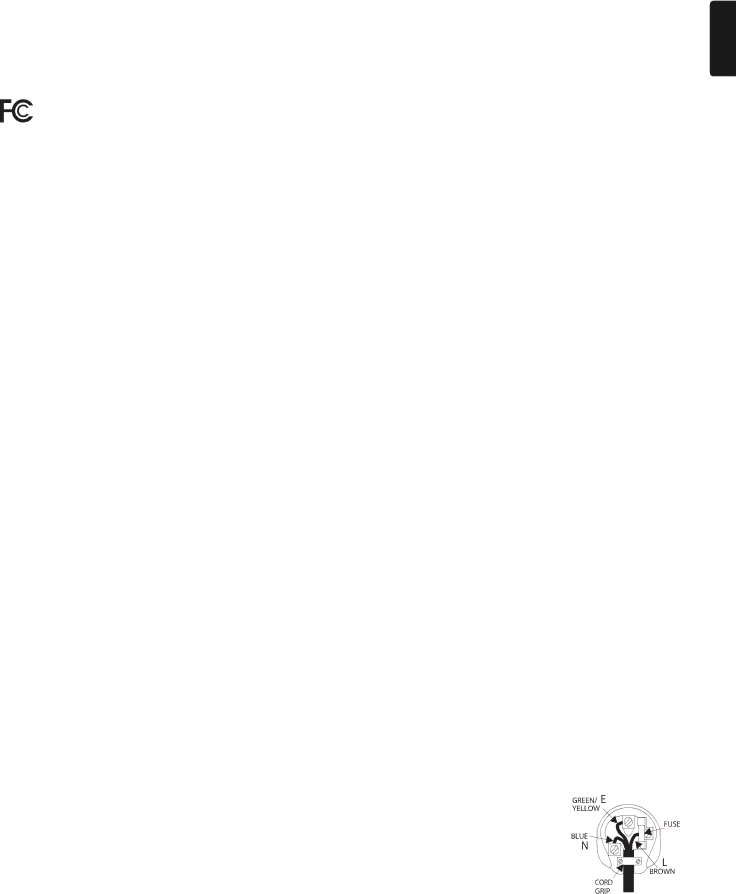
Plug-fitting Instructions (UK only)
The cord supplied with this appliance is
The wire which is coloured BLUE must be connected to the terminal which is marked with the letter ‘N’ or coloured BLACK.
The wire which is coloured BROWN must be connected to the terminal which is marked with the letter ‘L’ or coloured RED.
The wire which is coloured GREEN/YELLOW must be connected to the terminal which is marked with the letter ‘E’ or coloured GREEN.
If a standard
5