Contents
Page
Supplied accessories
Nomenclature
LCD/Viewfinder Displays
LCD panel Viewfinder Display
About LCD illuminator panel
About LCD
Command Dials
Custom Setting
Film
Exposure
Using your camera correctly
Introduction
Take trial shots
Have Nikon spot-check your camera regularly
Contents
Install Batteries and Check Battery
Power Mount Lens
About This Manual
Load Film
Basic Operation
Battery power Appears Sufficient battery power
Lightly press the shutter release button to activate
Exposure meter
Incorrect positioning of + and poles may damage the camera
Mount Lens
When camera is left unattended without lens
Check the lens type
Turn the power switch on, confirm that the film
Speed setting is set to s, then open the camera
Load Film
Back by sliding the camera back lock release lever
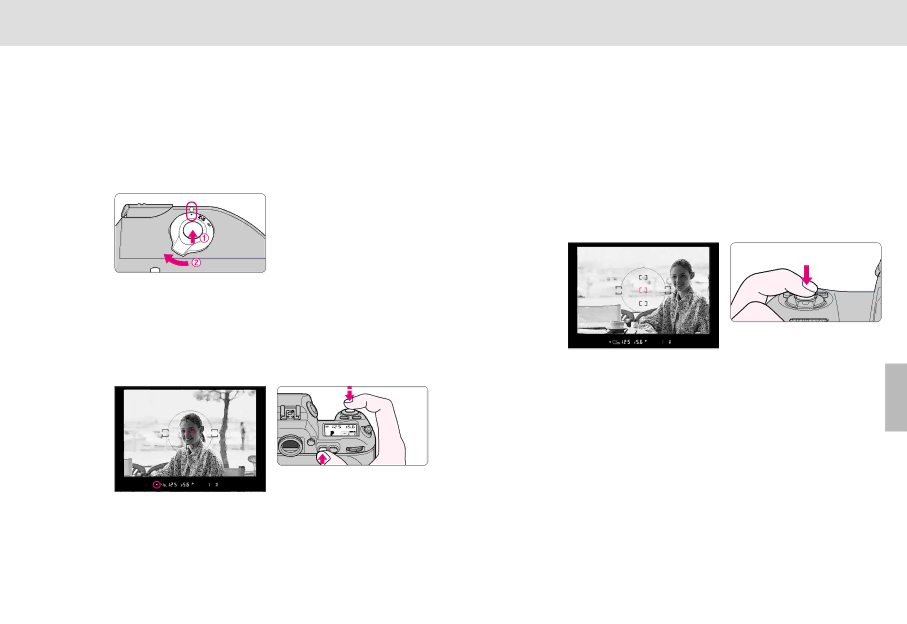
Rotate the focus area selector lock release
Set the focus mode selector to S Single Servo AF
Select center focus area with the focus area selector
Symbol Exposure mode Shooting characteristics
Shooting characteristics of exposure modes
Camera controls exposure automatically
Hold the camera properly
Hold Camera and Focus
Camera shake and shutter speed
Confirm indications in the viewfinder while lightly
Pressing the shutter release button. Shutter speed
Aperture are shown in 1/3 steps
Confirm that film is completely rewound, then
Metering System
About Metering System and Exposure
Exposure
When a non-CPU lens is attached
Types of CPU lenses and other usable lenses/accessories
Lens Compatibility
Type Nikkor and other CPU Nikkor lens
Rotate the film advance mode selector while pressing
Film advance mode selector lock release to select
Film advance mode
Film
Set focus mode selector to S or C for autofocus operation
Autofocus
Focus Area
AF start button
AF Area Mode
Rotate AF area mode selector to select AF area mode
Dynamic AF Mode with Closest Subject Priority
Autofocus modes
Confirm focus indicator / and lock focus
Appears when the subject is in focus
Focus Lock
While keeping the focus locked, recompose and shoot
Manual focus using Electronic Rangefinder
Manual Focus
Low-contrast scenes
Patterned subject or scene
Center-Weighted Metering
Exposure Metering System
Matrix Metering/3D Matrix Metering
Spot Metering
Shooting in Each Exposure Mode
Program chart
¡ Programmed Auto
Compose picture, focus and shoot
Shutter-Priority Auto
Set the shutter speed by rotating the Main-Command Dial
Locking shutter speed
£ Aperture-Priority Auto
Set the aperture by rotating the Sub-Command Dial
Locking aperture
Electronic analog exposure display
¢ Manual
Exposure factor with AF Micro-Nikkor lens
Aperture adjustment in Aperture-Priority Auto Exposure mode
Flexible Program page 47 in Programmed Auto Exposure mode
Auto Exposure Lock
Exposure Compensation
Auto Exposure/Flash Exposure Bracketing
With 1/2 steps
With 1/3 steps
With one steps
Composeshoot. picture, confirm focus indicator /
Multiple Exposure
Diopter Adjustment/LCD Illuminator
Long Time Exposure
Changing Focusing Screens
Using the tweezers, push the front edge of the holder
Upward until it clicks into place
Make sure the screen is in its proper place
Composition
Self-Timer Operation
Other than
Depth of field
About Depth of Field and Focus Tracking
Focus Tracking
Menu/Features of Custom Setting
Creating Custom Setting
Custom Setting
Bracketing order
Switching Command Dial operations pages
Auto Exposure/Flash Exposure Bracketing options
Easy Exposure Compensation
Film advance in multiple exposure
Delay time for auto meter-switch off
Delay time for self-timer operation
Shutter release confirmation with self-timer LED
Aperture setting with lens’ aperture ring pages
Two-Button Reset
Canceling Custom Setting
Types of TTL Auto Flash
Flash Sync Mode Features
¤ Slow Sync
‹ Rear-Curtain Sync
› Red-Eye Reduction
Usable Optional Speedlights
Mode
Using the Speedlight
Set the flash sync mode
Attach the Speedlight and set the metering system
Confirm the flash shooting distance range and shoot
Focusing operation
Combinations of AF Functions
Optional Accessories
Focusing Screens
Right-Angle Viewing Attachment DR-4/Eyepiece Adapter DK-7
Filters
Lenses
Data Back MF-29 Speedlight SB-27
Wireless Slave Flash Controller SU-4
Speedlight SB-80DX
Soft case CF-57/CF-58
Accessories connected to 10-pin remote terminal
Neckstraps/Handstrap AH-4
Camera Care
Troubleshooting
Turn the camera power off when changing batteries
Use fresh batteries at low temperatures
Keep batteries out of children’s reach
BuLb in S mode
Reduction function When a Speedlight Without Red-Eye
Battery power With new ones
Overexposure may
Specifications
Multiple exposure Activated using film advance mode dial
SB-50DX, SB-30, SB-29s/29, SB-28/28DX, SB-27, SB-26
Equipped
104 105
Battery
AA-type lithium
Time Bulb
Exposure +20C 68F
Index
Custom Setting Menu
Nikon Corporation