Minolta F100 instruction manual About memory cards, Switch

Page 19

If the card-not-recognized message appears, the inserted card in the camera may need to be format- ted. A card used in another camera may have to be formatted before being used. If the unable-to- use-card message appears, the card is not compatible with the camera and cannot be formatted.

A card is formatted in the basic section of the setup menu (p. 96). When a card is formatted, all the data on the card is permanently erased.

About memory cards


The response time during recording and playback is longer with


MultiMediaCards compared with SD Memory Cards. This is not a


defect, but rather due to the specifications of the cards. When

Write-

using large capacity cards, some operations like deletion may take

protect

longer.

switch

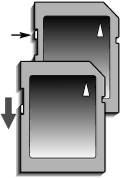
The SD Memory Card has a write-protect switch to prevent image


data from being deleted. By sliding the switch to the bottom of the


card, the data will be protected. However, when the card is pro-


tected, images cannot be recorded. If an attempt is made to


record or delete an image with the camera, the card-locked mes-

Lock

sage will appear on the monitor and the orange flash lamp near

position

the viewfinder will blink quickly. For memory card care and storage


see page 122.


19

Image 19
Contents HA-A204 Before YOU Begin For Proper and Safe USE For Proper and Safe USE Page About this manual Multi-function recording mode advanced operation Short guide to photography Movie recording 100 Camera body Page Viewfinder Mode dialData panel Getting UP and Running Changing the CR-V3 batteryAttaching the hand strap Installing AA batteriesAuto power save Battery condition indicatorConnecting the AC adapter sold separately Changing the memory card About memory cards SwitchSetting the date and time Camera notes Handling the camera AUTO-RECORDING Mode Basic OperationSetting the camera to record images automatically Focus range Using the zoom lensAbout camera operation Basic recording operation Special focusing situations Focus signalsAutomatic Digital Subject Program Selection Digital-subject-program button AUTO-RECORDING Mode Display button recording mode Flash modes Flash signals Flash range auto-recording modeCamera-shake warning Quick View Deleting images in Quick View Quick-view displayEnlarged playback Other Quick View features Navigating the auto-recording mode menu Basic Drive modes Continuous advance Shooting tips Self-timerRemote control sold separately Normal Under BracketingNumber of frames in bracketing series Frame counter VGA Image size and image qualityApproximate file sizes Recording Tips Voice memoDigital zoom Focus area selection Focus lock Exposure compensation Shooting tips What is an EV? What is a stop?MULTI-FUNCTION Recording Mode Advanced Operation Multi-function recording mode display Navigating the multi-function recording mode menu Custom Programmed AE P Exposure modesAperture priority a Photographer selects the shutter speed and the camera sets Shutter priority SManual exposure M Bulb exposures White balance Preset White BalanceAutomatic White Balance Custom White Balance Single-shot AF Focus modesSubject Tracking AF Full-time AF Manual focusMetering modes AF sensor displayFlash range and camera sensitivity Camera sensitivity ISOHigh contrast scene After compensation Digital Effects ControlSelect enter Date imprinting Instant playback Short Guide to Photography Page Movie Recording Countdown in seconds Recording movies and audio with the RC-3 remote controlAudio Recording Single-frame playback and histogram display Playback Mode Viewing and Editing ImagesPlaying back voice memos and audio captions Viewing imagesDeleting single files Playing back movies and audio recordingsEnlarged playback Image only Display button playback modeNavigating the playback-mode menu Copying to camera memory Sel. conf. enter Frame-selection screenDeleting files Locking files If an audio track is already attached to the image, a Audio captioningSlide show Slide Creating a Dpof Print Order About DpofOrdering an Index Print Copy and E-mail Copy 101MLTEM 101MLTCP Viewing images on a television Minolta History Setup Mode Controlling the CAMERA’S OperationNavigating the setup menu Refer to the following sections Formatting memory cards LCD monitor brightnessFile Number # Memory LanguageFolder name Audio signalsReset default VolumeShutter FX YYYY/MM/DD Video output Setting the date formatQuickTime system requirements DATA-TRANSFER Mode Connecting to a ComputerIBM PC / AT Compatible Macintosh System requirementsConnecting the camera to a computer 107 Automatic Installation Connecting to Windows 98 and 98SEManual Installation DATA-TRANSFER Mode Auto power save data-transfer mode Connecting to Mac OSDcim Misc 100MLT08 10120801 102MLTCP 103MLTEM Memory card folder organizationCamera Notes Windows 98 and 98SE Disconnecting the camera from the computerWindows ME, 2000 professional, and XP Macintosh Changing the memory card Data-transfer mode Problem Symptom Cause Solution Make sure the subject is within About Ni-MH batteries Removing the driver software Windows Camera Care Memory cards Operating Temperatures and ConditionsBatteries Copyright Digital Camera Tested To Comply With FCC Standards CCD Page Universal Copyright Convention
Related manuals
Manual 3 pages 5.26 Kb