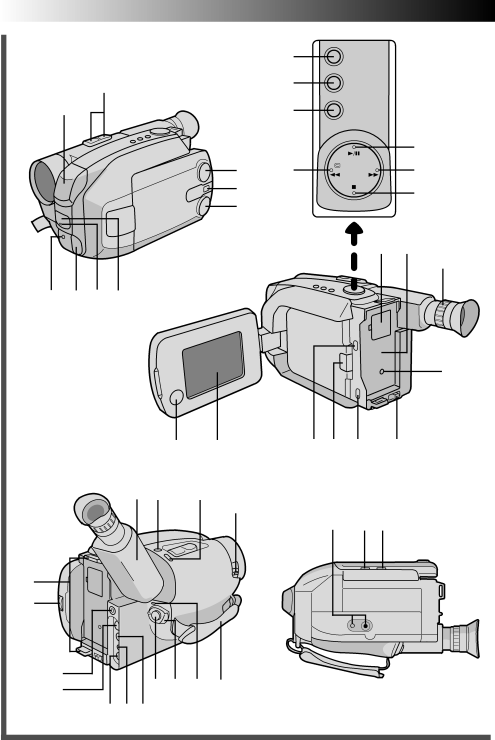
JVC GR-AXM500 specifications 76EN CONTROLS, Indications and Connectors

Page 76

76EN CONTROLS, INDICATIONS AND CONNECTORS (cont.)


5


1


6


R


7


9


2

8


0


3


!


4


U I


^

Q T E Y


t


s

d

@ # $

%


P &

*


w

f

e r


O


(


y

) q W a


u


i op


Image 76
Contents GR-AXM500 Dear Customer Crossed Out Dust Bin MarkIt is recommended that you Connection to the mains supply in the United KingdomSome DO’S and DON’TS on the Safe USE of Equipment This unit is produced to comply with Standard IEC PublProgramme AE with Special Effects Focus, Exposure Control and so onZoom-in Zoom-outCassette Adapter C-P7U BN-V12UCable Adapter DC CordUsing the battery pack To remove the battery packBATT. Release Push EjectSwitch Button Power Switch Set to PlaySystem Select Switch Set to D.S.C Hook on Snapshot Button 2PushPower Supply PowerAttach Battery Pack Detach Battery PackTo DC in jack Terminal AC Power Car Battery Charger/Adapter BH-V3E optionalCharge marker DC OUTClose Cover Insert BatteryClose the compartment cover until it clicks in place DATE/TIME Setting Menu Select DialMenu Jog Dial LCD monitor or viewfinderGrip Adjustment Viewfinder AdjustmentAdjust Length Shoulder Strap AttachmentTripod Mounting Attach StrapSET Recording Mode Recording Mode SettingCont Loading/Unloading a Cassette Enter RECORD-STANDBY Mode Basic RecordingLoad a Cassette Start ShootingTape remaining time indicator Stop RecordingNow calculating BlinkingPower Switch Start/Stop Button Lights while recording Switch Is in progressInterface shooting Journalistic shootingBrightness control Zoom Speed Setting Menu Zooming Speed 1 4 in order of speed Basic FeaturesWhen the Select Dial is set to Auto Lock Purpose FeatureOperation Video Recording Basic Features Feature Purpose OperationDATE/TIME Display Select DialTo brighten the scene when natural lighting is too dim Set the Light OFF/AUTO/ON Switch as requiredMode when you use the video light Video LightSelect Snapshot Mode SnapshotTake Snapshot ModeLCD monitor or viewfinder Fine 12Remaining number of shots Pictrue mode display Fine or STD standard Pin-UpFull EN Video Recording Advanced Features Second later, the mode is activated After 1 secProgramme AE With Special Effects LCD monitor or viewfinder MarkAuto Mode Lock Auto Mode ReleaseElectronic Fog Filter ND EffectAdvanced Features Engage FADE- or Wipe Standby ModeTo Cancel FADE- or WIPE- Standby Mode Fade/WipeEngage Wide Mode Select Super Lolux ModeWide Super LoLuxGain UpSelect Preset Title Instant TitlesTitle LCD monitor or viewfinder Title displayEND Character Setting Close MenuMenu Jog Dial Menu Screen Press the Menu Jog DialVideo Recording Advanced Features Using Menu For Detailed AdjustmentAdjusts focus automatically Allows you to adjust focus manually pgAdjusts exposure automatically Allows you to adjust exposure manually pgTally lamp comes on to signal the start of recording 22x magnification can function. When set to OFF duringFunctions are disabled Setting isManual Exposure Screen To brighten the image To darken the imageFocusing Patterns that are regularly repeatedFocus Menu Screen END Adjustment of FocusManual Focus Screen Manual White Balance Adjustment M.W.B Access White Balance Menu ScreenSelect White Balance B. Menu ScreenPrepare White Object Select MWBMemorize White Balance Menu Jog DialIndicator INT. Time MenuREC Time Menu INT. TimeRelease Animation Mode Time-LapseSET Interval Between Recordings SET Recording TimeBasic Playback Rewind or Fast-forward the tapePlay Back Stop PlaybackFeatures EN Speaker volume controlAdjust Volume TrackingVideo Playback Features Counter R/M REWUsing The Cassette Adapter EN Cassette AdapterInsert Cassette in Adapter Play Back on Connected VCRConnect Camcorder to TV Connect Camcorder to VCRTurn on the camcorder, the VCR and the TV VCR Recording deck PLAY/PAUSESelect Picture Mode Mode SnapshotBasic Shooting ShootPicture Mode Setting Menu Picture Mode SettingSET Picture Mode Select FunctionC. Shooting Advanced Features Mode FunctionFollowing happens when Twilight mode is selected Changed to another modeCaptures faster action than Sports mode pg High shutter speed clearly captures fast-moving action pgIf you select FOCUS, EXPOSURE, DATE/ Time or Character Mode when you wish to shoot many still images Is better than STANDARD, Fine is more suitable for postProduction on a PC On NextEN D.S.C. Shooting Advanced Features C. Playback Basic Playback ENC. Playback Advanced Features Switch to D.S.CSelect Dial Menu Jog Dial Set the System SeletMode Effect Images you shot beforehand pgSelect ALLIndex Access Index Menu ScreenView Index Images Protect SET ProtectAccess Delete Menu Screen Select Delete ModeDelete ScreenAccess Delete Execute Menu Screen Case of SelectSlide Show Menu Screen Ex. Slide ShowClose the software, then switch off the camcorder Connect to Personal ComputerRUN Image Transfer SOFT- Ware END TransferringPull OUT Battery Holder Replace Battery HolderPull out the battrery holder while sliding the lock hole RM-V709U providedInterval Timer Indicator Rec Time IndicatorTransmitted beam effective area START/STOP Viss INT. Time REC TimeSET Remote to Operate VCR Random Assemble Editing R.A.EditOperate VCR Connect to Prepare CamcorderPrepare VCR Recording deckAccess R.A. Edit Counter Display Register Beginning of SceneRegister END of Scene Register Additional ScenesEngage VCR’S RECORD-PAUSE Mode Begin Automatic EditingEND Automatic Editing VCR REC Stby ON/OFFLCD monitor or viewfinder System Select Switch START/STOP REW Play Insert PauseButton Power Switch Select Still ImageBegin Insert Editing END Insert EditingAudio dubbing indicator REW Play DUB PauseOpen/Close Switch Set to Power OFF Lens CoverBATT. Release Push Eject Remove Marks74EN Displayed when any of the buttons located Tape Length Indicator@ Picture Stabiliser Indicator Tape Remaining Time76EN CONTROLS, Indications and Connectors Dioptre Adjustment Clock Battery Compartment Battery Pack MountSelect Dial DATE/TIME ButtonNo power is supplied Some functions are not availablePlayback Recording cannot be performed Recording does not startTroubleshooting Format Menu ScreenTo prevent damage and prolong service life During useTo avoid hazard Store cassettesFor safety, do not Avoid using the unitTo prolong service life Do not leave the unitCleaning the video heads Special Notes on Video HeadsDust and dirt on video heads Important NoteOptional Accessories Charging the Battery Pack Discharge The Battery PackHigh Speed Shutter Mode Delete Select Menu ScreenIndex Page GR-AXM500