JVC GZ-MS230 manual Video Recording, Indications during video recording

Page 12

Recording

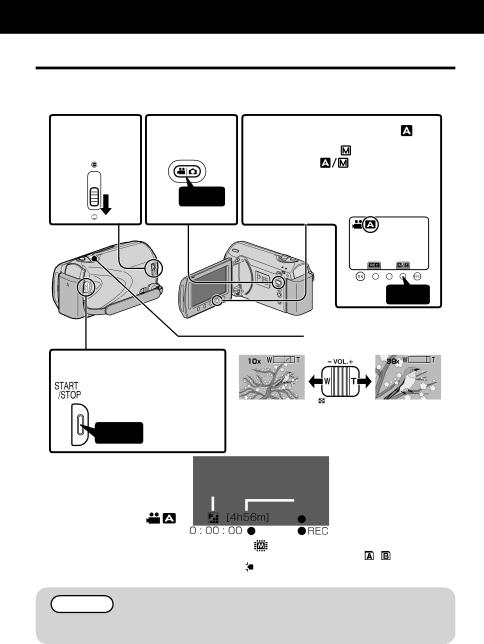
Video Recording

You can record without worrying about the setting details by using the auto mode.

Before recording an important scene, it is recommended to conduct a trial recording.

1Open the

2 Select

3 Check if the recording mode is Auto.

lens cover.

video mode.

If the mode is

Manual,


touch the

button to switch.


The mode changes between

Press

auto and manual with every touch.


Touch

Zooming

4 Start recording.

Press again to stop.

(Wide angle)

(Telephoto)

Press

Indications during video recording


Video Quality


Remaining Recording Time


Scene Counter


Record-Standby


Recording in Progress


Recording Media


(GZ-MS215 : / )


Battery Indicator

NOTE

The estimated recording time of the supplied battery pack is approximately 50 minutes. ( P.18)

12 For more information, refer to the Detailed User Guide http://manual.jvc.co.jp/index.html/

Image 12
Contents Access the following website on your PC Information CopyingHttp//manual.jvc.co.jp/index.html Safety Precautions Http//manual.jvc.co.jp/index.htmlTrademarks Verifying the Accessories IndexNames of Parts and Functions UPLOAD/EXPORTCharging the Battery Pack To detach the battery packAttach the battery pack Plug in the powerGrip Adjustment Inserting an SD cardInformation GZ-MS230 Models with Built-in MemoryGZ-MS215 Models with Dual Slot To remove the cardManufacturer Panasonic, TOSHIBA, SanDisk, ATP Video Still Image SD card 256 MB to 2 GB, Sdhc card 4 GB to 32 GBTo use an SD card GZ-MS230 only To use SD cards that have been used on other devicesTouch Clock Setting Open the LCD monitorSelect YES and touch SET DATE/TIME! is displayedTo reset the clock To change the display languageVideo Recording Indications during video recordingStill Image Recording Recording Getting StartedPlayback Further InformationPlaying Back/Deleting Files on this Unit To capture a still image during playbackUsable operation buttons during playback Pause the playback and press the Snapshot buttonWhen images look unnatural on the TV Playing Back on TVPlaybackRecording Getting Started To play back with date/time displayDubbing Files by Connecting to a DVD Recorder or VCR Prepare to recordDisplay Date only Using the Menu StartedPlaybackRecording Getting Recordable Time/Number of Images Troubleshooting Action Battery pack is being chargedTrouble Recording PlaybackOther problems Recording FailureData Recorded is TOO Little Unable to Save ActionTo prevent damage and prolong service life To prolong service lifeTo avoid hazards To prevent damage to the LCD monitor, do notFor safety, do not Avoid using the unitTo prevent the unit from dropping Do not leave the unitSpecifications CameraJpeg standard Recording media SD/SDHC card 1 or 2 cardsAV Connection Zoom