Panasonic DMC-S1K Press the Playback button Set to multiple screen display, To restore

Page 24

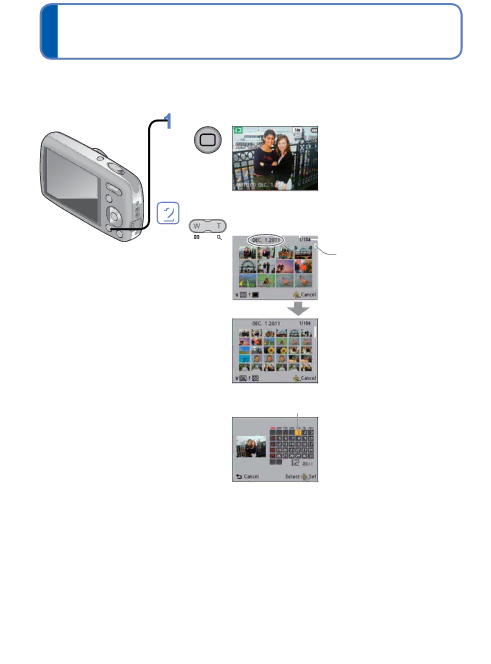
Viewing as list (Multi Playback/Calendar Playback)

Playback Mode:

You can view 12 (or 30) pictures at once (Multi Playback), or view all pictures taken on a certain date (Calendar Playback).

To restore

Press the T side of the zoom button

Press the Playback button

Set to multiple screen display


Date recorded

Picture no.

The display


Total no.


Scroll bar

changes


each time


the W side


is pressed


(12 screens)


To change from 12/30-screen display to single- screen display

Select picture with ▲▼◄► and press [MENU/SET]

(30 screens)

Selected date (First picture from the date)

Select week with ▲▼ and date with ◄►, and press [MENU/SET] to display that date’s pictures on a 12-screen display.

(Calendar screen)

Only months when pictures were taken are shown on the calendar screen. Pictures taken without clock settings are displayed with the date January 1st, 2011.

Pictures displayed with [!] cannot be played back.

Pictures taken with destination settings of [World Time] are displayed in the calendar screen with appropriate date of the destination’s time zone.

24 VQT3E45

Image 24
Contents DMC-S1 Contents Connecting with other devices RecordingPlayback/Editing OthersBefore use Camera handlingCondensation lens clouding Always take a test shot first No compensation for missed shotsCarefully observe copyright laws Also refer to Usage cautions and notes →80Standard Accessories Optional accessoriesNames of parts Left cursor buttonDown cursor button Up cursor buttonCharging the battery Detach the battery after charging is completedAbout batteries that you can use with this unit Charging light ChargeSupplied battery Optional battery Supplied battery Optional battery Approx minRecording conditions by Cipa standard ∗1 DMC-S310 VQT3E45 Inserting and removing the card optional/ the battery Battery To removeTo remove card Using the DC coupler optional instead of battery Insert DC coupler instead of battery Open DC coupler coverConnect AC adaptor to DC in socket of DC coupler Picture save destination cards and built-in memory Compatible memory cards optionalType of Card Capacity Remaining battery and memory capacity When in operationRecording capacity guidelines pictures/recording time Recording picture capacity still picturesSetting the clock Press the Power buttonPress MENU/SET Confirm the setting and press MENU/SET To change time setting Recording Mode Holding the cameraTo use flash Focus displayAutomatic Scene Detection Taking pictures with zoom Zoom In/OutTaking motion pictures End recordingPlayback Mode Viewing your pictures Normal PlayPress the Playback button Scroll through picturesWatching motion pictures Select the motion picture and start playbackOperations during Motion Picture Playback To restore Press the Playback button Set to multiple screen displayDeleting pictures To delete multiple up to 50 or all picturesSetting the menu About the menu screenMenu type Menu operation flowPress to select a setting, and then press MENU/SET Press MENU/SETPress / several times Using the Setup menu Reset Reset Rec. settings? Reset setup parameters?Auto Review Output Video Out ∗Deleted When a card/built-in Restored. CheckContent of the card Rotate Disp OFFDemo Mode Stabilizer Demo LanguageON/OFF Select Normal Picture Mode Take a picture Recording Mode listDisplay the screen for Recording Return to desired composition Focus rangeChanging recording information display Press to change displayGuide lines Taking pictures with the self-timer Display Selftimer Select time durationTaking pictures with flash Display Flash Select the desired typeAvailable types in each mode Available flash range when Sensitivity setting isScene Mode Taking pictures with Exposure Compensation Display Exposure Select a valueTaking pictures according to the scene Scene Uses, Tips PortraitSoft Skin Tips SelfPanorama AssistSports Night FoodParty Baby SunsetHigh SensBeach SnowUseful features for travel World Time Select Home Select Destination Set your home areaSet destination area Using the Rec menu For details about the setting procedure in the Rec menu →26Mode Settings Setting guideMode Settings Picture Quality Picture Size Rec QualitySensitivity Qvga ∗White Balance AF Mode Mode Settings ON/OFF Mode Settings /OFF Speed No. of picturesDigital Zoom BurstColor Mode AF Assist LampRed-Eye Removal DMC-S3 only Mode Settings W/O Time/With Time/OFF StabilizerDate Stamp Clock SetDifferent playback methods Playback Mode Normal PlaySlide Show Filtering PlaySlide Show Select playback methodSet playback effects Select Start with and press MENU/SETWhen Category Selection has been selected in step Filtering PlaySelect the method to narrow down the displayed pictures CalendarUsing the Playback menu Select Single or Multi Select picture and make settingUpload Set Set-up Press MENU/SET → Playback menu → Select Upload SetUploading to image-sharing websites To clear allResize Select Single Select still pictureSelect size Set-up Press MENU/SET → Playback menu → Select ResizeSelect OK Select Yes Favorite Set-up Press MENU/SET → Playback menu → Select FavoriteTo cancel while releasing all Press MENU/SET ProtectSet-up Press MENU/SET → Playback menu → Select Protect Copy Select the copy method directionSet-up Press MENU/SET → Playback menu → Select Copy Using with your PC To cancel connectionSelect PC on the camera Operate with your computer Getting ReadyWhen using Windows XP, Windows Vista, Windows 7, or Mac OS Folder and file names on computerWindows MacintoshUsing PHOTOfunSTUDIO to copy pictures to your computer Uploading pictures to image-sharing websitesDouble-click LUMIXUP.EXE to start it Select the upload destinationTo cancel print PrintingPrinting multiple pictures Print with dateMake settings before selecting Print start Select item 216×279.4 mmWhen using TVs with an SD card slot Viewing on TV screenConnect camera to TV Turn on TV Turn on camera Press the Playback buttonList of LCD monitor displays Playback Message displays Memory Card Error Memory card parameter error Read Error/Write Error Please check the cardFolder cannot be created Camera does not work even if power is turned on Power cuts off during useCannot record pictures Monitor sometimes shuts off even though power is on Motion picture recording stops midwayBrightness is unstable Monitor flickers indoors Date/age is not displayedNo flash emitted Multiple flashes are emittedIncorrect date displayed in Calendar Playback Thumbnail is displayed is shown on the screenBlackened red areas in recorded pictures. DMC-S3 only Sound of the recorded motion pictures sometimes breaks upCannot print when connecting to printer Edges cut off pictures when printingCannot send pictures to computer Cannot print the dateCamera rattles if shaken Camera is hotLens makes a clicking noise Clock is incorrectWhen in use Usage cautions and notesMemory cards