Dual XDVD700 owner manual Audio Adjustment From Remote

Page 17

XDVD700 OPERATION

Mode

Optional Mode Selection

Volume

Programmable Turn-on Volume

Mute

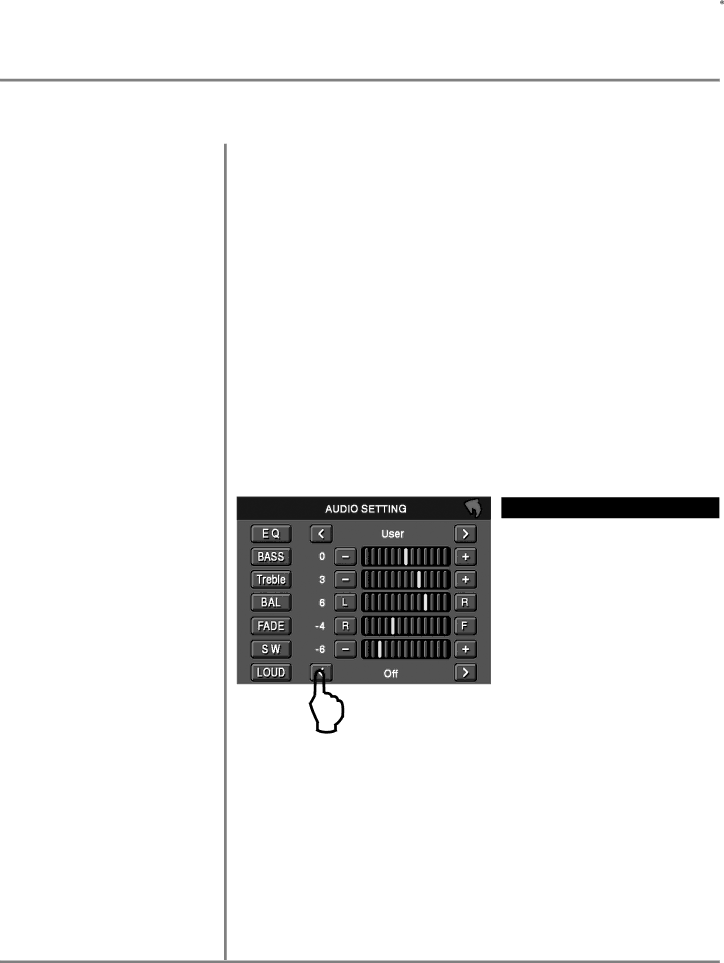
Audio Adjustment (from front panel)

Audio Adjustment

(from Remote)

General Operation

Press MODE to select between TUNER, DVD and AUX IN inputs. Modes of operation are indicated in the OSD (On Screen Display) and secondary LCD.

With the monitor open, press the top left corner of the screen to display the OSD menu. Press TUNER, DVD or AUX IN icon to select the desired source.

Adjust VOLUME using rotary encoder or the VOL   buttons.

Turn VOLUME rotary to desired listening level, press and hold VOLUME rotary knob for 3 seconds to program currently selected volume level.

Press MUTE to silence the audio; will appear in the OSD. Press MUTE again to cancel.

Press in VOLUME rotary knob on left front panel,

Press in VOLUME again to advance to desired parameter to be changed, Turn VOLUME rotary Q or P to adjust to desired level,

Press in VOLUME to advance to next selection,

Press and hold the VOLUME button on the front panel to exit.


ITEM

RANGE


USER

FLAT


JAZZ

POP


EQ

CLASSICAL

ROCK


NEWS

URBAN


RAVE

MOVIE


TECHNO


BASS

-7

+7

L


TREBLE

-7

+7


BALANCE

-9

+9


FADER

-9

+9


SUB

-7

+7


LOUD

OFF

ON


Press the SEL button,

Press the p q buttons on the remote to select an item to be adjusted, Press or to adjust the desired setting,

Press the ESC button on the remote control to exit the audio control menu.

Notes: The Bass and Treble levels are only adjustable when EQ is set to "User” mode. The Loud function compensates for deficiencies in sound ranges at low levels. When the Loud function is on, LOUD is displayed on the screen.

16

Image 17
Contents XDVD700 Safety NotesCopyright Notes Table of Contents XDVD700 Preparation Additional Notes Safety InformationTo prevent damage or injury Getting Started PreparationBefore You Start Wiring Notes Subwoofer output Expanded Wiring Diagram Inputs/OutputsWiring Diagram Optional A/V Connections IR Remote Preparation Insert the battery holderMonitor Notes Control Locations Monitor ClosedEnter Control Functions Monitor ClosedControl Locations Monitor Open Control Functions Monitor Open Disc-in indicator Monitor Angle pqSystem Reset Control Locations Remote Control Functions Remote General Operation Power On/Off Monitor Open/Close Monitor Angle PositionAdjust Volume using rotary encoder or the VOL   buttons Audio Adjustment From RemoteINFO/PIC BRIGHTNESS/CONTRAST Band Main Menu Access General Setup Menu Matrix General Setup MenuGeneral Setup Menu Select Radio Region Video Out TFT Auto Open Clock Mode Clock Adjust Anti-theft Code Anti-theft On/Off Load Factory Screen Tilt Screen Setup MenuScreen Setup Menu Matrix Screen Saver Touch Screen Calibrate Version Disc Subtitle Language Setup MenuLanguage Setup Menu Matrix Audio Language DVD Menu View Mode Video Setup MenuVideo Setup Manu TV Shape Press the Rating tab to access Rating Setup Menu Rating Setup MenuRating Setup Menu Set Password Set Rating Level AM/FM Tuner Operation OSD Overview Tuner ModeAM/FM Tuner Operation OSD Overview AM/FM Tuner Operation Storing Presets Auto Store Presets Tuner Mode Preset View Access Preset ViewXDVD700 Operation First situation is while driving DVD Operation Parking Brake InitializationDVD Operation DVD Disc SymbolsInsert CD/DVD with label facing upwards Inserting a disc DVD Operation Inserting a DiscDVD Loading Slot Access Main Menu DVD must be inserted to access these functions and featuresDVD Operation Touch Screen Controls Displays Disc InformationDVD Operation Touch Screen Controls Searching a DVD DVD Operation Searching a DVDDVD Operation CD Operation OSD Overview CD Operation OSD Overview Playing CD-DA discs Selecting by Keypad CD OperationCD Operation Shuffle Mode Repeat Mode Scan Mode Play/Pause Stop MP3/WMA Operation OSD Overview MP3/WMA Operation OSD Overview Up/Down Song Select Direct Select Direct Song Entry MP3/WMA OperationMP3/WMA Operation Media Compatibility Playback Order Media CompatibilityTransfer Bit rates Recommended SettingsAdditional MP3/WMA Information What to do? Limited One Year WarrantyProblem Cause Action TroubleshootingSpecifications