Eclipse - Fujitsu Ten 54420 owner manual Setting the clock

Page 23

Basic operation

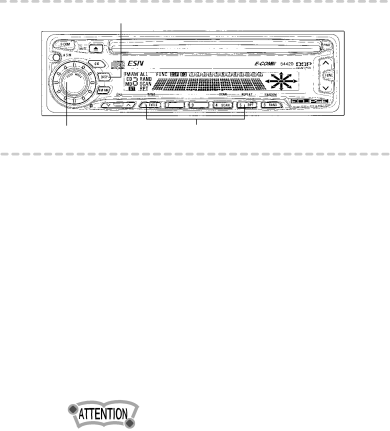
[DISP] button

[AUDIO CONTROL] button

Buttons [1] to [5]

Setting the clock

This receiver uses the 12-hour, A.M./P.M.display notation.

1 . Press the [DISP] button repeatedly to switch to the clock display mode.

2 . To adjust the hour, press either button [1] or [2] while holding the [DISP] button down.

Button [1]: Turns the hour back.

Button [2]: Turns the hour forward.

3 . To adjust the minutes, press either button [3] or [4] while holding the [DISP] button down.

Button [3]: Turns the minutes back.

Button [4]: Turns the minutes forward.

To set the clock to 0 minutes, 0 seconds (an exact hour), press button [5], while holding down the [DISP] button.

For example:

At 3:23: Pressing button [5] returns to 3:00.

At 3:32: Pressing button [5] advances to 4:00.

23

Image 23
Contents By Fujitsu TEN For your safety in using Page Page Table of Contents How to operate the tuner If you have a question Operating Precautions About compact discs Okay About cleaning a CD Front View Names of controls and partsInsert the CD into the slot ESN Key CD security operating procedureHow to program the Key CD Insert your Key CD into the slot How to cancel the Key CDNext, program a new Key CD How to change the Key CDFirst, cancel the existing Key CD How to resume normal operation ESN security lock out What happens if an incorrect CD is inserted? How to Read the Electronic Serial Number How to turn the Security indicator on/offPress the PWR button Turning the power on and offBasic operation Listening to a CDPress the button to tune to a station Listening to the tunerPress the FM AM button Turn the Audio Control button to the left or right Adjusting audio volumeDisplaying the clock Others Disabling the guide tone feature for button operationSetting the clock Enabling the loudness control Switching audio control modesDisabling the display Switching Non-Fader modesDisabling the Tone Control Cancel feature Enabling E-COM featurePress the CD button How to operate the CD playerListening to CDs Press button 4 Scan Playing the beginning of tracks ScanPress the button Playing tracks in random order Random Switching the displayRepeating the same track Repeat Press the (EJECT) button Ejecting the discDisplaying a genre for a CDs Tap the FM AM button to switch to the desired FM or AM mode How to operate the tunerTuning to a station Each tap switches modes from FM1 → FM2 → FM3 → AM Manually setting stations into memory Press the ASM button Preset station scanFM Reception Differs from AM FM reception characteristicsReception Area of FM Broadcasts Multipath Precautions in use of the remote control How to use the Card remote controlCutting the volume instantly muting Turning the power on/offAdjusting the audio volume Switching playback modesSelect a station manually or automatically How to play the tunerSelecting preset stations Select the FM/AM bandSkipping to the next or previous CD How to play CDsSwitching disc modes Replacing the battery How to use an optional NOB remote control Band button Band Mode Mode button Tune . Seek buttons Press the Track button Button Skips to the next track Enabling the optional E-COM feature Illuminating the NOB remote controlReplacing the battery Two new batteries ・Use only two of the same kind of battery Listening to a CD Basic operationPlaying tracks in random order Random Playing the beginning of tracks ScanRepeating the same track Repeat Specifying a CD to play Disp button Button1 After pressing the Func button, tap button How to operate the DSP functionsSwitching room sizes Fine-tuning an individual roomsize mode Initial echo delay Reverberation Retrieving a preset pattern from memory Switching equalizer modes How to operate the EQ functionsFine-tuning EQ functions Retrieving an equalizer mode from memory If you have a question Mechanically Displaying information For troubleshootingMUTE? Or, the disc cannot be General SpecificationsCD Section Components Before InstallationSetting the system-selector switch Mounting the main unit Mounting instructionInstall the bezel on the main unit Refer to Names of lead wires and destinationsMounting instruction System Red Yellow Blue Orange/White Blue/White Black Mounting instruction Mounting instruction Record Your KEY CD HERE… Customer Notice