Features
A masterpiece amongst turntables with a worldwide repu- tation.
Highly accurate turntable speed maintained continuously with a quartz pitch control.
•The pitch can be varied throughout the range maintaining perfect accuracy.
•Pitch can be instantly reset to the rated speed (33 1/3 or 45 r/min) with the reset button.
The direct drive produces high torque.
•Wow and flutter below 0.01 %. Starting torque of 1.5
•Smooth stops are achieved with a fully electronic braking system. The braking speed can be adjusted with the brake speed control knob.
Tone arm with gimbal suspension
•Using the balance weight control measurement units on the tone arm, you can quickly change stylus pressure settings to the appro- priate pressure.
•Stylus skipping can be reduced using horizontal weight control for scratch play.
•The tone arm can be finely adjusted in a range of 6 millimeters with the lockable height control.
•A light illuminates the stylus.
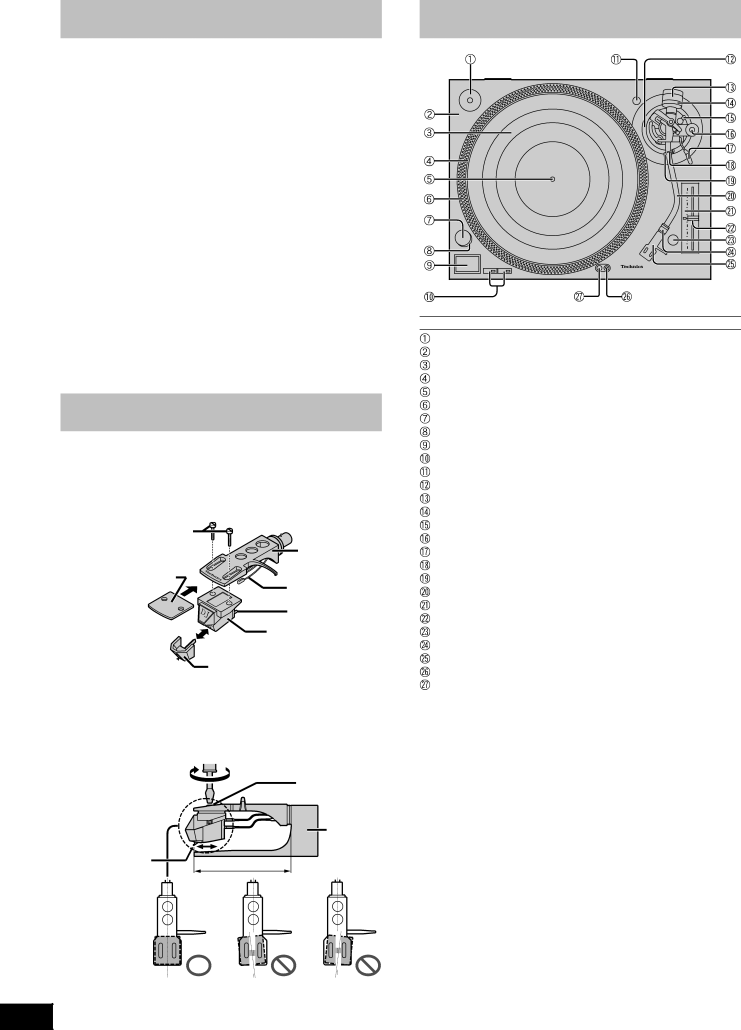
Preparation of the cartridge
1Attach a cartridge (not included).
Follow the cartridge’s instructions to correctly attach it to the head shell.
•Use the included shell weight when using a light cartridge (3.5 to 6.5 grams).
Screws
Head shell
Shell weight
Lead wire
Terminal
Cartridge
Stylus
2Adjust the overhang.
Fit the included overhang gauge to the head shell. Adjust the overhang and facing of the cartridge and tighten the screws.
•Line the stylus tip up with the end of the gauge.
•The cartridge should be parallel on the shell head.
| Screws |
| Overhang |
| gauge |
Stylus tip | 52 mm |
|
| Controls |
|
|
| |
|
| 6 |
|
| 4 |
|
| 2 |
|
| +8 |
|
| 2 |
|
| 4 |
|
| 6 |
|
| +8 |
No. | Name | Reference page(s) |
EP record adaptor | 8 |
Turntable base | 4 |
Turntable mat (Or disc slip sheet) | 5 |
Turntable | 5 |
Center spindle | 5 |
Strobe mirrors | 9 |
Power switch (power) | 8 |
Strobe light, pilot lamp | 8 |
8 | |
Speed select buttons (33, 45) | 8 |
Shell stand | 4 |
7 | |
Balance weight | 5 |
Stylus pressure control | 6 |
Arm lock | 7 |
6 | |
Cue lever | 6 |
Arm clamp | 6 |
Arm rest | 6 |
Tone arm | 5 |
Pitch indicator | 9 |
Pitch control (pitch adj.) | 9 |
Reset button (reset) | 8 |
Locking nut | 5 |
Head shell | 5 |
Stylus light switch | 8 |
Stylus light | 8 |
4
RQT7018