LG Electronics M4716C owner manual Tile Mode set 1 to 9 c3 x r3 Column, ID10 Row

Page 34

User Menus

Screen Tiling Options

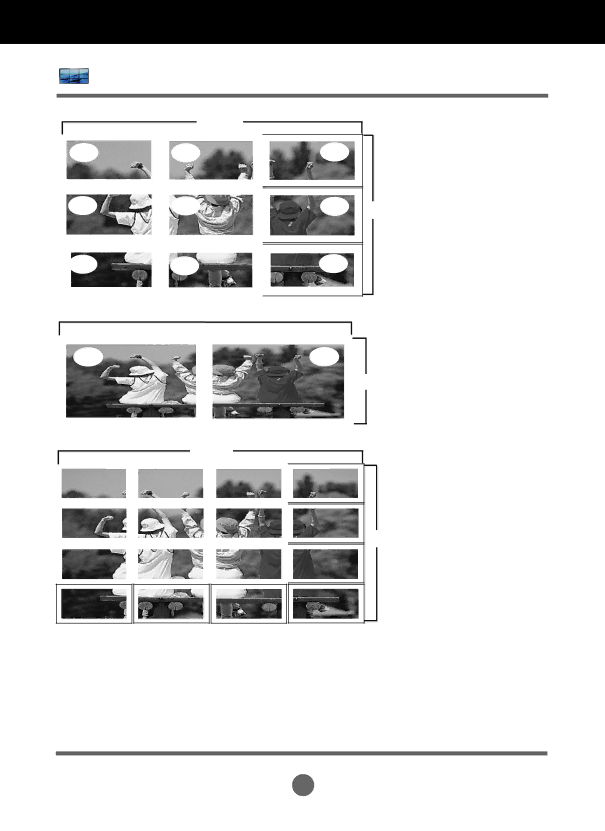
-Tile Mode (set 1 to 9): c(3) x r(3) Column

ID 1

ID 2


ID3


ID 4

ID 5


ID 6


ID 9

ID 7

ID 8


-Tile Mode (set 1 to 2): c(2) x r(1) Column

ID1

ID2


-Tile Mode (set 1 to 16): c(4) x r(4) Column

ID 1

ID 2

ID 3

ID 4


ID 5

ID 6

ID 7

ID 8


ID 9

ID10

ID 11

ID 12


Row

Row

Row

ID 13

ID 14

ID 15

ID 16

Tile ID: Select the location of the Tile by setting an ID.

Natural: Omits the distance between the screens allowing the image to be displayed naturally.

H-Size:Adjusts the horizontal size of the screen taking into account the size of the bezel.

V-Size:Adjusts the vertical size of the screen taking into account the size of the bezel.

H-Position:Moves the screen horizontally.

V-Position:Moves the screen vertically.

Reset: Initializes and releases current Tile Mode settings.

All Tile settings are released when selecting Tile recall and the screen returns to Full screen.

34

Image 34
Contents Monitor Signage Table of Contents Included Accessories AccessoriesSeparately Purchased Accessories Connecting the Stand PartsConnecting the Speakers Portrait Mode Using the Remote Control Remote Control ButtonsClear Button Energy Saving ButtonInput Select Button ARC ButtonPart Names and Functions Rear ViewConnecting to External Devices Connecting to Your PCConnecting to External Devices Using the LAN Using AV Input Daisy Chaining SetVesa Fdmi Wall Mounting Kensington Security SlotCable Management Cable ManagementVideo Input Component Input 480i/480p/576i/576p/720p/1080i/1080p Select ComponentHdmi Input 480p/576p/720p/1080i/1080p HDMI-DVI RCA-PCUser Menus Screen Adjustment OptionsAdjust Button OSD SelectIR Receiver For PC Analog signalInput Button SuperSignAdjusts USB options OSD MenuAdjusting the Screen Automatically Adjusting the OSD On-Screen DisplayUse the remote control to adjust the OSD Adjusting Screen Color Aspect RatioEnergy Saving Level 1 80% light Level 2 60% light Level 3 40% lightPicture Mode Backlight Advanced Control Settings Picture Reset Returns Picture Mode to the default factoryScreen Adjusting Audio Adjusting the Timer Selecting Options Factory Reset Power IndicatorNetwork Setup DPM SelectScreen Tiling Options Tile ModeTile Mode set 1 to 4 c2 x r2 Column RowTile Mode set 1 to 9 c3 x r3 Column ID10 RowUSB Options Connecting USB DevicesSelect Photo List, Music List or Movie List Precautions when using the USB device Photo List Photo ListPhoto Selection and Pop-Up Menu Photo ListViewing Photos Music List Music ListMusic Selection and Pop-Up Menu Up to 6 music files are listed per027 Movie List MPEG1, MPEG2 AC3,MPEG,MP3,PCMMovie List Movie Selection and Pop-Up Menu Movie ListUsing the remote control PlayClose DivX Registration CodeDeactivation Troubleshooting No Image is DisplayedTroubleshooting Audio Does Not Work LCD Panel SpecificationsPower Rated VoltageEnvironmental Video SignalInput Connector ConditionsDTV Mode Controlling Multiple Set Command Reference List DATA1 DATA2 DATA3 Transmission / Receiving Protocol Controlling Multiple Set Controlling Multiple Set Controlling Multiple Set BrightnessCommand h To adjust screen brightness Tint Real data mapping 0 to Red To Green A10 A11 A12 Auto ConfigureCommand j u A14 A15 A16 Acknowledgement XSet IDOK/NGDatax DataHex Mode Controlling the Multiple Product Controlling the Multiple Product A21 A22 A23 A24 A25 A26 A27 A28 A29 90H HDMI/DVI DTV A0H HDMI/DVI PC IR Codes Down Back Page Model Serial