Contents
201a
Do not open or modify in any way the unit or its AC adaptor
Protect the unit from strong impact. Do not drop it
Important Notes
Contents
Contents
Connecting External Midi Devices
About V-LINK
220
Main Features
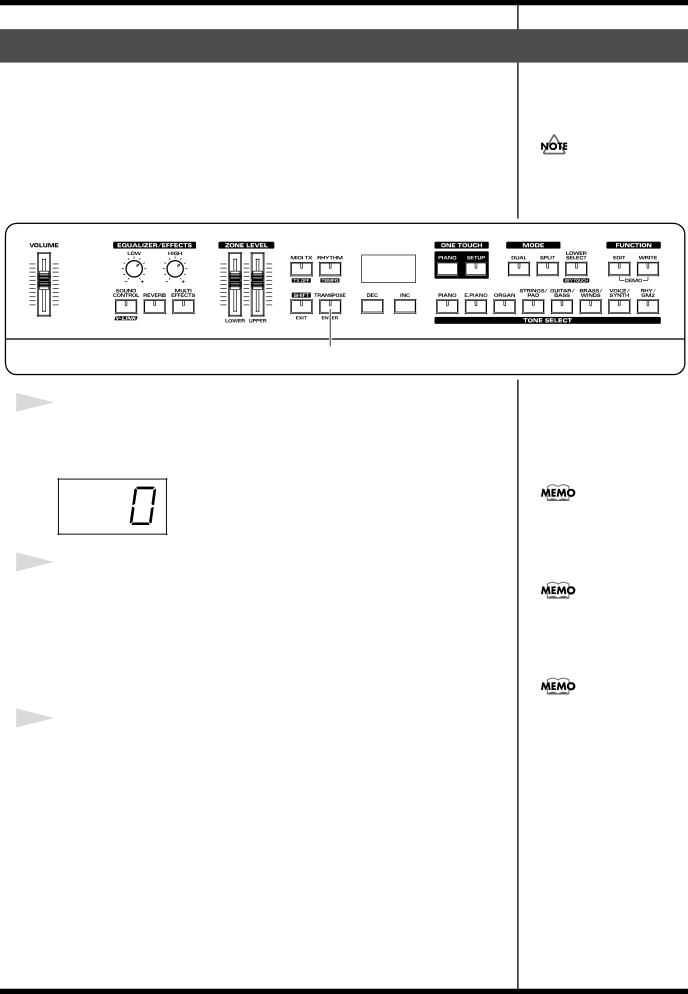
Front Panel
Panel Descriptions
Panel Descriptions
Rear Panel
Getting Ready
Connect the supplied power cord to the supplied AC adaptor
Making Connections
Before you begin making connections, confirm the following
Connecting Pedals
Connecting the RD-300SX to External Equipment
Turning On the Power
Turning the Power On and Off
Press the Power switch on the back of the unit
Turning Off the Power
Adjusting the Volume
Adjust the volume using the Volume slider
Tuning to Other Instruments’ Pitches Master Tune
Basic Organization of the RD-300SX
Overview of the RD-300SX
Units of Sound
Basic Operation of the RD- 300SX
Song Name Composer/Copyright
Listening to the Demo Demo Play
Hold down Edit and press Write
To stop a song while it is playing, press ONE Touch Piano
Piano Performances ONE Touch Piano
Performing with the Keyboard
Press ONE Touch Piano
Tone Select button for the selected category lights
Performing with a Variety of Tones
Turning Dual or Split off turning the indicator off
Switching to Single Mode
Playing Multiple Tones with the Keyboard
Pressing ONE Touch Piano
Press Dual once more, and the indicator light goes out
Press DUAL, getting the indicator to light
Performing with Two Layered Tones Dual
Pressing Two Tone Select buttons Simultaneously
Keyboard’s Split Point p
Press SPLIT, getting the indicator to light
Hold down Split for several seconds
Changing the Keyboard’s Split Point
Changing the Tone for a Zone
Hold down Transpose for several seconds
Transposing the Key of the Keyboard Transpose
Hold down Transpose and press a key
Pitch of the tone in semitone Steps Key Transpose p
Press SHIFT, and the indicator light goes out
Changing the Velocity When the Key Touch Is Set to Fixed
Changing the Keyboard’s Touch
Hold down Shift and press Lower Select
Adding Reverberation to Sounds Reverb
Press REVERB, getting its indicator to light
Changing the Reverb Effect Type
Changing the Depth of Reverb Effect Reverb Depth
Adding a Variety Effects to the Sound Multi Effects
Press Multi EFFECTS, getting its indicator to light
Changing the Depth of Effect
Hold down Multi Effects and press INC or DEC
Adding a Spinning Sound to Organ Tones Rotary Effect
Changing the Multi-effects Type
While holding down SHIFT, press Multi Effects
Press Organ and select the organ tone
Making a More Consistent Sound Sound Control
Turn the Equalizer knobs to adjust the levels in each range
Playing Rhythm Rhythm
Press Rhythm to make the button indicator light
Changing the Rhythm Pattern
Pattern List p
Changing Rhythm Tempos
Changing the Rhythm Volume
Press SETUP, getting the indicator to light
Selecting Stored Settings Setup
Press INC or DEC, or Tone Select buttons to select a Setup
Setup List p
Settings Not Saved in a Setup
Storing Settings to Setups Write
Press WRITE, getting the indicator to light
When Enter is pressed, saving of the Setup begins
Disabling the Buttons Panel Lock
Press ONE Touch Piano or Exit to cancel Panel Lock
While holding down EDIT, press Enter
Making System Settings System
Settings for Each Function Edit
How to Make Settings
Parameters That Can Be Set
Adjusting the Tuning Temperament, Key
Tuning to Other Instruments’ Pitches Master Tuning
Switching the Pedal’s Polarity Damper Pedal Polarity
Selecting the Keynote
Using the Pedal to Switch Setup Setup Pedal Shift
Switching the Pedal’s Polarity Control Pedal Polarity
Making the Settings for the USB Driver
Indication Value Description
Setting the Zone to which Multi Effects are Added MFX Zone
Setup-Related Settings Common
Changing the Pedal Function Control Pedal Function
Press INC or DEC to select Common, then press
Press INC or DEC to select Tone, then press Enter
Tone Settings Tone Parameter
Parameter Value Description
Changing the Bend Range Bend Range
Changing the Pitch Fine Tune
Press INC or DEC to select U-L, then press Enter
Part On/Off Part
Setting the Pan
Turning Each Controller On and Off
Transferring Setups to External Devices Setup Bulk Dump
Utility Settings Utility
Bulk Dump Setup
Bulk Dump Temporary
Press Enter again to start the Factory Reset operation
Restoring Saved Settings to the RD- 300SX
Transmit play back the data from the external sequencer
Press Organ
Switching Local Control On and Off
Setting the Midi Tx Mode
Indication
Using the RD-300SX As a Master Keyboard
Connecting External Midi Devices
What’s MIDI?
Settings for Recording
Connecting to an External Sequencer
Connecting External Midi Devices
Recording the Performance
Selecting RD-300SX Sounds from an External Midi Device
Switching Setups
Making Connections
Number Bank Select Program Change
Exchanging Midi Messages with Your Computer
Switching USB Drivers
Press INC or DEC to set the value Display Value Description
Again
About V-LINK
How to Use the V-LINK
Hold down Shift and press Sound Control
Hold down Shift and press Sound Control once again to exit
Problem Check/Solution
Troubleshooting
Keyboard is Played
Troubleshooting
When listening through speakers
When listening through headphones
Effect name Overview
Effects List
SPACE-D
Effects List
3TAP PAN
Sympathetic
Display Meaning
Error Messages
Tone Name
Tone List
Tone List
106
Rhythm Set List
Rhythm Set List
GM2 Standard GM2 Room GM2 Power GM2 Electric
GM2 Analog GM2 Jazz GM2 Brush GM2 Orchstra GM2 SFX
Rhythm Pattern
Rhythm Pattern List
Selecting Stored Settings Setup p
Setup List
Shortcut List
What to do Operation
Midi Implementation Chart
Midi Implementation Chart
Connectors
Main Specifications
KEY Touch
Index
Rhythm
Index
For the U.K
Compliance Information Statement
For EU Countries
For the USA
Information