Asus A8V-VM manual Installing an operating system, Support CD information, Running the support CD

Page 78

3.1Installing an operating system

This motherboard supports Windows® 2000/2003 Server/XP/64-bit XP operating systems (OS). Always install the latest OS version and corresponding updates to maximize the features of your hardware.

• Motherboard settings and hardware options vary. Use the setup procedures presented in this chapter for reference only. Refer to your OS documentation for detailed information.

Make sure that you install Windows® 2000 Service Pack 4 or the

Windows® XP Service Pack2 or later versions before installing the drivers for better compatibility and system stability.

3.2Support CD information

The support CD that came with the motherboard package contains the drivers, software applications, and utilities that you can install to avail all motherboard features.

The contents of the support CD are subject to change at any time without notice. Visit the ASUS website(www.asus.com) for updates.

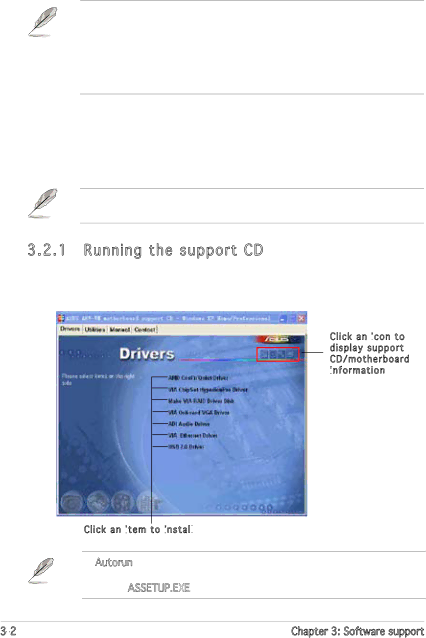
3.2.1 Running the support CD

Place the support CD to the optical drive. The CD automatically displays the Drivers menu if Autorun is enabled in your computer.

Click an icon to display support CD/motherboard information

Click an item to install

If Autorun is NOT enabled in your computer, browse the contents of the support CD to locate the file ASSETUP.EXE from the BIN folder. Double- click the ASSETUP.EXE to run the CD.

3-

Chapter 3: Software support

Image 78
Contents Motherboard E2421 Second Edition January Table of contents Bios setup PCI PnP Power menu Suspend Mode Repost Video on S3 ResumeSoftware support Federal Communications Commission Statement Canadian Department of Communications StatementThis class B digital apparatus complies with Canadian Ices Safety information Electrical safetyOperation safety Where to find more information About this guideHow this guide is organized Typography Conventions used in this guideA8V-VM specifications summary USB LANA8V-VM specifications summary Page Product Package contents WelcomeSpecial features Product highlightsInnovative Asus features Before you proceed Onboard LEDPlacement direction Motherboard overviewScrew holes Motherboard layout DIMMA164 DIMMA264Central Processing Unit CPU Installing the CPUTo install a CPU Locate the CPU socket on the motherboard OverviewAsus A8V -VM Installing the heatsink and fan A8V-VM CPU Fan Connector Memory configurations System memoryRecommended memory configurations DDR400 Qualified Vendors ListSides SS Single-Sided Installing a Dimm Removing a DimmRemove the Dimm from the socket To install an expansion card Installing an expansion cardConfiguring an expansion card Expansion slotsStandard interrupt assignments IRQ assignments for this motherboardPCI Express x1 slot PCI slotsPCI Express x16 slot Jumpers Clear RTC RAM ClrtcA8V-VM Keyboard Power Setting Connectors Rear panel connectorsLAN port LED indications Internal connectors Audio 2, 4, or 6-channel configurationA8V-VM IDE Connectors A8V-VM CPU Sata Connectors A8V-VM Fan Connectors A8V-VM USB 2.0 Connectors A8V-VM ATX Power Connectors A8V-VM Internal Audio Connector Chassis intrusion connector 4-1 pin Chassis AafpA8V-VM System Panel Connector Bios setup Managing and updating your Bios Creating a bootable floppy diskAsus EZ Flash utility From the Open field, typeTo copy the current Bios file using the Afudos utility Copying the current BiosUpdating the Bios file To update the Bios file using the Afudos utilityUtility verifies the file and starts updating the Bios Asus CrashFree Bios 2 utility Recovering the Bios from a floppy diskRecovering the Bios from the support CD Asus Update utility Installing Asus UpdateUpdating the Bios through the Internet Updating the Bios through a Bios file Bios setup program Default Bios settings for this motherboard apply for mostMenu bar Bios menu screenConfiguration Navigation keysSub-menu items Configuration fieldsMenu items Pop-up windowSystem Date Day xx/xx/xxxx Main menuSystem Time Legacy Diskette a 1 .44M, 3.5Type Auto LBA/Large Mode AutoPrimary, Secondary, Third and Fourth IDE Master/Slave Block Multi -sector TransferM AutoSystem Information CPU Frequency XXX value is auto-detected JumperFree ConfigurationAdvanced menu AGP/PCI Frequency AutoCPU Configuration Memclock Mode Auto NorthBridge ConfigurationMemory Configuration MCT Timing Mode AutoCMD-ADDR Timing Mode 2T ECC ConfigurationDram ECC Enable Disabled AGP Bridge K8M890 AGP/PCI Express Configuration L2 Cache BG Scrub DisabledData Cache BG Scrub Disabled OnChip VGA Frame Buffer Size DisabledAudio Controller Enabled SouthBridge VIA VT8251 ConfigurationLAN Controller Enabled USB1.1 USB Ports ConfigurationUSB 8 PortsOnboard Devices Configuration PCI PnP PCI Latency TimerConfiguration options No Yes Plug and Play O/S NoPalette Snooping Disabled Allocate IRQ to PCI VGA YesAcpi Apic Support Enabled Power menuSuspend Mode Auto Repost Video on S3 Resume NoAPM Configuration Power On By PS/2 Mouse Disabled Power On By PME# DisabledPower On By KBC Enabled Power On By RTC Alarm DisabledCPU Fan Speed xxxxRPM or N/A CPU Temperature xxxºC/xxxºF MB Temperature xxxºC/xxxºFHardware Monitor Chassis Fan Speed xxxxRPM or N/A1st ~ xxth Boot Device 1st Floppy Drive Boot menuBoot Device Priority Hard -DISK DrivesBoot Settings Configuration Interrupt 19 Capture Disabled Change Supervisor PasswordSecurity Clear User Password User Access Level Full Access Change User Password Password Check SetupExit & Save Changes Load Setup DefaultsExit menu Exit & Discard ChangesSoftware3 support Installing an operating system Support CD informationRunning the support CD Drivers menu Utilities menu Manual Microsoft DirectX Anti -virus UtilityAsus Contact information