Measurement
Taking Measurements
Connect the
The LCD includes a
The analyzer will store up to 500 gas measurement values, labeled by numbers 0 through 499, along with the current date and time of each measurement. You have the choice of acquiring this information manually or automatically, as described below.
Automatic Data Acquisition
Before starting automatic measurement storage, first select the sampling rate desired using the Sampling Rate menu of the WinLog97 program.
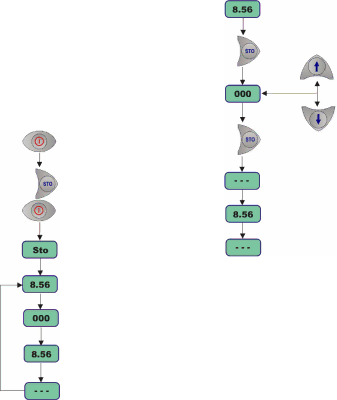
Switch the instrument OFF (by pressing the POWER key). Then hold down the STO button while switching the instrument back ON. The LCD displays the message Sto for about one second.
Gas concentration measurements are displayed for about two minutes. After two minutes the instrument displays the sample number (starting at 000), then the gas concentration measurement value followed by
This storage sequence repeats automatically, at the rate specified.
To end automatic storage, switch the instrument OFF (by pressing the POWER key) while it is in normal measurement mode. Switching ON again without holding down the STO button returns the instrument to measurement mode.
Manual Data Acquisition
For the first measurement you wish to store, press the STO button once to display a sample number. The default sample number is 000 (for first time access), or the last used memory position where data was stored, incremented by a value of 1.
You can increase or decrease this number by pressing the × Ø buttons within three seconds.
Press STO a second time, within five seconds of the first. The instrument then displays the gas concentration measurement value for about three seconds, followed by a clearing message as the value is stored.
Repeat the above steps to store additional measurements.
Page 3