HP Custom Quilt Label Kit manual Adding images, Adding text

Page 11

adding images

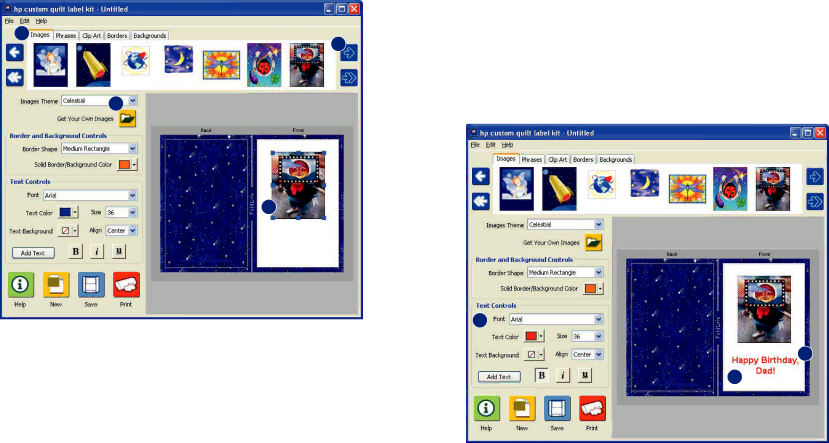
1.Click the Images tab.

2.From the Images Theme list, select Celestial.

3.Click and drag the image shown to the right (front) side of the card until you see a green highlight. Then release the mouse button.

4.Use the resizing handles on the outer corners of the image to resize it, as shown.

1

3

2

4

adding text

Now, let’s add text to the front of your card.

1.Click the Add Text button. A text box appears.

2.Type, “Happy Birthday, Dad!”

3.In the Text Controls area, make these settings:

Font: Arial

Text Color: Red

Size: 36

Align: Center

Click the (bold) button

4.Click anywhere outside the text box. Then, click and drag the text box under the image until you see a green highlight. Release the mouse button.

5.Click the text box and use the left and right resizing handles to make the text fit inside the border, as shown.

3

5

4

20

21

Image 11
Contents Hp custom quilt label kit Getting started Contents HP Custom Quilt Label Kit contains IntroductionWindows Installing and starting the programInstalling the program on your computer Let’s get startedChoosing a template Overview of the programRunning the program from the CD-ROM Online help Getting helpOverview of main window Hp support by phone Contacting hp customer careHp support web sites Hp support emailAdding borders Creating a story labelSelecting a template Adding text Adding images and clip artPrinting your label Saving your labelAdding backgrounds Creating a matching gift cardCreate the front and back of your gift card Selecting a templateAdding text Adding imagesAdding clip art Create the inside of your gift cardSaving the front and back of your gift card Saving the inside of your gift card Printing your gift cardPrinting the front and back of your gift card Here are some other ideas for inspiration Advanced creativityPrinting the inside of the gift card Advanced creativity Advanced creativity Tip