Panasonic SC-PM47 manual Before recording, OperationsRecording C

Page 20

A To protect tapes against further recording Side A

Tab for side B

Tab for side A

To re-record

Normal position tape

Adhesive tape

B

1

3

operationsRecording C

OPENcOPEN

Before recording

Types of tapes which can be recorded correctly

The system automatically identifies the type of tape.

NORMAL POSITION/TYPE I


HIGH POSITION/TYPE II


METAL POSITION/TYPE IV


High position and metal position tapes can be used, but the unit will not be able to record or erase them correctly.
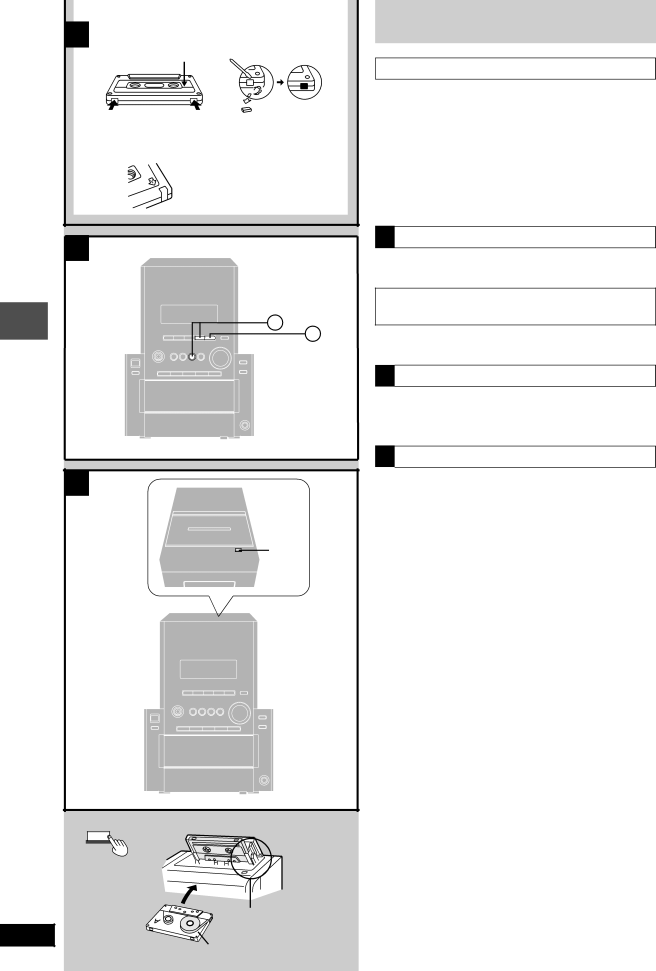
AErasure prevention

The illustration shows how to remove the tabs to prevent re- cording. To record on the tape again, cover as shown.

The effect of volume and sound quality on recording.

These have no effect on recording.

They can be changed for playback.

1B To erase a recorded sound

2Press [- TAPE] and then [L/–DEMO].

3Insert the recorded cassette with the tape facing in. Press [[REC/ J].

CPreparatory steps

Do these steps before each recording.

Wind up the leader tape so recording can begin immediately.

Press [c OPEN], insert a cassette with the tape facing in.

Make sure the cassette is fully inserted and close the lid by hand.

c

OPEN

20

RQT6530

Insert inside the guides

Side to be recorded facing up

Image 20
Contents CD Stereo System Table of contents Dear customerFollowing Applies only in the U.S.A Supplied accessoriesUse Safety InstallationMaintenance ServicePlacement of speakers Remote controlUse of batteries Operation notesConnections Connecting analog equipment Optional antenna connectionsExternal unit connections FM outdoor antennaMain unit Front panel controlsBeforeuse Before Remote ControlPlay Mode Radio manual tuning Listening operationsRadio preset tuning Automatic pre-settingManual pre-setting Selecting channelsCDs ListeningoperationsListening to the CD on a single tray CD selection and careCD Check Listening to a CD placed in a Specific trayPress CD 1 CD 5 to open the tray and insert the CD Limitations on MP3/WMA play When making MP3/WMA files to play on this unitPlaying MP3/WMA Press Display to select a desired CD display mode How discs with MP3/WMA differ from CDsPress 4/REW/g or 3/FF/f to select Press Album again Desired track Press CD 2/ J to start playListening to specific CDs and tracks CD Play Mode function Press DiscPress 1-5 to select the disc Select the track with the numeric buttonsDirect access play Repeat playCD display Press DisplayOperations ListeningProgram play Press CD 2/ J and then L /CLEAR Press Program Press DiscCassette tapes Before recording OperationsRecording CRecording from the radio Recording CDsEnhancing the sound quality Using the built-in sound Quality settingsUsing an external unit Timers and others Auto-off functionTurning the demo function off Press and hold -AUTO OFFSetting the time To mute the volumeConvenient functions To dim the display panelUsing the timers Using the play/record timerClock Timer By remote control only To check settingsPress Sleep to select the desired time Using the sleep timerTimers Troubleshooting guide ReferenceWarranty only for U.S.A Customer Services Directory only for U.S.AProduct Service MaintenanceFor a cleaner crisper sound Product informationSpecifications When moving the unit Electric Corporation of America Puerto Rico, Inc. PSC