Danby DAC10560DE, DAC9006DE Energy-Saving Tips, Installation Notes, Installation Hardware

Page 5

Caractéristiques de télécommande

Affichage Électronique: Affiche l’information suivante;

A:Icônes du Télécommande ‘En Marche’ et Mode.

B:Horloge et Minutrie

C:Réglage de la température

D:Réglage de Vitesse du ventilateur

Boutons De Commande:

1.Commutateur de courant

2.Mode

3.Vitesse du ventilateur

4. Économiseur d'Énergie

Affichage


Électronique

A


B


C


D


1


2


3


MODE


4


5

6


©

7


8


9


11

Energy-Saving Tips

Your Room Air Conditioner is designed to be highly efficient in energy savings.

Follow these recommendations for greater efficiency.

1.Select thermostat setting that suits your comfort needs and leave thermostat at that chosen setting.

2.The filter is very efficient in removing airborne particles. Keep air filter clean. Normally, filter should be cleaned every 2 weeks. More frequent cleaning may be necessary depending on indoor air quality.

3.Use drapes, curtains, or shades to keep direct sunlight from heating room, but DO NOT obstruct the air conditioner. Allow air to circulate around the unit without obstruction.

4.Start your air conditioner before outdoor air becomes hot and uncomfortable. This avoids an initial period of discomfort while unit is cooling off the room.

5.When outdoor temperatures are cool enough, use HIGH or LOW FAN only. This circulates indoor air, providing some cooling comfort, and utilizes less electricity than when operating on a cooling setting.

5.Minutrie

6.Utilisé pour augmenter ou réduire le température par incréments de 10 et le minuterie en incréments de 0.5 hr jusqu’a 10 heures et incréments de 1 hr jusqu’a 24 heures.

7.Annuler le programme “Minutrie en Marche” et/ou “Minutrie Arrêt”.

8.Serrure empêche les arrangements de télécommande d'être changé.

9.Horloge: Appuyez sur le bouton pendant 3 secondes

pour régler l'horloge. Appuyer sur la flèche ou pour ajuster l'horloge en les incréments de 1 minute, ou continuez à maintenir la flèche pour ajuster le temps en incréments de 10 minutes.

10.Mode de Sommeil.

11.Lumière d’affichage électronique (allumez/arrêtez)

12.Reconstituez tous les arrangements de télécommande au réglages par défaut.

10

12


Deux piles alcalines « AAA » sont requises pour le fonctionnement de la télécommande (incluses).

Les piles devraient être remplacées quand :

a)Aucun signal sonore (bip) n’est entendu durant la programmation de l’unité principale.

b)L’unité principale ne répond pas à un signal émis par la télécommande.

Remplacement des piles :

1.Glisser le couvercle du compartiment des piles à l’arrière de la télécommande dans le sens de la flèche. Tirer délicatement jusqu’à ce que le

couvercle se sépare complètement de l’unité.

2.Insérer deux (2) piles (AAA) en observant la polarité indiquée dans le compartiment des piles (+/-).

3.Réinstaller le couvercle.

4.Si la télécommande ne sera pas utilisée pour des périodes prolongées (vacances, etc.), les piles devraient être retirées de la télécommande.

La télécommande fonctionnera en dedans d’une distance de 8 mètres (26 pi.) du récepteur situé à l’intérieur de l’unité principale. Toute obstruction entre le récepteur et la télécommande pourrait causer une interférence au signal, ce qui limiterait la capacité de programmation de l’unité principale.

Installation Notes

Electric Shock Hazard

To avoid the possibility of personal injury, disconnect power to the unit before installing or servicing.

Tools Needed for Installation

Screw Drivers: Both Phillips and flat head

Power Drill: 1/8 inch diameter drill bit

Pencil

Measuring Tape

Scissors

Carpenters Level

CAUTION

To avoid installation/operation difficulties,

read these instructions thoroughly.

Your Room Air Conditioner is designed for easy installation in a single or double-hung window. This unit is NOT designed for vertical (slider type) windows and/or through-the-wall applications.

NOTE: Save the shipping carton and packing materials for future storage or transport of the unit. Remove from carton, the plastic bag containing the installation hardware kit necessary for the installation of your air conditioner. Please check the contents of hardware kit against the corresponding model check list, prior to installation of the unit. See Fig. 1

Installation Hardware

3/4" Screws (7)

Safety Lock (1)

*3/8" Screws (4)

*“L” Shaped

mounting bracket


*Factory installed on

(1)

some models.

*Factory installed


on some models.


Sash bracket (2)

Adhesive


Foam Seal (1)


Side Curtain RH (1)

Side Curtain LH (1)


Fig. 1


19

4

Image 5
Contents Climatiseur de pièce Room Air ConditionerModel Modèle Models ModèlesParts Identification Table of ContentsGuide de dépannage This symbol denotes a caution or warningIntroduction Précautions et entretien Electrical SpecificationsReceptacle and Fuse Types Information sur le filtre à airInstallation Hardware Installation NotesCaractéristiques de télécommande Energy-Saving TipsInstructions de fonctionnement Select the Best LocationCabinet Assembly of the Side Curtains toCompleting the Installation Choix du meilleur endroit Key Pad FeaturesTEMP. /TIMER Control Used to increase or Quincaillerie dinstallation Remote Control FeaturesConseils déconomie dénergie Electronic DisplayCleaning Air Filter Care and MaintenanceEnd-of-Season Care Spécifications électriquesIntroduction Troubleshooting GuideCe symbole indique une mise en garde ou un Avertissement 9006DE 10066DE Table des matièresIdentification des pièces

DAC9006DE, DAC10560DE specifications

The Danby DAC9006DE and DAC10560DE are two standout models in the realm of portable air conditioning units, designed to deliver efficient cooling solutions for various living spaces. These models showcase a blend of advanced technology, user-friendly features, and energy efficiency, making them ideal choices for residential and office environments.

The Danby DAC9006DE boasts a cooling capacity of 9,000 BTU, efficiently designed to cool areas up to 400 square feet. This makes it a great option for bedrooms, small living rooms, or home offices. It utilizes a powerful rotary compressor that ensures quick cooling and consistent temperature maintenance. Additionally, the unit operates quietly at a noise level of around 52 dBA, allowing users to sleep or work without disruption.

On the other hand, the DAC10560DE offers a more robust cooling capacity of 10,500 BTU, making it suitable for spaces up to 450 square feet. This model is perfect for slightly larger rooms, ensuring a comfortable environment during the warm summer months. Like its smaller counterpart, the DAC10560DE employs a rotary compressor that enhances its energy efficiency and performance.

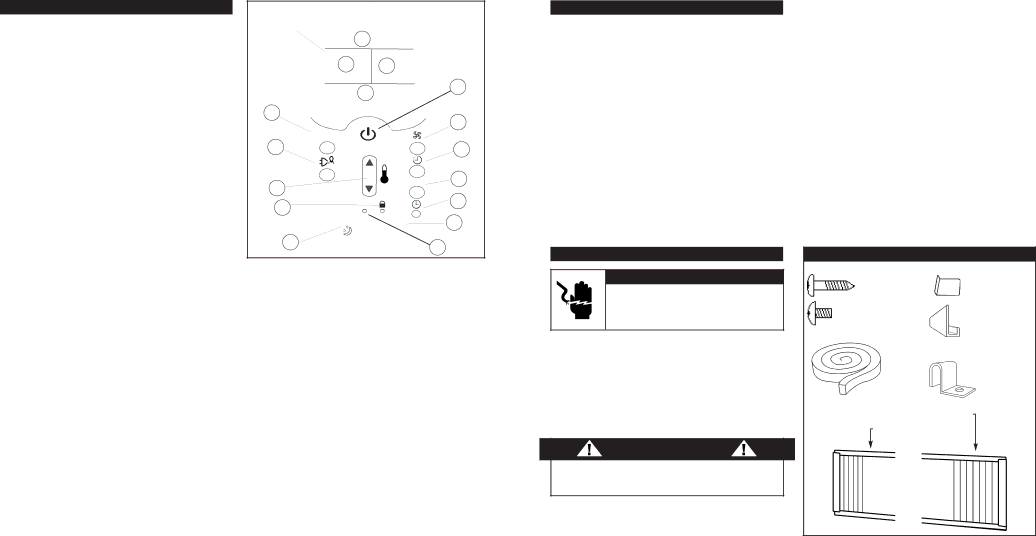
Both models feature a programmable thermostat, allowing users to set their desired temperature. The intuitive electronic controls make it easy to adjust settings, and the included remote control adds convenience by allowing users to change the settings from anywhere in the room. Additionally, the air conditioners come equipped with a 24-hour programmable timer, giving users the flexibility to pre-set cooling schedules that align with their daily routines.

Another significant feature of the Danby DAC9006DE and DAC10560DE is the integrated dehumidifier function. This feature helps remove excess moisture from the air, improving indoor air quality and comfort levels, especially in humid climates. Both models are also equipped with washable air filters, which are easy to maintain and help ensure optimal airflow while capturing dust and allergens.

In terms of installation, both units come with a convenient window installation kit, allowing for easy setup without requiring professional assistance. Their sleek and modern design ensures they blend seamlessly with home decor while providing effective cooling solutions. Overall, the Danby DAC9006DE and DAC10560DE represent excellent options for individuals seeking reliable and efficient air conditioning units to combat heat and humidity.