Glen Dimplex Home Appliances Ltd
BI 70 / 90 FP
manual
Shown with fixing kit
Install
To select an alarm tone
Symbols on the LED display
Warranty
Cleaning
Cooking temperatures
Technical Data
To switch on the grill
Using the grill
Page 30
Belling BI Installation Instructions
Method 1:
Without housing unit (between 2 base units)
Shown with fixing kit
28
Page 29
Page 31
Image 30
Page 29
Page 31
Contents
Belling BI 70 / 90 FP
Belling Customer Care
0844 81 53
Contents
Your 1st Year Guarantee
Introduction
Condensation
To replace an oven light bulb
Cooling fan
Glass door panels
Environmental Protection
Be Safe Not Sorry
Using the Grill
To switch on the grill
Detachable grill pan handle
Using the grill
Top oven light
Using the Top Oven
To switch on the top oven
Preheating
Cooking temperatures
Temperature Shelf Approximate At ˚C Position Cooking Time
Top oven baking guide Cooking times
Using the Main Oven
To switch on the oven
To help the air to circulate freely
Be safe
Cooking with a fan oven
Defrosting and cooling
Defrosting times
Temperature Approximate Cooking time
Main oven baking guide
Oven shelves
Using the Ovens
Oven furniture Baking tray and roasting tins
Slow cooking
Traditional fruit cakes
Roast turkey
Roasting guide
200˚C Top Oven Conventional Beef
Automatic cookingin the mainoven
Do not
Hints for automatic cooking in the main oven
Symbols on the LED display
Programmer / Clock
Programmer buttons
To set the time of day Setting the minute minder
To select an alarm tone
Semi-automatic cooking
Fully automatic cooking
Semi-automatic cooking Duration method
End Time method
Fully automatic cooking example
Automatic cooking hints
Automatic cooking
Do not
Easy Clean Enamel surfaces
Cleaning
Always let the appliance cool before cleaning
Chrome plated parts
Glass parts
Painted, plastic and metal finish parts if fitted
Stainless Steel surfaces stainless steel finish models only
Belling BI Installation Instructions
Prepare for installation
Fixing Kit
Shown with fixing kit
Shown without fixing kit
Before you start
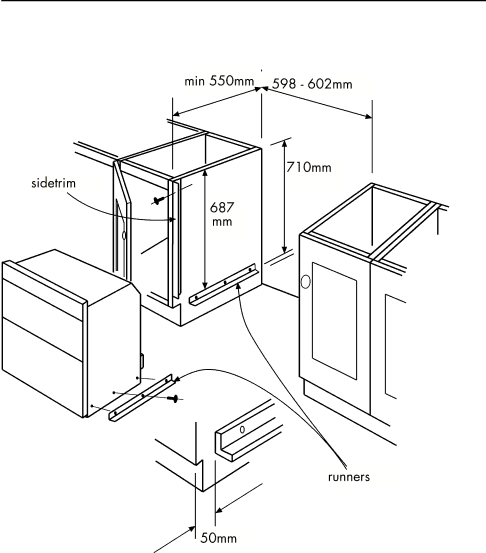
To fix the runners if required
Shown with fixing kit
Shown without fixing kit
Belling BI Installation Instructions
Belling Installation Instructions
Prepare installation Do not lift the oven by the door handle
Belling Installation Instructions
Connect to the electricity supply
Check edging strip
General 70/90cm Installation Instructions
Secure appliance into housing unit 70cm models
To secure applianceto housing unit
Electrical supply
Technical Data
Installing a hob above the appliance 70cm models
Load Wattage
Page
Page
Page
Model No Serial No
Related pages
Trouble Shooting for ZyXEL Communications 2304R-P1
Specifications for Kodak KB20
Problems/Error Messages for 3Com 3CR990-FX-97
Flowchart 2.11-No OS Loading from Hard Drive, Part for Compaq TC1000
How to Delete the Face Recognition Data for Toshiba Satellite M300/M300D/ L310/L310D Satellite Pro M300/M300D/ L310/L310D
Final Install Process for EverFocus 22HH1144
Parts List for Hitachi C 10RA2
5LANGUAGE Code List for Sylvania 6626LDG
Refrigerant System Diagram for Friedrich MR36C3F
How does feedback affect the performance of the REDMIKE?
Learn more here
Top
Page
Image
Contents