Installation

IN OUT

BALANCED IN

A

B

C

7

RS BACK

IN OUT

BALANCED IN

A

B

C

6

R SURR

IN OUT

BALANCED IN

A

B

C

5 RIGHT

IN OUT

BALANCED IN

A

B

C

4 CENTRE

IN OUT

BALANCED IN

A

B

C

3 LEFT

IN OUT

BALANCED IN

A

B

C

2

L SURR

IN OUT

POWER ON/OFF

BALANCED IN

SLOBLO FUSE

A

B

C

1

LS BACK

12V

TRIGGER

IN

POWER INLET

230V

Positioning the unit

<Place the amplifier on a level, firm surface.

<Avoid placing the unit in direct sunlight or near sources of heat or damp.

<Do not place the unit on top of another power amplifier or other sources of heat.

<Ensure adequate ventilation.

If the unit is placed in an enclosed space, such as a bookcase, equipment rack or cabinet, make sure that there is adequate space and ventilation in the enclosure for air to flow through the ventilation slots and cool the amplifier. Inadequate cabinet ventilation may cause the P1000 to shut down due to thermal overload.

The amplifier will run warm, even during normal operation.

<Ensure that the equipment rack or stand can support the weight of the P1000.

Connecting to a pre-amplifier

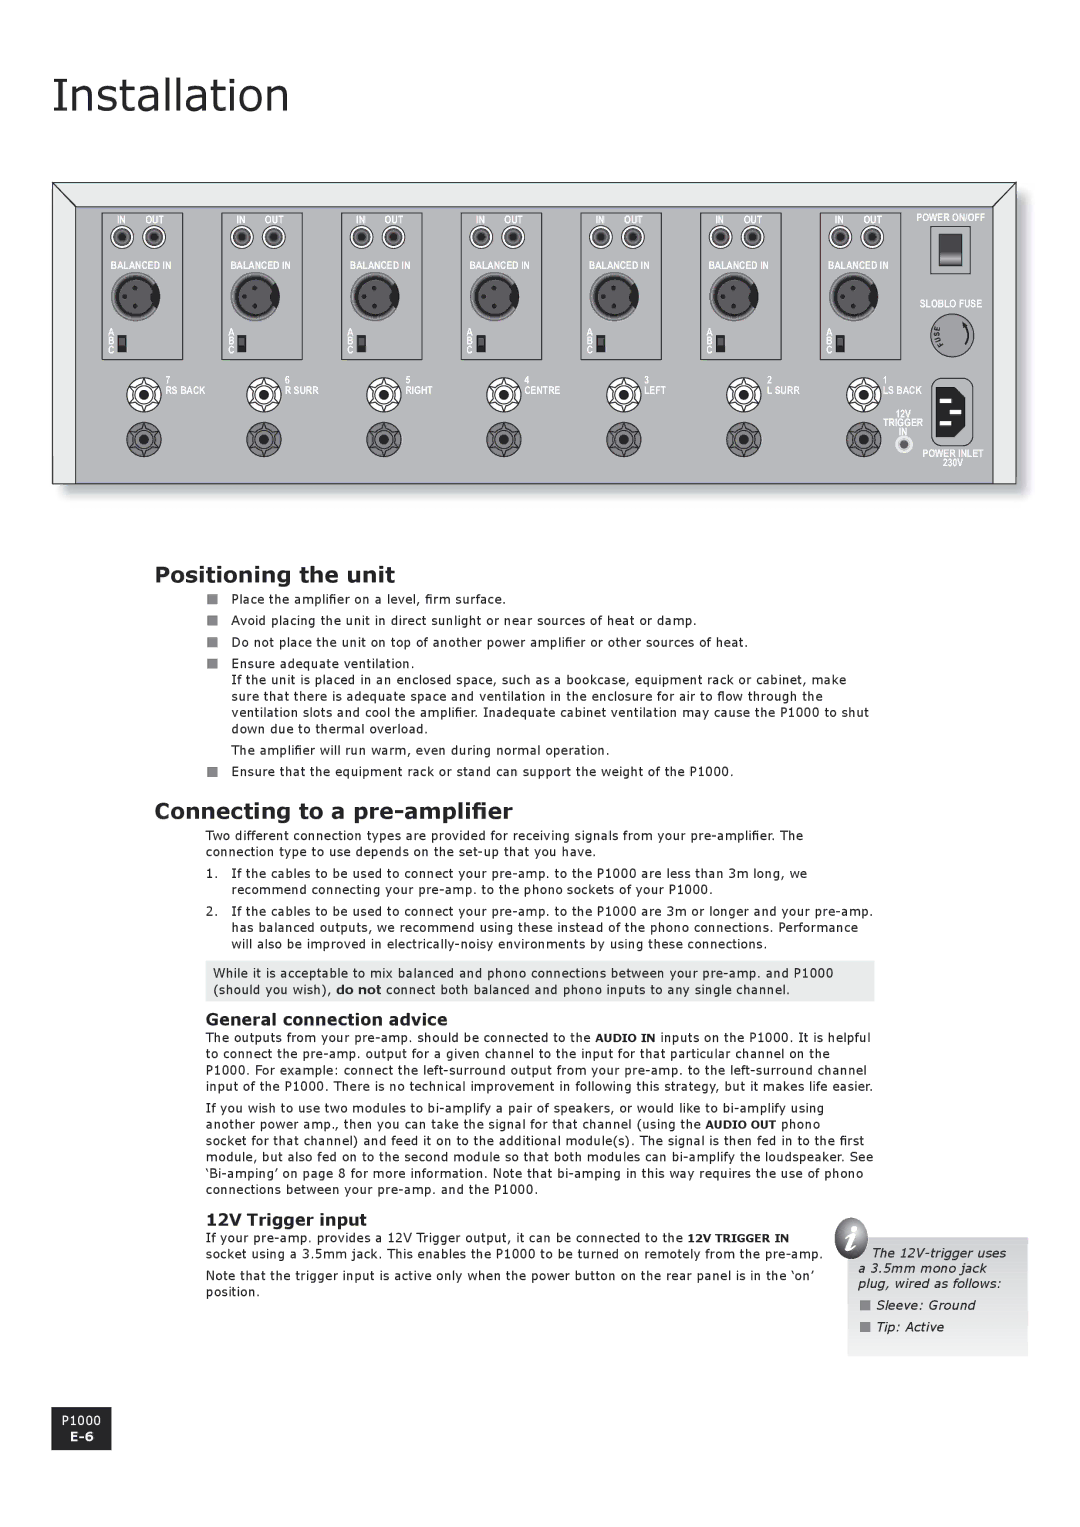
Two different connection types are provided for receiving signals from your pre-amplifier. The connection type to use depends on the set-up that you have.

1.If the cables to be used to connect your pre-amp. to the P1000 are less than 3m long, we recommend connecting your pre-amp. to the phono sockets of your P1000.

2.If the cables to be used to connect your pre-amp. to the P1000 are 3m or longer and your pre-amp. has balanced outputs, we recommend using these instead of the phono connections. Performance will also be improved in electrically-noisy environments by using these connections.

While it is acceptable to mix balanced and phono connections between your pre-amp. and P1000 (should you wish), do not connect both balanced and phono inputs to any single channel.

General connection advice

The outputs from your pre-amp. should be connected to the AUDIO IN inputs on the P1000. It is helpful to connect the pre-amp. output for a given channel to the input for that particular channel on the P1000. For example: connect the left-surround output from your pre-amp. to the left-surround channel input of the P1000. There is no technical improvement in following this strategy, but it makes life easier.

If you wish to use two modules to bi-amplify a pair of speakers, or would like to bi-amplify using another power amp., then you can take the signal for that channel (using the AUDIO OUT phono socket for that channel) and feed it on to the additional module(s). The signal is then fed in to the first module, but also fed on to the second module so that both modules can bi-amplify the loudspeaker. See ‘Bi-amping’ on page 8 for more information. Note that bi-amping in this way requires the use of phono connections between your pre-amp. and the P1000.

12V Trigger input

If your pre-amp. provides a 12V Trigger output, it can be connected to the 12V TRIGGER IN socket using a 3.5mm jack. This enables the P1000 to be turned on remotely from the pre-amp.

Note that the trigger input is active only when the power button on the rear panel is in the ‘on’ position.

The 12V-trigger uses a 3.5mm mono jack plug, wired as follows:

<Sleeve: Ground

<Tip: Active

P1000

E-6

Page 6
Image 6
3Com P1000 Installation, Positioning the unit, Connecting to a pre-amplifier, General connection advice, 12V Trigger input

P1000 specifications

The 3Com P1000 is a notable device from the early days of networking that played a significant role in the evolution of communication technology. Known for its versatility and functionality, the P1000 was designed primarily for the small to medium-sized business market, offering a robust solution for network connectivity.

One of the main features of the 3Com P1000 is its high-speed data transfer capability, supporting both wired and wireless connections. This allowed businesses to enjoy fast internet access and enable seamless communication between devices. The P1000 supported Ethernet technology, which facilitated reliable network connections and provided users with the bandwidth needed for various applications, from simple file sharing to more complex data-intensive tasks.

In terms of wireless features, the P1000 incorporated advanced wireless networking technologies, ensuring that users could connect multiple devices without the need for extensive cabling. This wireless capability was particularly beneficial for businesses looking to enhance their mobility and flexibility in the workplace. The device often featured dual-band frequency options, enabling better performance in environments with high-density wireless usage.

Security was another core characteristic of the 3Com P1000. It included robust security protocols that helped protect sensitive data transmitted over the network. Features such as WPA2 encryption and built-in firewalls contributed to creating a secure networking environment for businesses, which is especially crucial in the digital age where cyber threats are prevalent.

Moreover, the P1000 came equipped with easy-to-use management tools, allowing IT administrators to configure settings efficiently. Its intuitive interface facilitated the setup of network devices, making it easier for businesses to deploy their networks without requiring extensive IT knowledge. These management tools provided insights into network performance, enabling proactive measures to be taken when needed.

In summary, the 3Com P1000 was a pivotal networking device that combined high-speed connectivity, wireless capabilities, strong security features, and user-friendly management tools. Its design considerations suited the needs of small to medium-sized businesses, paving the way for more advanced networking solutions in the years to come.