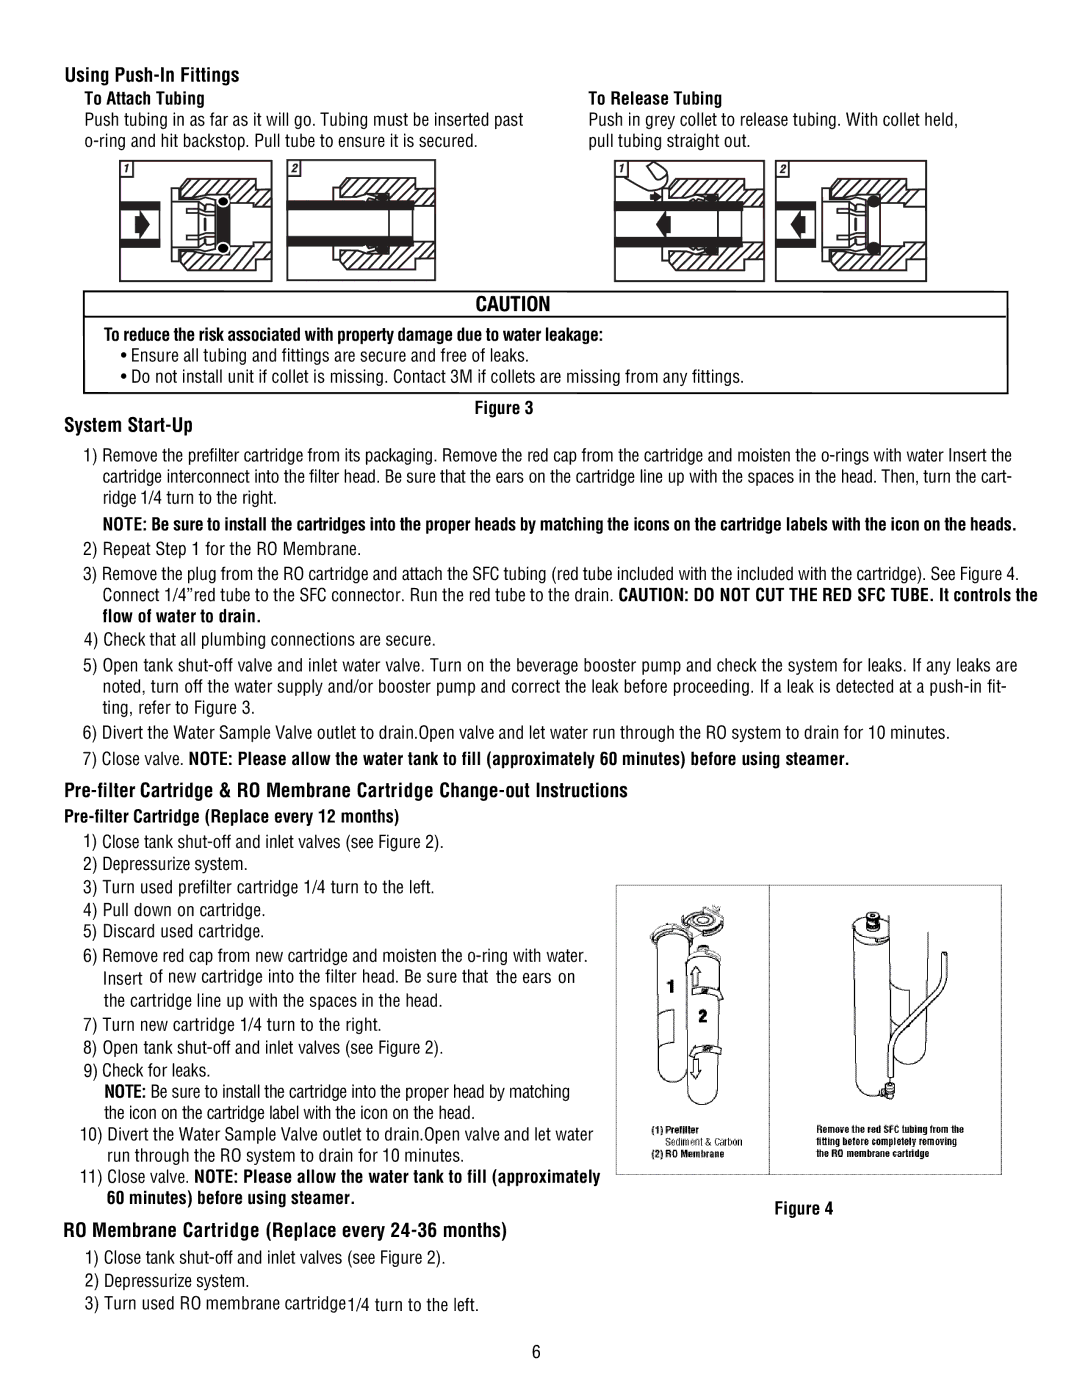
Using Push-In Fittings

To Attach Tubing

Push tubing in as far as it will go. Tubing must be inserted past o-ring and hit backstop. Pull tube to ensure it is secured.

1

2

CAUTION

To Release Tubing

Push in grey collet to release tubing. With collet held, pull tubing straight out.

1

2

To reduce the risk associated with property damage due to water leakage:

Ensure all tubing and fittings are secure and free of leaks.

Do not install unit if collet is missing. Contact 3M if collets are missing from any fittings.

Figure 3

System Start-Up

1)Remove the prefilter cartridge from its packaging. Remove the red cap from the cartridge and moisten the o-rings with water Insert the cartridge interconnect into the filter head. Be sure that the ears on the cartridge line up with the spaces in the head. Then, turn the cart- ridge 1/4 turn to the right.

NOTE: Be sure to install the cartridges into the proper heads by matching the icons on the cartridge labels with the icon on the heads.

2)Repeat Step 1 for the RO Membrane.

3)Remove the plug from the RO cartridge and attach the SFC tubing (red tube included with the included with the cartridge). See Figure 4. Connect 1/4”red tube to the SFC connector. Run the red tube to the drain. CAUTION: DO NOT CUT THE RED SFC TUBE. It controls the flow of water to drain.

4)Check that all plumbing connections are secure.

5)Open tank shut-off valve and inlet water valve. Turn on the beverage booster pump and check the system for leaks. If any leaks are noted, turn off the water supply and/or booster pump and correct the leak before proceeding. If a leak is detected at a push-in fit- ting, refer to Figure 3.

6)Divert the Water Sample Valve outlet to drain.Open valve and let water run through the RO system to drain for 10 minutes.

7)Close valve. NOTE: Please allow the water tank to fill (approximately 60 minutes) before using steamer.

Pre-filter Cartridge & RO Membrane Cartridge Change-out Instructions

Pre-filter Cartridge (Replace every 12 months)

1)Close tank shut-off and inlet valves (see Figure 2).

2)Depressurize system.

3)Turn used prefilter cartridge 1/4 turn to the left.

4)Pull down on cartridge.

5)Discard used cartridge.

6)Remove red cap from new cartridge and moisten the o-ring with water. Insert of new cartridge into the filter head. Be sure that the ears on the cartridge line up with the spaces in the head.

7)Turn new cartridge 1/4 turn to the right.

8)Open tank shut-off and inlet valves (see Figure 2).

9)Check for leaks.

NOTE: Be sure to install the cartridge into the proper head by matching the icon on the cartridge label with the icon on the head.

10) Divert the Water Sample Valve outlet to drain.Open valve and let water run through the RO system to drain for 10 minutes.

11) Close valve. NOTE: Please allow the water tank to fill (approximately

60 minutes) before using steamer.

Figure 4

RO Membrane Cartridge (Replace every 24-36 months)

1)Close tank shut-off and inlet valves (see Figure 2).

2)Depressurize system.

3)Turn used RO membrane cartridge1/4 turn to the left.

6

Page 6
Image 6
3M FSTMO75 manual Using Push-In Fittings, System Start-Up, RO Membrane Cartridge Replace every 24-36 months

FSTMO75 specifications

The 3M FSTMO75 is a versatile and innovative product that stands out in the realm of transportation safety and visibility solutions. Designed primarily for use in various applications including transportation, construction, and emergency response, the FSTMO75 offers exceptional performance and reliability.

One of the main features of the 3M FSTMO75 is its advanced retroreflective technology, which significantly enhances visibility in low-light conditions. This is particularly crucial for vehicles and equipment operating in potentially hazardous environments. The retroreflection effect ensures that light from headlights or other sources is redirected back toward the source, making objects and personnel more noticeable to drivers and operators. This feature greatly contributes to overall safety by reducing the risk of accidents.

The FSTMO75 boasts a durable construction, designed to withstand harsh environmental conditions. It is built with high-quality materials that resist wear and tear, ensuring longevity even in rugged settings. This characteristic makes it an ideal choice for use in construction zones, where durability is essential due to exposure to heavy machinery and unpredictable weather.

Additionally, the 3M FSTMO75 incorporates a user-friendly design that facilitates easy application. Whether applied to vehicles, road signs, or equipment, the adhesive backing ensures secure attachment, while its flexibility allows it to conform to various surfaces. This adaptability makes it suitable for diverse applications, from marking vehicles to enhancing the visibility of road hazards.

Another noteworthy characteristic of this product is its ability to provide bright and vibrant colors. The fluorescent options available within the FSTMO75 product line enhance visibility even in daylight, increasing the likelihood that individuals or equipment will be seen from a distance. This is particularly beneficial in public works scenarios where safety is paramount.

In conclusion, the 3M FSTMO75 is a cutting-edge solution for enhancing visibility and safety in various environments. With its advanced retroreflective technology, durable construction, user-friendly application, and vibrant color options, it sets a high standard in the market. Whether in construction, emergency response, or transportation, the FSTMO75 offers essential benefits that prioritize safety and efficiency for users on the job.