Model 390 User Guide - English
Congratulations on your purchase of | • a speakerphone for handsfree | |
a Model 390 telephone! The Model | calls; | |
390 boasts several timesaving and | • access to advanced services. | |
advanced features, including: | Use this user guide to learn more | |
• a large | ||
about the Model 390’s features. | ||
• a 200 entry Directory and 100 |
| |
entry Callers List; |
|
The red telephone light shows when you have incoming calls, a message, or a call on hold. A message is displayed when the light is on. See the section “Status lights” for more information.
Flashing light – call is on hold, a message is waiting, or a call is ringing.
Steady light – another phone is using | £ |
the line. The display shows |
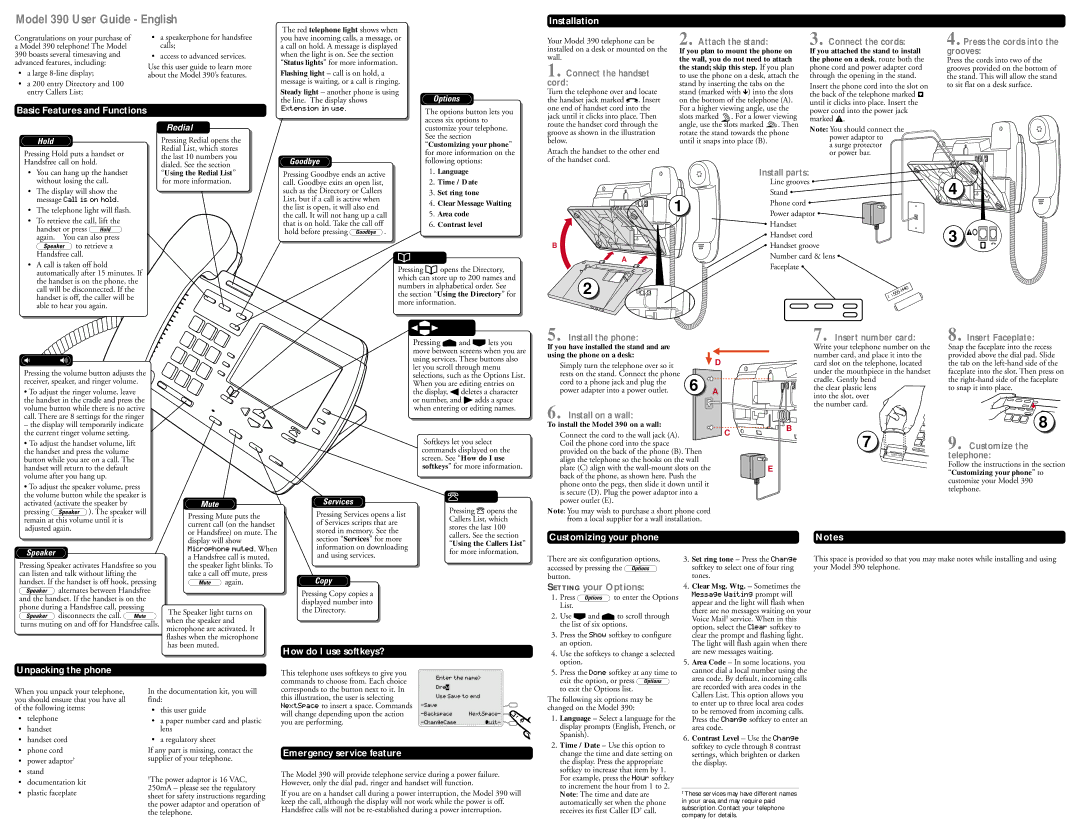
Installation
Your Model 390 telephone can be installed on a desk or mounted on the wall.
1. Connect the handset cord:
Turn the telephone over and locate the handset jack marked ![]() . Insert
. Insert
2. Attach the stand:
If you plan to mount the phone on the wall, you do not need to attach the stand; skip this step. If you plan to use the phone on a desk, attach the stand by inserting the tabs on the stand (marked with ![]() ) into the slots on the bottom of the telephone (A).
) into the slots on the bottom of the telephone (A).
3. Connect the cords:
If you attached the stand to install the phone on a desk, route both the phone cord and power adapter cord through the opening in the stand.
Insert the phone cord into the slot on the back of the telephone marked ![]() until it clicks into place. Insert the
until it clicks into place. Insert the
4. Press the cords into the grooves:
Press the cords into two of the grooves provided on the bottom of the stand. This will allow the stand to sit flat on a desk surface.
Basic Features and Functions
o
Pressing Hold puts a handset or Handsfree call on hold.
Redial
Pressing Redial opens the Redial List, which stores the last 10 numbers you dialed. See the section
Extension in use. | The options button lets you |
| |
| access six options to |
| customize your telephone. |
| See the section |
| “Customizing your phone” |
k | for more information on the |
following options: |
one end of handset cord into the jack until it clicks into place. Then route the handset cord through the groove as shown in the illustration below.
Attach the handset to the other end of the handset cord.
For a higher viewing angle, use the slots marked ![]() . For a lower viewing
. For a lower viewing
angle, use the slots marked ![]() . Then rotate the stand towards the phone until it snaps into place (B).
. Then rotate the stand towards the phone until it snaps into place (B).
power cord into the power jack marked ![]() .
.
Note: You should connect the
power adaptor to a surge protector or power bar.
•You can hang up the handset without losing the call.
•The display will show the message Call is on hold.
•The telephone light will flash.
•To retrieve the call, lift the handset or press o again. You can also press ⁄to retrieve a Handsfree call.
•A call is taken off hold automatically after 15 minutes. If the handset is on the phone, the call will be disconnected. If the handset is off, the caller will be able to hear you again.
“Using the Redial List”
for more information.
Pressing Goodbye ends an active | 1. | Language | |
2. | Time / Date | ||
call. Goodbye exits an open list, | |||
such as the Directory or Callers | 3. | Set ring tone | |
List, but if a call is active when | 4. | Clear Message Waiting | |
the list is open, it will also end | |||
5. | Area code | ||
the call. It will not hang up a call | |||
that is on hold. Take the call off | 6. | Contrast level | |
hold before pressing k. |
|
|
Pressing opens the Directory, which can store up to 200 names and numbers in alphabetical order. See the section “Using the Directory” for more information.
Install parts:
|
|
| Line grooves • | 4 |
|
| 1 | Stand • | |
|
| Phone cord • |
| |
|
| Power adaptor • |
| |
|
|
|
| |
|
|
| • Handset | 3 |
|
|
| • Handset cord | |
|
|
|
| |
B |
|
| • Handset groove |
|
| A |
| Number card & lens • |
|
|
| Faceplate • |
| |
|
|
|
|
2 |
—
Pressing the volume button adjusts the receiver, speaker, and ringer volume.
•To adjust the ringer volume, leave the handset in the cradle and press the volume button while there is no active call. There are 8 settings for the ringer
– the display will temporarily indicate the current ringer volume setting.
•To adjust the handset volume, lift the handset and press the volume button while you are on a call. The handset will return to the default volume after you hang up.
•To adjust the speaker volume, press the volume button while the speaker is activated (activate the speaker by pressing ⁄). The speaker will remain at this volume until it is adjusted again.
>
Pressing Mute puts the current call (on the handset or Handsfree) on mute. The
¯
3 4
˘
Pressing ¯and ˘lets you move between screens when you are using services. These buttons also let you scroll through menu selections, such as the Options List. When you are editing entries on the display, 3deletes a character or number, and 4adds a space when entering or editing names.
Softkeys let you select commands displayed on the screen. See “How do I use softkeys” for more information.
Í
Pressing Services opens a list | Pressing | opens the | |
Callers List, which | |||
of Services scripts that are | |||
stores the last 100 | |||
stored in memory. See the | |||
5. Install the phone: |
If you have installed the stand and are using the phone on a desk:
Simply turn the telephone over so it |
| D |
|
|
|
| |
rests on the stand. Connect the phone | 6 |
|
|
cord to a phone jack and plug the |
|
| |
power adapter into a power outlet. | A |
| |
6. Install on a wall: |
|
|
|
To install the Model 390 on a wall: |
| C | B |
Connect the cord to the wall jack (A). |
| ||
|
| ||
Coil the phone cord into the space |
|
|
|
provided on the back of the phone (B). Then |
|
| |
align the telephone so the hooks on the wall |
|
| |
plate (C) align with the |
| E | |
back of the phone, as shown here. Push the phone onto the pegs, then slide it down until it is secure (D). Plug the power adaptor into a power outlet (E).
Note: You may wish to purchase a short phone cord from a local supplier for a wall installation.
7. Insert number card:
Write your telephone number on the number card, and place it into the card slot on the telephone, located under the mouthpiece in the handset cradle. Gently bend
the clear plastic lens into the slot, over the number card.
7
8. Insert Faceplate:
Snap the faceplate into the recess provided above the dial pad. Slide the tab on the
8
9. Customize the telephone:
Follow the instructions in the section “Customizing your phone” to customize your Model 390 telephone.
display will show
section “Services” for more | callers. See the section | |
“Using the Callers List” | ||
|
Customizing your phone | Notes |
⁄
Pressing Speaker activates Handsfree so you can listen and talk without lifting the handset. If the handset is off hook, pressing
⁄alternates between Handsfree and the handset. If the handset is on the phone during a Handsfree call, pressing
⁄disconnects the call. ß turns muting on and off for Handsfree calls.
Microphone muted. When a Handsfree call is muted, the speaker light blinks. To take a call off mute, press
ßagain.
The Speaker light turns on when the speaker and microphone are activated. It flashes when the microphone has been muted.
information on downloading | for more information. | |
and using services. | ||
|
J
Pressing Copy copies a displayed number into the Directory.
How do I use softkeys?
There are six configuration options, accessed by pressing the £ button.
SETTING your Options:
1. | Press £to enter the Options |
| List. |
2. | Use ˘and ¯to scroll through |
| the list of six options. |
3. | Press the Show softkey to configure |
| an option. |
4. | Use the softkeys to change a selected |
| option. |
3. | Set ring tone – Press the Change |
| softkey to select one of four ring |
| tones. |
4. | Clear Msg. Wtg. – Sometimes the |
| Message Waiting prompt will |
| appear and the light will flash when |
| there are no messages waiting on your |
| Voice Mail† service. When in this |
| option, select the Clear softkey to |
| clear the prompt and flashing light. |
| The light will flash again when there |
| are new messages waiting. |
5. | Area Code – In some locations, you |
This space is provided so that you may make notes while installing and using your Model 390 telephone.
Unpacking the phone
When you unpack your telephone, you should ensure that you have all of the following items:
• | telephone |
• | handset |
• | handset cord |
• | phone cord |
• | power adaptor† |
• | stand |
• | documentation kit |
In the documentation kit, you will find:
•this user guide
•a paper number card and plastic lens
•a regulatory sheet
If any part is missing, contact the supplier of your telephone.
†The power adaptor is 16 VAC, 250mA – please see the regulatory
This telephone uses softkeys to give you
commands to choose from. Each choice | Enter the name> | |||
Dre |
|
|
| |
corresponds to the button next to it. In | w |
|
| |
|
|
|
| |
this illustration, the user is selecting | Use Save to end | |||
NextSpace to insert a space. Commands |
| |||
will change depending upon the action | NextSpace- | |||
you are performing. | Quit- | |||
Emergency service feature
The Model 390 will provide telephone service during a power failure. However, only the dial pad, ringer and handset will function.
5. Press the Done softkey at any time to |
exit the option, or press £ |
to exit the Options list. |
The following six options may be changed on the Model 390:
1. | Language – Select a language for the |
| display prompts (English, French, or |
| Spanish). |
2. | Time / Date – Use this option to |
| change the time and date setting on |
| the display. Press the appropriate |
| softkey to increase that item by 1. |
| For example, press the Hour softkey |
| to increment the hour from 1 to 2. |
cannot dial a local number using the |
area code. By default, incoming calls |
are recorded with area codes in the |
Callers List. This option allows you |
to enter up to three local area codes |
to be removed from incoming calls. |
Press the Change softkey to enter an |
area code. |
6. Contrast Level – Use the Change |
softkey to cycle through 8 contrast |
settings, which brighten or darken |
the display. |
• plastic faceplate |
sheet for safety instructions regarding the power adaptor and operation of the telephone.
If you are on a handset call during a power interruption, the Model 390 will keep the call, although the display will not work while the power is off. Handsfree calls will not be
Note: The time and date are |
automatically set when the phone |
receives its first Caller ID† call. |
†These services may have different names in your area, and may require paid subscription. Contact your telephone company for details.